WebGL es un estándar web abierto que le permite crear aplicaciones gráficas altamente eficientes para ejecutar en navegadores web a través de la aceleración de hardware.
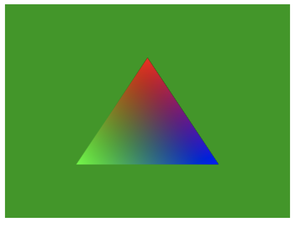
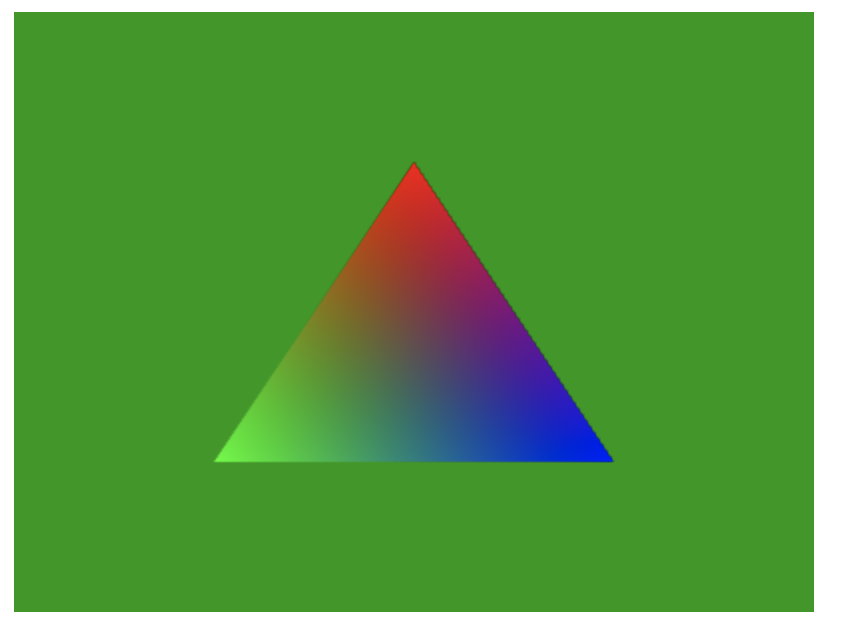
Este artículo lo guiará a través de cómo crear un contexto WebGL y representar un triángulo simple (como se muestra en la imagen a continuación) usando WebGL 2.0.

Triángulo WebGL
Configuración de WebGL: para desarrollar y ejecutar una aplicación WebGL, todo lo que necesita es un navegador web y un editor de código. ¡Eso es todo! No necesita instalar nada adicional en su sistema. Actualmente, WebGL es compatible con los principales navegadores Apple (Safari), Google (Chrome), Microsoft (Edge), Opera (navegador web Opera) y Mozilla (Firefox). Por lo tanto, asegúrese de actualizar su navegador a la última versión.
Creando un contexto WebGL: Para comenzar, creamos un archivo HTML con un elemento <canvas> para dibujar y mostrar animaciones en el navegador.
index.html
<!DOCTYPE html>
<html>

<head>
    <title></title>
</head>

<body>
    <canvas id="canvas" width="400" height="300">
        Your browser does not support HTML5
    </canvas>
    <script src="app.js"></script>
</body>

</html>
Ahora, para comenzar a renderizar contenido, primero debemos crear un contexto WebGL usando JavaScript.
app.js
// Request html canvas element
var canvas = document.getElementById("canvas");

// Create a WebGL rendering context
var gl = canvas.getContext("webgl2");

// Tell user if their browser does not support WebGL
if (!gl) {
    alert("Your browser does not support WebGL");
}

// Set the color of the canvas.
// Parameters are RGB colors (red, green, blue, alpha)
gl.clearColor(0, 0.6, 0.0, 1.0);
// Clear the color buffer with specified color
gl.clear(gl.COLOR_BUFFER_BIT);
Si el navegador es compatible con WebGL, verá un cuadro vacío con un fondo verde esperando recibir contenido.

Contexto WebGL de salida
Definición de los sombreadores: hasta ahora, tenemos nuestro lienzo y WebGL preparados y listos para mostrar contenido. Ahora, definamos nuestros shaders.
Los shaders son programas que se ejecutan en la GPU escritos en OpenGL Shading Language (GLSL) y nos permiten realizar operaciones matemáticas para transformar vértices y/o colores. En WebGL, solo necesitamos proporcionar dos sombras: vertex shader y fragment shader . El sombreador de vértices se usa para especificar la posición final de los vértices, y el sombreador de fragmentos se usa para definir la superficie de color de nuestro modelo. GLSL es semánticamente similar al lenguaje C. Tenemos una función principal para realizar todas las operaciones y tenemos parámetros de entrada y salida indicados como entrada, salida y tipos de datos como vec2, vec3, vec4.
Echemos un vistazo a estos dos sombreadores para nuestro triángulo simple.
Javascript
// Define shaders: vertex shader and fragment shader
const shaders = {
    vs: `#version 300 es
        in vec2 vertPosition;
        in vec3 vertColor;
        out vec3 fragColor;

        void main() {
            fragColor = vertColor;
            gl_Position = vec4(vertPosition, 0, 1);
        }`,

    fs: `#version 300 es
        precision mediump float;
        in vec3 fragColor;
        out vec4 outColor;

        void main() {
            outColor = vec4(fragColor, 1);
        }`
};
Una vez definidos los sombreadores en GLSL, ahora estamos listos para crear los objetos sombreadores y compilarlos para que WebGLProgram pueda usarlos. Usamos los métodos gl.createShader(), gl.shaderSource() y gl.compileShader() para nuestros vertexShader y fragmentShader.
Javascript
// Create WebGl Shader objects
var vertexShader = gl.createShader(gl.VERTEX_SHADER);
var fragmentShader = gl.createShader(gl.FRAGMENT_SHADER);

// sets the source code of the WebGL shader
gl.shaderSource(vertexShader, shaders.vs);
gl.shaderSource(fragmentShader, shaders.fs);

// Compile GLSL Shaders to a binary data
// so WebGLProgram can use them
gl.compileShader(vertexShader);
gl.compileShader(fragmentShader);
Creación del programa WebGL: el siguiente paso es crear el programa WebGL para alojar nuestro sombreador de vértices y sombreador de fragmentos en la GPU.
Javascript
// Create a WebGLProgram
var program = gl.createProgram();

// Attach pre-existing shaders
gl.attachShader(program, vertexShader);
gl.attachShader(program, fragmentShader);

gl.linkProgram(program);
Creando el Objeto Triángulo: En este paso, creamos los atributos de vértice y los datos de entrada a los sombreadores (el triángulo). Definimos dos atributos para este triángulo “ posición” y “ color” . Creamos una array de » datos » para cada atributo utilizando 32 bits, ya que esto es necesario en los búferes de vértices. Las arrays de » datos» contienen las coordenadas del triángulo en el plano XY y los colores RGB para cada vértice del triángulo.
Javascript
const vertexAttributes = {
    position: {
        numberOfComponents: 2, // X and Y ordered pair coordinates
        data: new Float32Array([0.0, 0.5, -0.5, -0.5, 0.5, -0.5])
    },
    color: {
        numberOfComponents: 3, // RGB triple
        data: new Float32Array([1, 0, 0, 0, 1, 0, 0, 0, 1])
    }
};
Creación de búferes de vértices y representación: Ahora, necesitamos crear búferes para almacenar los atributos de los vértices. En las aplicaciones OpenGL/WebGL, los búferes son espacios de memoria en la tarjeta gráfica (VRAM) que utilizan los sombreadores para realizar operaciones matemáticas. Recuerde, los sombreadores se ejecutan en la GPU y necesitamos la memoria de la tarjeta gráfica para un acceso rápido a los datos. Aquí, creamos dos búferes, uno para el atributo de posición y otro para el atributo de color.
Luego usamos gl.getAttribLocation() y gl.vertexAttribPointer() para decirles a los sombreadores cómo estamos enviando los datos en los atributos de vértice.
Finalmente, ejecutamos los shaders usando gl.drawArrays()
Javascript
// Create an initialize vertex buffers
var vertexBufferObjectPosition = gl.createBuffer();
var vertexBufferObjectColor = gl.createBuffer();

// Bind existing attribute data
gl.bindBuffer(gl.ARRAY_BUFFER, vertexBufferObjectPosition);
gl.bufferData(gl.ARRAY_BUFFER, vertexAttributes.position.data,
        gl.STATIC_DRAW);

var positionAttribLocation = gl.getAttribLocation(program,
        'vertPosition');

gl.vertexAttribPointer(positionAttribLocation,
    vertexAttributes.position.numberOfComponents,
        gl.FLOAT, gl.FALSE, 0, 0);
gl.enableVertexAttribArray(positionAttribLocation);

// Bind existing attribute data
gl.bindBuffer(gl.ARRAY_BUFFER, vertexBufferObjectColor);
gl.bufferData(gl.ARRAY_BUFFER, vertexAttributes.color.data,
        gl.STATIC_DRAW);

var colorAttribLocation = gl.getAttribLocation(program,
        'vertColor');

gl.vertexAttribPointer(colorAttribLocation,
    vertexAttributes.color.numberOfComponents, gl.FLOAT,
            gl.FALSE, 0, 0);
gl.enableVertexAttribArray(colorAttribLocation);

// Set program as part of the current rendering state
gl.useProgram(program);
// Draw the trinagle
gl.drawArrays(gl.TRIANGLES, 0, 3);
Juntando todo: aquí tenemos todas las piezas juntas en el archivo app.js. Para probar este código, descargue los archivos html.index y app.js y colóquelos en el mismo directorio, y luego abra index.html en su navegador web.
index.html
<!DOCTYPE html>
<html>

<head>
    <title></title>
</head>

<body>
    <canvas id="canvas" width="400" height="300">
        Your browser does not support HTML5
    </canvas>
    <script src="app.js"></script>
</body>

</html>
app.js
// Request html canvas element
var canvas = document.getElementById("canvas");

// Create a WebGL rendering context
var gl = canvas.getContext("webgl2");

// Tell user if their browser does not support WebGL
if (!gl) {
    alert("Your browser does not support WebGL");
}

// Set the color of the canvas.
// Parameters are RGB colors (red, green, blue, alpha)
gl.clearColor(0, 0.6, 0.0, 1.0);
// Clear the color buffer with specified color
gl.clear(gl.COLOR_BUFFER_BIT);

// Define shaders: vertex shader and fragment shader
const shaders = {
    vs: `#version 300 es
        in vec2 vertPosition;
        in vec3 vertColor;
        out vec3 fragColor;

        void main() {
            fragColor = vertColor;
            gl_Position = vec4(vertPosition, 0, 1);
        }`,

    fs: `#version 300 es
        precision mediump float;
        in vec3 fragColor;
        out vec4 outColor;

        void main() {
            outColor = vec4(fragColor, 1);
        }`
};

// Create WebGl Shader objects
var vertexShader = gl.createShader(gl.VERTEX_SHADER);
var fragmentShader = gl.createShader(gl.FRAGMENT_SHADER);

// sets the source code of the WebGL shader
gl.shaderSource(vertexShader, shaders.vs);
gl.shaderSource(fragmentShader, shaders.fs);

// Compile GLSL Shaders to a binary data so
// WebGLProgram can use them
gl.compileShader(vertexShader);
gl.compileShader(fragmentShader);

// Create a WebGLProgram
var program = gl.createProgram();

// Attach pre-existing shaders
gl.attachShader(program, vertexShader);
gl.attachShader(program, fragmentShader);

gl.linkProgram(program);

const vertexAttributes = {
    position: {

        // X and Y ordered pair coordinates
        numberOfComponents: 2,
        data: new Float32Array([0.0,
            0.5, -0.5, -0.5, 0.5, -0.5])
    },
    color: {
        numberOfComponents: 3, // RGB triple
        data: new Float32Array([1.0, 0.0,
            0.0, 0.0, 1.0, 0.0, 0.0, 0.0, 1.0])
    }
};

// Create an initialize vertex buffers
var vertexBufferObjectPosition = gl.createBuffer();
var vertexBufferObjectColor = gl.createBuffer();

// Bind existing attribute data
gl.bindBuffer(gl.ARRAY_BUFFER, vertexBufferObjectPosition);
gl.bufferData(gl.ARRAY_BUFFER,
    vertexAttributes.position.data, gl.STATIC_DRAW);

var positionAttribLocation =
    gl.getAttribLocation(program, 'vertPosition');

gl.vertexAttribPointer(positionAttribLocation,
    vertexAttributes.position.numberOfComponents,
    gl.FLOAT, gl.FALSE, 0, 0);
gl.enableVertexAttribArray(positionAttribLocation);

// Bind existing attribute data
gl.bindBuffer(gl.ARRAY_BUFFER, vertexBufferObjectColor);
gl.bufferData(gl.ARRAY_BUFFER,
    vertexAttributes.color.data, gl.STATIC_DRAW);

var colorAttribLocation =
    gl.getAttribLocation(program, 'vertColor');

gl.vertexAttribPointer(colorAttribLocation,
    vertexAttributes.color.numberOfComponents,
    gl.FLOAT, gl.FALSE, 0, 0);
gl.enableVertexAttribArray(colorAttribLocation);

// Set program as part of the current rendering state
gl.useProgram(program);
// Draw the trinagle
gl.drawArrays(gl.TRIANGLES, 0, 3);
Producción:

Salida: triángulo WebGL
Publicación traducida automáticamente
Artículo escrito por joseflores01 y traducido por Barcelona Geeks. The original can be accessed here. Licence: CCBY-SA