En este artículo, desarrollaremos una ventana GUI utilizando el marco kivy de Python.
Kivy es una herramienta GUI independiente de la plataforma en Python. Es una biblioteca Python de código abierto para el desarrollo rápido de aplicaciones multitáctiles en Windows, macOS, Android, iOS, Linux y Raspberry Pi. El paquete KivyMD es una colección de widgets compatibles con Material Design que se pueden usar con el módulo Kivy. En este artículo, desarrollaremos una ventana GUI utilizando el marco kivy de Python y agregaremos los estilos de fuente disponibles en KivyMD.
Instalación:
Para instalar los módulos, escriba el siguiente comando en la terminal.
pip install kivy
pip install kivymd
Estilos de fuente disponibles en KivyMD:
| S. No | Estilo de fuente |
|---|---|
| 1 | H1 |
| 2 | H2 |
| 3 | H3 |
| 4 | H4 |
| 5 | H5 |
| 6 | H6 |
| 7 | Subtítulo1 |
| 8 | Subtítulo2 |
| 9 | cuerpo1 |
| 10 | cuerpo2 |
| 11 | Botón |
| 12 | Subtítulo |
| 13 | sobrerayado |
| 14 | Icono |
Método 2: Hacer con lenguaje Kv.
Paso 1: importe los paquetes necesarios.
Para esto, necesitaremos importar Builder desde kivy y MDApp, MDLabel desde el paquete kivymd.
Python3
installing packages
from kivy.lang import Builder
from kivymd.app import MDApp
from kivymd.uix.label import MDLabel
Paso 2: Diseñe el diseño utilizando el lenguaje kv.
Primero, declararemos la clase de widget de pantalla llamada MDScreen y luego la clase de widget secundaria. Aquí, MDBoxLayout es una clase secundaria y MDToolbar es una clase secundaria.
Usaremos la identificación y la orientación en nuestro MDBoxLayout, aquí nuestra identificación será un cuadro y estableceremos nuestra orientación en vertical. MDToolbar tendrá un solo parámetro llamado título. El título funciona como un texto de salida en MDToolbar.
Python3
#  kv lang
KV = '''
# declaring screen
MDScreen:

    #this will create vertical box layout
    MDBoxLayout:
        id: box
        orientation: "vertical"

        MDToolbar:
            title: "MDFonts"
'''
Paso 3: Escribiendo el programa principal.
Para ejecutar el archivo kv, usaremos load_string() y le pasaremos nuestro lenguaje kv y definiremos una función llamada build() y cuando se llame, cargará kv y devolverá la pantalla. run() se usa para ejecutar la clase y no requiere ningún parámetro.
Para mostrar varias fuentes, usaremos un bucle for y agregaremos el widget uno por uno usando add_widget() y le pasaremos la MDLabel. Aquí MDLabel toma 3 parámetros:
Sintaxis: MDLabel(texto=””, halign=””,font_style=””)
donde text es nuestro texto de salida, halign se usa para alinear el texto, por lo que para este ejemplo usamos center y font_style es la fuente que queremos usar para el texto. Puede elegir cualquier fuente enumerada en la tabla anterior.
Python3
# app class
class Test(MDApp):
    def build(self):

        # this will load kv lang
        screen = Builder.load_string(KV)

        # running loop for all the declared font name
        for font_name in [
            "H1",
            "H2",
            "Subtitle1",
            "Button",
            "Overline",
            "Caption",
            "Icon",
        ]:  # this will add widgets to the screen
            # for all font_name
            # declared in list
            screen.ids.box.add_widget(
                MDLabel(
                    text= "GEEKSFORGEEKS",
                    halign="center",
                    font_style=font_name,
                )
            )
        # returning screen
        return screen

# running app
Test().run()
Implementación:
Python3
# installing packages
from kivy.lang import Builder
from kivymd.app import MDApp
from kivymd.uix.label import MDLabel

# kv lang
KV = '''
# declaring screen
MDScreen:

    #this will create vertical box layout
    MDBoxLayout:
        id: box
        orientation: "vertical"

        MDToolbar:
            title: "MDFonts"
'''

# app class
class Test(MDApp):
    def build(self):

        # this will load kv lang
        screen = Builder.load_string(KV)

        # running loop for all the declared font name
        for font_name in [
            "H1",
            "H2",
            "Subtitle1",
            "Button",
            "Overline",
            "Caption",
            "Icon",
        ]:  # this will add widgets to the screen
            # for all font_name
            # declared in list
            screen.ids.box.add_widget(
                MDLabel(
                    text= "GEEKSFORGEEKS",
                    halign="center",
                    font_style=font_name,
                )
            )
        # returning screen
        return screen

# running app
Test().run()
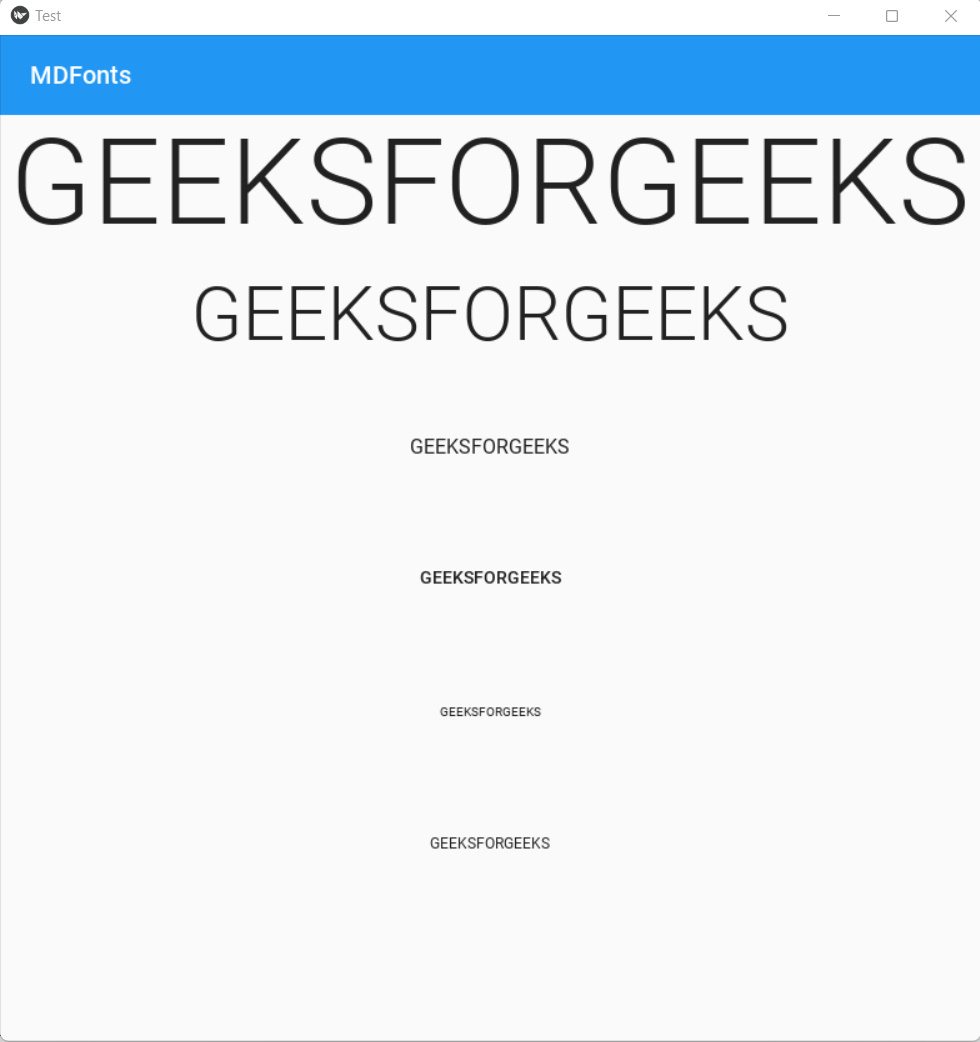
Producción:
Método 2: Hacer lo mismo sin lenguaje Kv.
Paso 1: Importación de paquetes.
Python3
# importing packages
from kivymd.app import MDApp
from kivymd.uix.label import MDLabel
from kivymd.uix.boxlayout import MDBoxLayout
Paso 2: Escribiendo el programa principal.
En este paso, la función principal será similar al ejemplo anterior. La única diferencia aquí es que estamos definiendo MDBoxLayout en la función principal y pasando el parámetro de orientación. Ahora aplicaremos el mismo ciclo que se hizo en el ejemplo anterior. Después de todo esto, ejecutaremos la clase MainApp.
Python3
# defining MainApp class
class MainApp(MDApp):
    def build(self):

        # this will set MDBoxLayout to vertical
        screen = MDBoxLayout(orientation = 'vertical')

        # running loop for all the declared font name
        for name_theme in [
            "H1",
            "H2",
            "Subtitle1",
            "Button",
            "Overline",
            "Caption",
            "Icon",
        ]:  # this will add widgets to the screen
            # for all font_name
            # declared in list
            screen.add_widget(
                MDLabel(
                    text="GEEKSFORGEEKS",
                    halign="center",
                    font_style=name_theme,
                )
            )

        # returing screen
        return screen

# running app
MainApp().run()
Implementación:
Python3
# importing packages
from kivymd.app import MDApp
from kivymd.uix.label import MDLabel
from kivymd.uix.boxlayout import MDBoxLayout

# defining MainApp class
class MainApp(MDApp):
    def build(self):

        # this will set MDBoxLayout to vertical
        screen = MDBoxLayout(orientation = 'vertical')

        # running loop for all the declared font name
        for name_theme in [
            "H1",
            "H2",
            "Subtitle1",
            "Button",
            "Overline",
            "Caption",
            "Icon",
        ]:  # this will add widgets to the screen
            # for all font_name
            # declared in list
            screen.add_widget(
                MDLabel(
                    text="GEEKSFORGEEKS",
                    halign="center",
                    font_style=name_theme,
                )
            )

        # returing screen
        return screen

# running app
MainApp().run()
Producción:
Publicación traducida automáticamente
Artículo escrito por vinamrayadav y traducido por Barcelona Geeks. The original can be accessed here. Licence: CCBY-SA