Xstream es una biblioteca simple de serialización/deserialización basada en Java para convertir objetos Java en su representación XML . También se puede utilizar para convertir una string XML en un objeto Java equivalente. Es una extensión rápida y eficiente de la biblioteca estándar de Java. También es altamente personalizable. Para este tutorial, asumimos que Java y las variables de entorno están correctamente instaladas en su entorno local.
Descargar el archivo XStream
Descargue el archivo Xstream más reciente desde este enlace . Si descargó el jar, debe configurar la variable CLASSPATH manualmente o con la ayuda de IDE, (o)
Con Maven:
Si lo agregó a su proyecto a través del repositorio central de maven, entonces no necesita configurar la variable CLASSPATH, maven lo hará automáticamente por usted.
<dependency>
  <groupId>com.thoughtworks.xstream</groupId>
  <artifactId>xstream</artifactId>
  <version>1.4.19</version>
</dependency>
Establecer variable CLASSPATH
A mano:
Linux:
export CLASSPATH=$CLASSPATH:$XStream_HOME/xstream-1.4.19.jar:
Ventanas:
Establezca la variable de entorno CLASSPATH en
%CLASSPATH%;%XStream_HOME%\xstream-1.4.19.jar;
Mac:
export CLASSPATH=$CLASSPATH:$XStream_HOME/xstream-1.4.19.jar:
(O)
Con la ayuda de un IDE: En IntelliJ IDEA siga los siguientes pasos:
Pasos :
Haga clic con el botón derecho en Proyecto -> Abrir configuración del módulo -> Bibliotecas -> Haga clic en ‘+’ -> Agregar Xstream Jar -> Aplicar y Aceptar


Aplicación XStream
Asegúrese de haber configurado los archivos Spring core y web jar
Java
import lombok.Getter;

@Getter
public class Employee {
    private String firstName;
    private String lastName;
    private int salary;
    private int age;
    private String gender;

    public Employee(String firstName, String lastName,
                    int salary, int age, String gender)
    {
        this.firstName = firstName;
        this.lastName = lastName;
        this.salary = salary;
        this.age = age;
        this.gender = gender;
    }
}
Java
import com.thoughtworks.xstream.XStream;
import com.thoughtworks.xstream.io.xml.DomDriver;
import java.io.FileWriter;
import java.io.IOException;
import org.springframework.boot.autoconfigure.SpringBootApplication;

@SpringBootApplication
public class XStreamExampleApplication {
    public static void main(String[] args)
        throws IOException
    {
        // Initializing XStream with Dom driver
        XStream xStream = new XStream(new DomDriver());

        // Now, to make the XML outputted by XStream more
        // concise, you can create aliases for your custom
        // class names to XML element names. This is the
        // only type of mapping required to use XStream and
        // even this is optional.
        xStream.alias("employee", Employee.class);

        Employee e1 = new Employee("Sanyog", "Gautam", 1000,
                                   19, "Male");

        // Serializing a Java object into XML
        String xml
            = xStream.toXML(e1); // Converting it to XML
        System.out.println(xml);

        // Java Object to a file
        try (FileWriter writer = new FileWriter(
                 "/home/anurag/xstreamExample.xml")) {
            xStream.toXML(e1, writer);
        }
        catch (IOException e) {
            e.printStackTrace();
        }
    }
}
Como puede ver, obtenemos nuestro XML limpio
<employee>
  <firstName>Sanyog</firstName>
  <lastName>Gautam</lastName>
  <salary>100</salary>
  <age>19</age>
  <gender>Male</gender>
</employee>
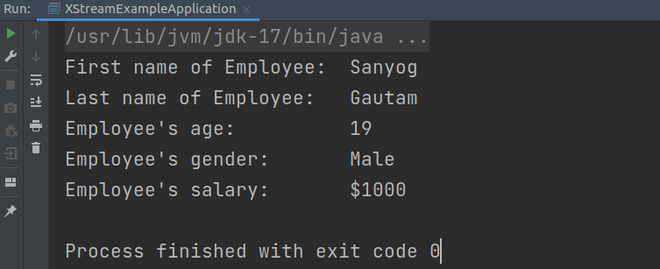
Podemos deserializar nuestro objeto desde ese XML
Java
import com.thoughtworks.xstream.XStream;
import com.thoughtworks.xstream.io.xml.DomDriver;
import java.io.IOException;
import org.springframework.boot.autoconfigure.SpringBootApplication;

@SpringBootApplication
public class XStreamExampleApplication {
    public static void main(String[] args)
        throws IOException
    {
        // Initializing XStream with Dom driver
        XStream xStream = new XStream(new DomDriver());

        // We need to configure the security framework in
        // XStream, so it deserializes the object from the
        // XML
        xStream.allowTypes(new Class[] { Employee.class });

        // Now, to make the XML outputted by XStream more
        // concise, you can create aliases for your custom
        // class names to XML element names. This is the
        // only type of mapping required to use XStream and
        // even this is optional.
        xStream.alias("employee", Employee.class);

        Employee e1 = new Employee("Sanyog", "Gautam", 1000,
                                   19, "Male");

        // Serializing a Java object into XML
        String xml
            = xStream.toXML(e1); // Converting it to XML

        // Deserializing a Java object from XML
        Employee employee = (Employee)xStream.fromXML(xml);

        System.out.println("First name of Employee:  "
                           + employee.getFirstName());
        System.out.println("Last name of Employee:   "
                           + employee.getLastName());
        System.out.println("Employee's age:          "
                           + employee.getAge());
        System.out.println("Employee's gender:       "
                           + employee.getGender());
        System.out.println("Employee's salary:       $"
                           + employee.getSalary());
    }
}
Recuperamos nuestro objeto

Objeto deserializado de XML
Publicación traducida automáticamente
Artículo escrito por anuragsinghrajawat22 y traducido por Barcelona Geeks. The original can be accessed here. Licence: CCBY-SA