Se puede agregar una opción a un elemento seleccionado usando 3 enfoques en jQuery:
Método 1: agregue la etiqueta de opción al cuadro de selección
La opción que se agregará se crea como una string HTML normal. El cuadro de selección se selecciona con el selector jQuery y esta opción se agrega con el método append() . El método append() inserta el contenido especificado como el último hijo de la colección jQuery. Por lo tanto, la opción se agrega al elemento seleccionado.
Sintaxis:
$('#selectBox').append(`${optionText}`)
Ejemplo:
<!DOCTYPE html>
<html>
<head>
    <title>
      Adding options to a select element using jQuery?
  </title>
</head>

<body>
    <h1 style="color: green">
      GeeksForGeeks
  </h1>
    <b>
      Adding options to a select element using jQuery?
  </b>
    <p>
        Select one from the given options:
        <select id="select1">
            <option value="free">Free</option>
            <option value="basic">Basic</option>
        </select>
    </p>
    <p>
      Click the button below to add
      one option to the select box.
  </p>

    <button onclick="addOption()">
      Add option
  </button>

    <script src=
"https://code.jquery.com/jquery-3.3.1.min.js">
  </script>
    <script type="text/javascript">
        function addOption() {
            optionText = 'Premium';
            optionValue = 'premium';

            $('#select1').append(`<option value="${optionValue}">
                                       ${optionText}
                                  </option>`);
        }
    </script>
</body>

</html>
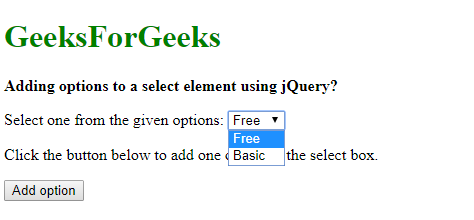
Producción:
- Antes de hacer clic en el botón:

- Después de hacer clic en el botón:

Método 2: Usar el constructor Option() para crear una nueva opción
El constructor Option() se usa para crear un nuevo elemento de opción. Se crea una nueva opción con el texto y el valor de la opción como parámetros. Luego, este elemento se agrega al cuadro de selección con el método append().
Sintaxis:
$('#selectBox').append(new Option(optionText, optionValue))
Ejemplo:
<!DOCTYPE html>
<head>
    <title>Adding options to a select element using jQuery?</title>
</head>
<body>
    <h1 style="color: green">GeeksForGeeks</h1>
    <b>Adding options to a select element using jQuery?</b>
    <p>
        Select one from the given options:
        <select id="select1">
            <option value="free">Free</option>
            <option value="basic">Basic</option>
        </select>
    </p>
    <p>Click the button below to add one option to the select box.</p>
    <button onclick="addOption()">Add option</button>
    <script src="https://code.jquery.com/jquery-3.3.1.min.js"></script>
    <script type="text/javascript">
        function addOption() {
            optionText = 'Ultimate';
            optionValue = 'ultimate';

            $('#select1').append(new Option(optionText, optionValue));
        }
    </script>
</body>
</html>
Producción:
- Antes de hacer clic en el botón:

- Después de hacer clic en el botón:

Método 3: crear un nuevo elemento de opción con el valor y el texto
Se crea un nuevo elemento jQuery DOM con la etiqueta de opción. El valor de la etiqueta se establece con el método val() y el texto de la opción se establece con el método text(). Luego, el elemento creado se agrega al cuadro de selección con el método append().
Sintaxis:
$('#selectBox').append($('<option>').val(optionValue).text(optionText))
Ejemplo:
<!DOCTYPE html>
<head>
    <title>Adding options to a select element using jQuery?</title>
</head>
<body>
    <h1 style="color: green">GeeksForGeeks</h1>
    <b>Adding options to a select element using jQuery?</b>
    <p>
        Select one from the given options:
        <select id="select1">
            <option value="free">Free</option>
            <option value="basic">Basic</option>
        </select>
    </p>
    <p>Click the button below to add one option to the select box.</p>
    <button onclick="addOption()">Add option</button>
    <script src="https://code.jquery.com/jquery-3.3.1.min.js"></script>
    <script type="text/javascript">
        function addOption() {
            optionText = 'Extra';
            optionValue = 'extra';

            $('#select1').append($('<option>').val(optionValue).text(optionText));
        }
    </script>
</body>
</html>
Producción:
- Antes de hacer clic en el botón:

- Después de hacer clic en el botón:

jQuery es una biblioteca JavaScript de código abierto que simplifica las interacciones entre un documento HTML/CSS. Es muy famosa por su filosofía de «Escribir menos, hacer más» .
Puede aprender jQuery desde cero siguiendo este tutorial de jQuery y ejemplos de jQuery .
Publicación traducida automáticamente
Artículo escrito por sayantanm19 y traducido por Barcelona Geeks. The original can be accessed here. Licence: CCBY-SA