Instalación del compilador GCC
Necesitamos instalar compiladores GCC para Windows. Linux ya tiene instalado GCC.
Pasos para la instalación
1.Download and Install the MinGW for GCC compiler using this link.
2.Open Control Panel in your system and then select: System (Control Panel)
3.Click on the Advanced system settings
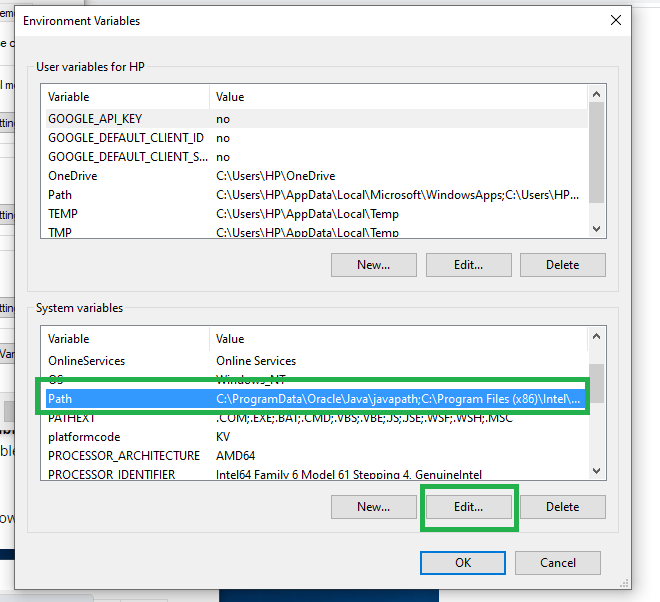
4.Click on Environment Variables. In the section System Variables, find the PATH environment variable
  and select it. Click Edit.
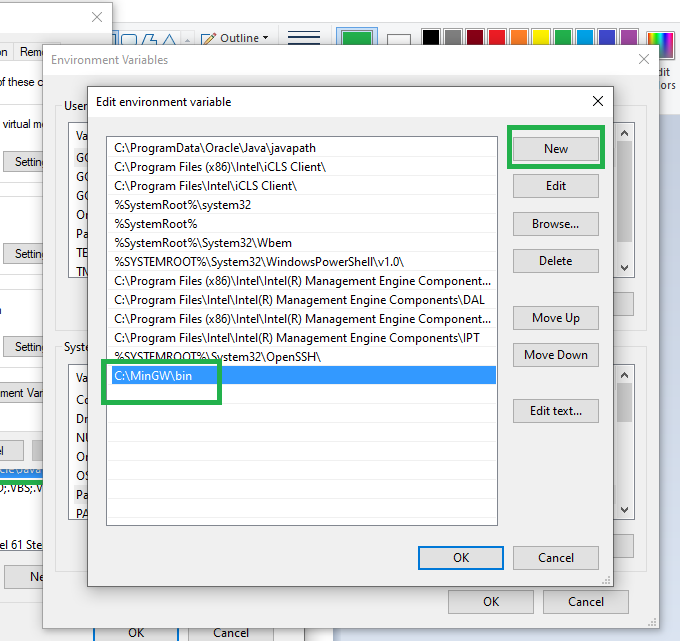
5.In the Edit System Variable window, specify the value of the PATH environment variable.
6.Type "C:\MinGW\bin"
7.Click OK.
8.Close all remaining windows by clicking OK.
Imágenes para referencia adicional
Extensiones importantes
1.Code Runner (By JunHan)---> To run the c++ code
2.C/C++ (By Microsoft)---> For intellisense and debugging
3.competitive-programming helper (By Divyanshu Agrawal) ---> Automatically Reads I/O for
  codechef/codeforces
Fragmento de usuario/plantilla de inicio para programación competitiva
A continuación se muestra el ejemplo de la plantilla para la programación competitiva que utilizan los programadores. Puede cambiar esta plantilla según su elección y preferencia:
C++
#pragma GCC optimize("Ofast")
#pragma GCC target("sse,sse2,sse3,ssse3,sse4,popcnt,abm,mmx,avx,avx2,fma")
#pragma GCC optimize("unroll-loops")
#include <bits/stdc++.h>
#include <complex>
#include <queue>
#include <set>
#include <unordered_set>
#include <list>
#include <chrono>
#include <random>
#include <iostream>
#include <algorithm>
#include <cmath>
#include <string>
#include <vector>
#include <map>
#include <unordered_map>
#include <stack>
#include <iomanip>
#include <fstream>

using namespace std;

typedef long long ll;
typedef long double ld;
typedef pair<int,int> p32;
typedef pair<ll,ll> p64;
typedef pair<double,double> pdd;
typedef vector<ll> v64;
typedef vector<int> v32;
typedef vector<vector<int> > vv32;
typedef vector<vector<ll> > vv64;
typedef vector<vector<p64> > vvp64;
typedef vector<p64> vp64;
typedef vector<p32> vp32;
ll MOD = 998244353;
double eps = 1e-12;
#define forn(i,e) for(ll i = 0; i < e; i++)
#define forsn(i,s,e) for(ll i = s; i < e; i++)
#define rforn(i,s) for(ll i = s; i >= 0; i--)
#define rforsn(i,s,e) for(ll i = s; i >= e; i--)
#define ln "\n"
#define dbg(x) cout<<#x<<" = "<<x<<ln
#define mp make_pair
#define pb push_back
#define fi first
#define se second
#define INF 2e18
#define fast_cin() ios_base::sync_with_stdio(false); cin.tie(NULL); cout.tie(NULL)
#define all(x) (x).begin(), (x).end()
#define sz(x) ((ll)(x).size())


void solve(){
}
int main()
{
    fast_cin();
    ll t;
    cin >> t;
    for(int it=1;it<=t;it++) {
     cout << "Case #" << it+1 << ": ";
        solve();
    }
    return 0;
}
Pasos para crear un fragmento de usuario/plantilla de inicio
1.Open VS Code and go to:
  File > Preferences > User Snippets
2.Click on New Snippets
3.Type cpp.json((can be anything).json)(the name of snippet)
4.Delete all the default code
5.Paste the json code given below
  (dont copy above C++ code!!, json files are needed for user snippets in VS Code)
Pasos para usar la plantilla Fragmento de usuario/Inicio en un archivo C++
1.Create a .cpp file(note: below snippet will only work once used in C++ file)
2.type the Snippet Trigger(look at "prefix" attribute in 3rd line of json file given below)
3.press tab or enter
  (the default prefix is set as gfg, you can alter it as per your need)
Código JSON para fragmento de usuario
Javascript
{
    "C++ Snippet": {
        "prefix": "gfg",
        "body": [
          "#pragma GCC optimize(\"Ofast\")",
          "#pragma GCC target(\"sse,sse2,sse3,ssse3,sse4,popcnt,abm,mmx,avx,avx2,fma\")",
          "#pragma GCC optimize(\"unroll-loops\")",
          "#include <bits/stdc++.h>  ",
          "#include <complex>",
          "#include <queue>",
          "#include <set>",
          "#include <unordered_set>",
          "#include <list>",
          "#include <chrono>",
          "#include <random>",
          "#include <iostream>",
          "#include <algorithm>",
          "#include <cmath>",
          "#include <string>",
          "#include <vector>",
          "#include <map>",
          "#include <unordered_map>",
          "#include <stack>",
          "#include <iomanip>",
          "#include <fstream>",
          " ",
          "using namespace std;",
          " ",
          "typedef long long ll;",
          "typedef long double ld;",
          "typedef pair<int,int> p32;",
          "typedef pair<ll,ll> p64;",
          "typedef pair<double,double> pdd;",
          "typedef vector<ll> v64;",
          "typedef vector<int> v32;",
          "typedef vector<vector<int> > vv32;",
          "typedef vector<vector<ll> > vv64;",
          "typedef vector<vector<p64> > vvp64;",
          "typedef vector<p64> vp64;",
          "typedef vector<p32> vp32;",
          "ll MOD = 998244353;",
          "double eps = 1e-12;",
          "#define forn(i,e) for(ll i = 0; i < e; i++)",
          "#define forsn(i,s,e) for(ll i = s; i < e; i++)",
          "#define rforn(i,s) for(ll i = s; i >= 0; i--)",
          "#define rforsn(i,s,e) for(ll i = s; i >= e; i--)",
          "#define ln \"\\n\"",
          "#define dbg(x) cout<<#x<<\" = \"<<x<<ln",
          "#define mp make_pair",
          "#define pb push_back",
          "#define fi first",
          "#define se second",
          "#define INF 2e18",
          "#define fast_cin() ios_base::sync_with_stdio(false); cin.tie(NULL); cout.tie(NULL)",
          "#define all(x) (x).begin(), (x).end()",
          "#define sz(x) ((ll)(x).size())",
          " ",
          "",
          "void solve(){",
          "}",
          "int main()",
          "{",
          "    fast_cin();",
          "    ll t;",
          "    cin >> t;",
          "    for(int it=1;it<=t;it++) {",
          "     cout << \"Case #\" << it+1 << \": \";",
          "        solve();",
          "    }",
          "    return 0;",
          "}"
        ],
        "description": "C++ Snippet"
      }
}
Imágenes para referencia adicional
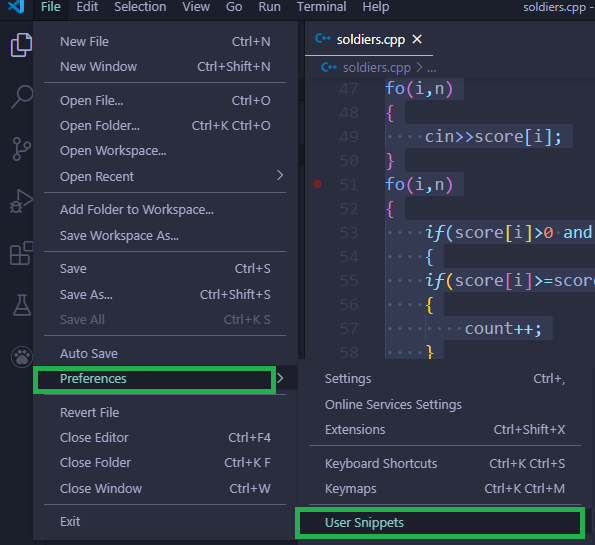
Navegación básica

Seleccione la opción resaltada para crear un nuevo fragmento

«escriba cpp.json» el nombre del fragmento, debe ser un archivo json
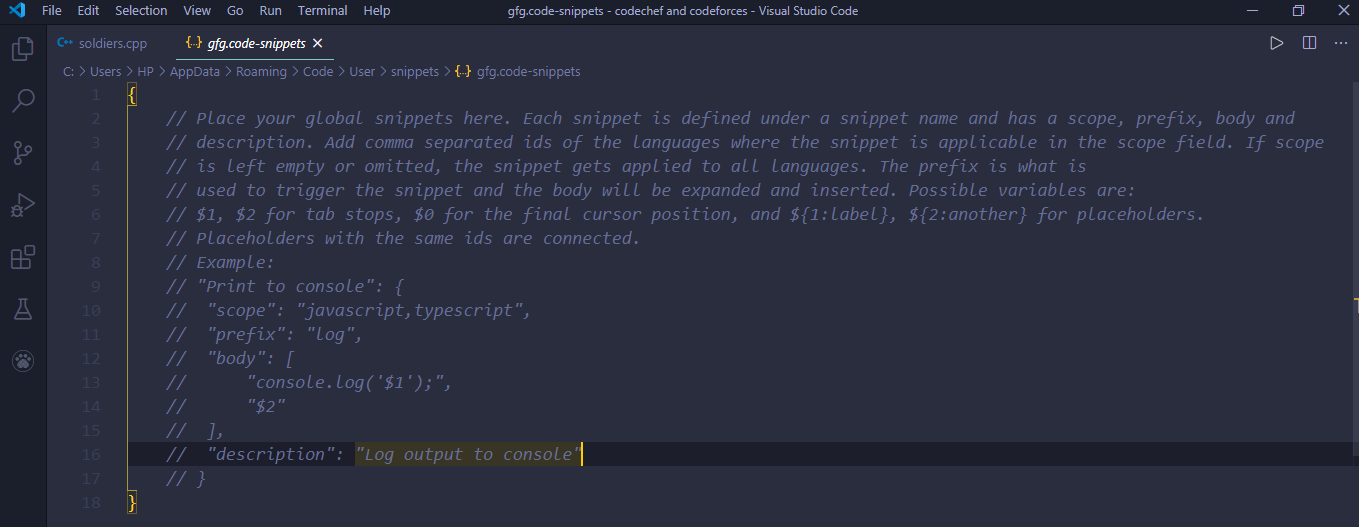
Borre todo este código predeterminado y pegue el código json dado
Nota: En Prefijo, debe usar su palabra de elección personal, aquí, por ejemplo, estoy usando gfg . Esto es muy importante porque es la clave para llamar a la plantilla en su código.

Guarde este fragmento presionando CTRL+S.
Abra un nuevo archivo cpp y escriba su prefijo que escribió en el cuadro de prefijo (aquí había usado gfg).

Input.txt y Output.txt (alternativa a la extensión auxiliar de programación competitiva)
Todos los sitios de codificación utilizan un método de comparación de archivos para verificar las respuestas. Significa que almacenan la salida a través de su programa en un archivo de texto y la comparan con el archivo de respuesta real. Por lo tanto, también debe hacerlo. Lo que debe hacer es crear una carpeta y dentro de ella crear 2 archivos input.txt, output.txt.
En primer lugar, cree los tres archivos necesarios. Un archivo cpp que contiene su programa. Un archivo de texto input.txt y output.txt. Asegúrese de que los tres archivos estén en el mismo directorio. Necesitamos dividir el editor en tres espacios.
- Espacio de código principal
- Espacio de entrada
- Espacio de salida
Pasos para la configuración de la pantalla
1.Once your cpp program is open, go to View>Editor Layout>Two Columns
2.In the empty(right) column right click and choose Split down
3.In the top window, right click and click on open file, open input.txt from the dropdown.
4.Repeat the same process in the bottom window.
5.Paste the c++ code at the end of post just inside the main method
Imágenes para referencia adicional
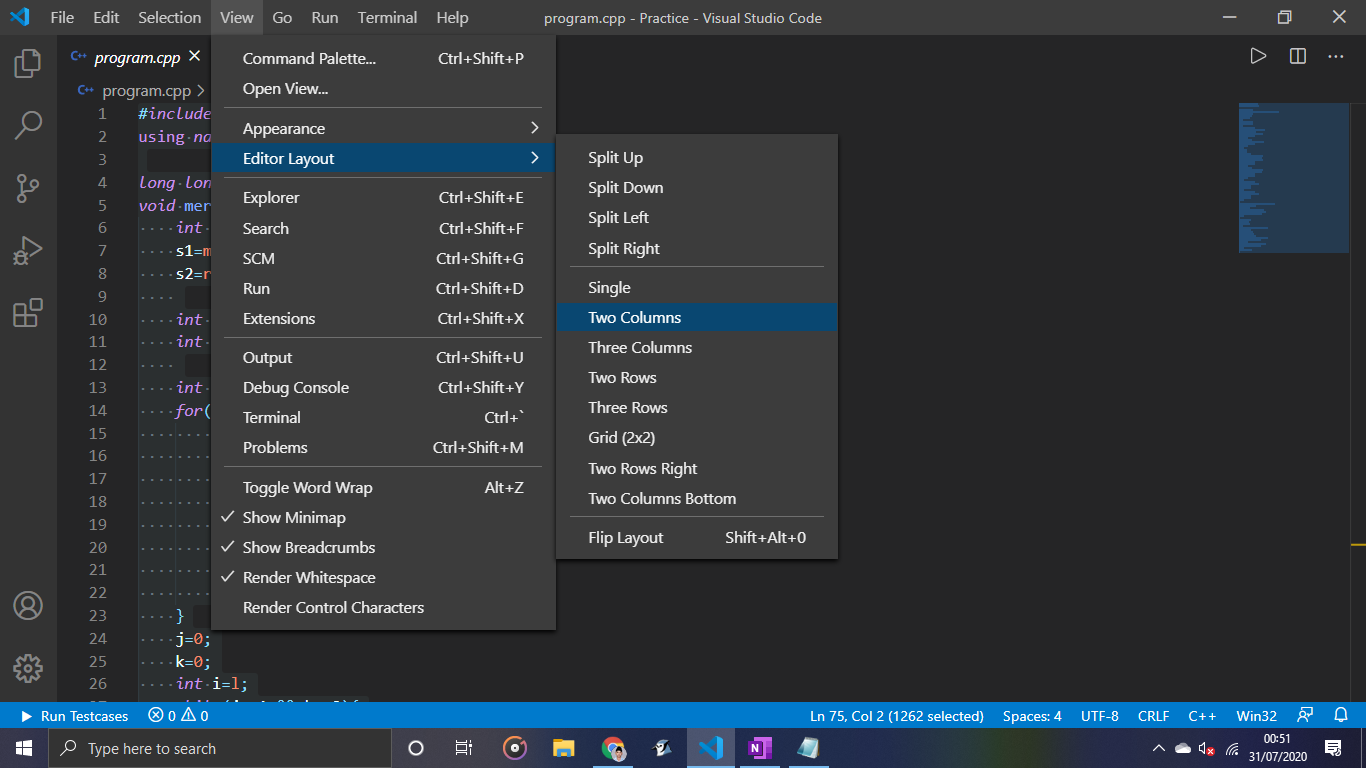


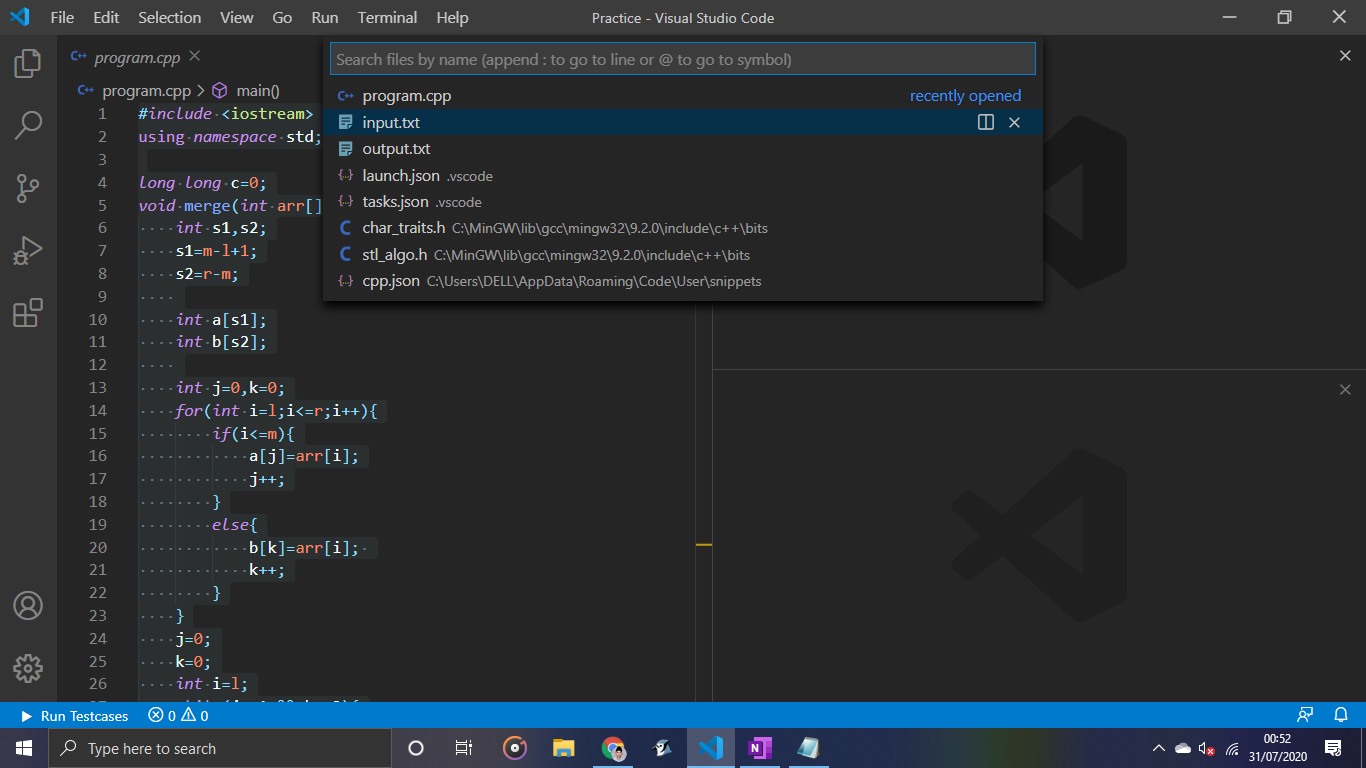

Nota: Cuando realice algún cambio en la entrada, no olvide guardarlo presionando ctrl+S en el cuadro input.txt.
Nota: No olvide agregar este código después de su principal()
C++
#ifndef ONLINE_JUDGE
freopen("input.txt", "r", stdin);
freopen("output.txt", "w", stdout);
#endif

