LableFrame en Tkinter es el widget que crea el área rectangular que contiene otros widgets. En este artículo, vamos a ver cómo podemos cambiar el borde del marco de la etiqueta. Pero para lograr el color, debemos pasar por el tema de Tkinter, por lo tanto, usamos el módulo ttk para el mismo que está incorporado en python 3 Tkinter.
Implementación paso a paso:
Paso 1: Importación de todos los módulos necesarios
Python3
# import tkinter
import tkinter as tk

# import ttk theme module for styling
import tkinter.ttk as ttk
Paso 2: Construya el marco de la etiqueta y coloque algunos widgets dentro de él.
Python3
import tkinter as tk
import tkinter.ttk as ttk
# initialize the tkinter window
root = tk.Tk()
# provide some width and height
root.geometry("300x300")
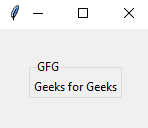
# created a label frame with title "Group"
labelframe = ttk.LabelFrame(root, text = "GFG")
# provide padding
labelframe.pack(padx=30, pady=30)
# created the text label inside the the labelframe
left = tk.Label(labelframe, text="Geeks for Geeks")
left.pack()
root.mainloop()
Producción:
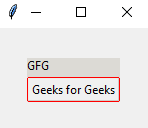
Ejemplo 1: uso del tema Clam en Tkinter.
Clam es un tema para ventanas y widgets de tkinter. Viene bajo el módulo ttk. La sintaxis para crear la ventana clam ttk:
style = ttk.Style()
style.theme_use('clam')
Nota: Usamos un tema de almeja en el módulo ttk que permite usar propiedades como colores de borde. Otros temas pueden no tener propiedades como el color del borde .
A continuación se muestra la implementación:
Python3
import tkinter as tk
import tkinter.ttk as ttk

root = tk.Tk()

# initialize style function
style = ttk.Style()

# Use clam theme
style.theme_use('clam')

# Used TLabelframe for styling labelframe widgets,
# and use red color for border
style.configure("TLabelframe", bordercolor="red")

labelframe = ttk.LabelFrame(root, text = "GFG")
labelframe.grid(padx = 30, pady = 30)

left = tk.Label(labelframe, text = "Geeks for Geeks")
left.pack()

root.mainloop()
Producción:
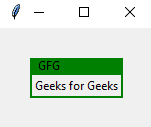
Ejemplo 2: Construyendo nuestro propio tema de funcionalidad de estilo.
Sintaxis:
# creando el tema
style.theme_create(‘class_name’, # Nombre de la clase
configuración={
‘TLabelframe’: { # Nombre del widget
‘configure’: { # Configurar argumento
‘background’:’green’ # cambiar argumento de fondo
}
}
}
)
# Por usar el tema
estilo.theme_use(‘nombre_clase’)
Creamos una función de tema de estilo con la ayuda de ttk style. Usamos theme_create para crear la funcionalidad y podemos usar eso usando theme_use para asignar el tema.
A continuación se muestra la implementación:
Python3
import tkinter as tk
import tkinter.ttk as ttk

# initialize the tkinter window
root = tk.Tk()

# initializing the style function
style = ttk.Style()

# creating the theme with the
# initializing the style function
style = ttk.Style()

# creating the theme with the
style.theme_create('style_class',

                   # getting the settings
                   settings={

                       # getting through the Labelframe
                       # widget
                       'TLabelframe': {

                           # configure the changes
                           'configure': {
                               'background': 'green'
                           }
                       },

                       # getting through the Labelframe's
                       # label widget
                       'TLabelframe.Label': {
                           'configure': {
                               'background': 'green'
                           }
                       }
                   }
                   )
style.theme_use('style_class')

# created a label frame with title "Group"
labelframe = ttk.LabelFrame(root, text="Group")

# provide padding
labelframe.pack(padx=30, pady=30)

# created the text label inside the the labelframe
left = tk.Label(labelframe, text="Geeks for Geeks")

left.pack()

root.mainloop()
Producción:
Publicación traducida automáticamente
Artículo escrito por shiv_ka_ansh y traducido por Barcelona Geeks. The original can be accessed here. Licence: CCBY-SA