Kivy es una herramienta GUI independiente de la plataforma en Python. Como se puede ejecutar en Android, IOS, Linux y Windows, etc. Básicamente se usa para desarrollar la aplicación de Android, pero eso no significa que no se pueda usar en aplicaciones de escritorio.
Animación:
Animation y AnimationTransition se utilizan para animar las propiedades del widget. Debe especificar al menos un nombre de propiedad y un valor objetivo. Para usar Animación, siga estos pasos:
- Configurar un objeto de animación
- Usar el objeto Animación en un Widget
Para usar animaciones debes importar:
from kivy.animation import Animation
Basic Approaches:

1) import runTouchApp
2) import Builder
3) import Widget
4) import Animation
5) import Clock
6) import Window
7) import random
8) import listproperty
9) Build the .kv file
10) Create root class
11) Create the clock and anim react class used to animate the boxes
12) Run the App
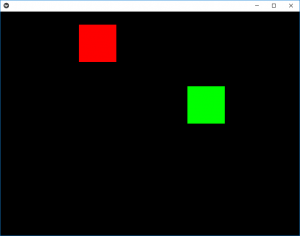
En el siguiente ejemplo, estamos creando los dos cuadros (rojo y verde) en los que estamos dando animaciones al cuadro rojo, es decir, cuando la aplicación se inicia, el cuadro rojo está en su vista animada, pero para aclarar los conceptos, estoy proporcionando el cuadro verde que al hacer clic, proporciona animaciones aleatorias, es decir, va a cualquier lugar al azar.
El programa consta de dos clases principales: la primera es la clase de reloj , que es para el cuadro rojo, ya que lo declaramos animado y la animación del cuadro verde está en la clase anim .
Para proporcionar el movimiento, debes jugar con la velocidad.
Implementación del Enfoque:
Python3
# work same as kivy.App used to run the App
from kivy.base import runTouchApp

# to use .kv file as a string we have to import it
from kivy.lang import Builder

# A Widget is the base building block of GUI interfaces in Kivy
from kivy.uix.widget import Widget

# The Clock object allows you to schedule a
# function call in the future
from kivy.clock import Clock

# Animation and AnimationTransition are
# used to animate Widget properties
from kivy.animation import Animation

# The Properties classes are used when
# you create an EventDispatcher.
from kivy.properties import ListProperty

# Core class for creating the default Kivy window.
from kivy.core.window import Window

# As name suggest used when random things required
from random import random


# load the kv file as string
Builder.load_string('''
<Root>:

# Setting the position (initial) of boxes

    ClockRect:
        pos: 300, 300
    AnimRect:
        pos: 500, 300

# creation and animation of red box
<ClockRect>:
    canvas:
        Color:
            rgba: 1, 0, 0, 1
        Rectangle:
            pos: self.pos
            size: self.size

# creation and animation of red box
<AnimRect>:
    canvas:
        Color:
            rgba: 0, 1, 0, 1
        Rectangle:
            pos: self.pos
            size: self.size
''')


# Create the root class
class Root(Widget):
    pass


# Create the clock class Then is when clicked
# how much time to animate
# the red colour block animation is created by it
class ClockRect(Widget):
    velocity = ListProperty([10, 15])

    def __init__(self, **kwargs):
        super(ClockRect, self).__init__(**kwargs)
        Clock.schedule_interval(self.update, 1 / 60.)

    def update(self, *args):
        self.x += self.velocity[0]
        self.y += self.velocity[1]

        if self.x < 0 or (self.x + self.width) > Window.width:
            self.velocity[0] *= -1
        if self.y < 0 or (self.y + self.height) > Window.height:
            self.velocity[1] *= -1


# Create the Animation class
# And add animation
# green colour box is animated through this class
class AnimRect(Widget):

    def anim_to_random_pos(self):
        Animation.cancel_all(self)
        random_x = random() * (Window.width - self.width)
        random_y = random() * (Window.height - self.height)

        anim = Animation(x = random_x, y = random_y,
                         duration = 4,
                         t ='out_elastic')
        anim.start(self)

    def on_touch_down(self, touch):
        if self.collide_point(*touch.pos):
            self.anim_to_random_pos()

# run the App
runTouchApp(Root())
Producción:
Vídeo de salida animado:
Publicación traducida automáticamente
Artículo escrito por YashKhandelwal8 y traducido por Barcelona Geeks. The original can be accessed here. Licence: CCBY-SA