Pytesseract o Python-tesseract es una herramienta de reconocimiento óptico de caracteres (OCR) para Python. Leerá y reconocerá el texto en imágenes, matrículas, etc. Python-tesseract es en realidad una clase contenedora o un paquete para el motor Tesseract-OCR de Google . También es útil y se considera como un script de invocación independiente para tesseract, ya que puede leer fácilmente todos los tipos de imágenes compatibles con las bibliotecas de imágenes de Pillow y Leptonica , que incluyen principalmente:
- jpg
- png
- gif
- bmp
- pelea, etc.
Además, si se usa como script, Python-tesseract también imprimirá el texto reconocido en lugar de escribirlo en un archivo. Python-tesseract se puede instalar usando pip como se muestra a continuación:
pip install pytesseract
Si está utilizando Anaconda Cloud, Python-tesseract se puede instalar como se muestra a continuación:
conda install -c conda-forge/label/cf202003 pytesseract
o
conda install -c conda-forge pytesseract
Nota: tesseract debe instalarse en el sistema antes de ejecutar el siguiente script.
A continuación se muestra la implementación.
Python3
from pytesseract import*
import argparse
import cv2


# We construct the argument parser
# and parse the arguments
ap = argparse.ArgumentParser()

ap.add_argument("-i", "--image",
                required=True,
                help="path to input image to be OCR'd")
ap.add_argument("-c", "--min-conf",
                type=int, default=0,
                help="minimum confidence value to filter weak text detection")
args = vars(ap.parse_args())

# We load the input image and then convert
# it to RGB from BGR. We then use Tesseract
# to localize each area of text in the input
# image
images = cv2.imread(args["image"])
rgb = cv2.cvtColor(images, cv2.COLOR_BGR2RGB)
results = pytesseract.image_to_data(rgb, output_type=Output.DICT)

# Then loop over each of the individual text
# localizations
for i in range(0, len(results["text"])):

    # We can then extract the bounding box coordinates
    # of the text region from  the current result
    x = results["left"][i]
    y = results["top"][i]
    w = results["width"][i]
    h = results["height"][i]

    # We will also extract the OCR text itself along
    # with the confidence of the text localization
    text = results["text"][i]
    conf = int(results["conf"][i])

    # filter out weak confidence text localizations
    if conf > args["min_conf"]:

        # We will display the confidence and text to
        # our terminal
        print("Confidence: {}".format(conf))
        print("Text: {}".format(text))
        print("")

        # We then strip out non-ASCII text so we can
        # draw the text on the image We will be using
        # OpenCV, then draw a bounding box around the
        # text along with the text itself
        text = "".join(text).strip()
        cv2.rectangle(images,
                      (x, y),
                      (x + w, y + h),
                      (0, 0, 255), 2)
        cv2.putText(images,
                    text,
                    (x, y - 10),
                    cv2.FONT_HERSHEY_SIMPLEX,
                    1.2, (0, 255, 255), 3)

# After all, we will show the output image
cv2.imshow("Image", images)
cv2.waitKey(0)
Salida:
ejecute el siguiente comando para ver la salida
python ocr.py --image ocr.png
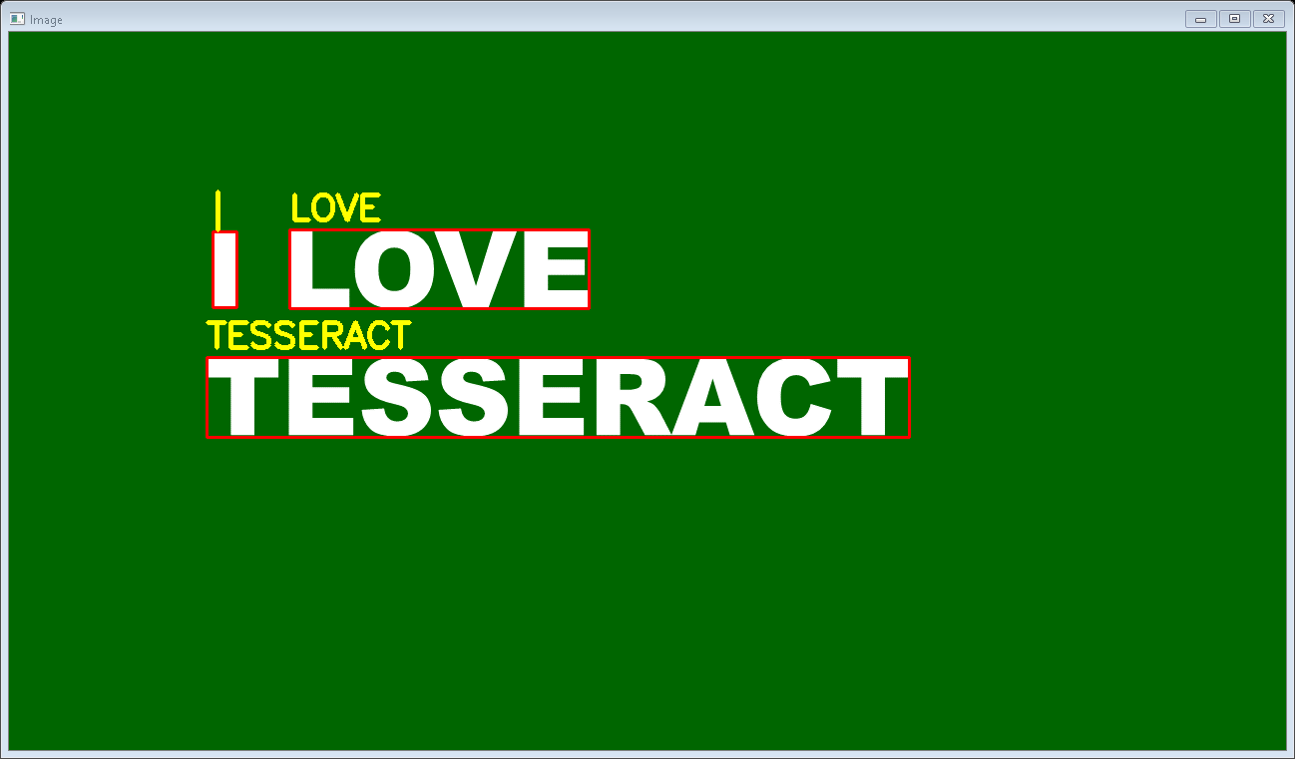
Además de la salida, veremos el nivel de confianza y el texto en el símbolo del sistema como se muestra a continuación:
Confidence: 93
Text: I

Confidence: 93
Text: LOVE

Confidence: 91
Text: TESSERACT
Publicación traducida automáticamente
Artículo escrito por vigneshsuresh4499 y traducido por Barcelona Geeks. The original can be accessed here. Licence: CCBY-SA