Kivy es una herramienta GUI independiente de la plataforma en Python. Como se puede ejecutar en Android, IOS, Linux y Windows, etc. Básicamente se usa para desarrollar la aplicación de Android, pero no significa que no se pueda usar en aplicaciones de escritorio.
Elipse:
Ellipse es una instrucción de lienzo de vértice. Permite dibujar un polígono regular o un arco a partir de ellos. En este artículo, veremos diferentes polígonos que tienen diferente número de lados y también muchos vértices en el círculo.
Al igual que en Kivy, podemos hacer polígonos a partir de una elipse. Tenga en cuenta que los ángulos en Kivy son diferentes a los de las matemáticas. En Kivy, el punto de 0 grados corresponde al punto de 90 grados en matemáticas.
Nota:
Estas son las fórmulas para x e y. Estas fórmulas matemáticas suponen que el centro es 0, 0. Por lo tanto, después de realizar los cálculos, tiene que haber una traducción por x de aey de b. El ancho es 2a y la altura es 2b.N segmentos = N vértices
1) ángulo[i]= i*360/n ; i=0 a n
2) x[i]=a cos(ángulo[i])
3) y[i]=b sin(ángulo[i])
4) En kivy 12’o reloj es 0 grados y aumenta en el sentido de las agujas del reloj pero en matemáticas, el reloj de las 3 en punto es un aumento de 0 grados en el sentido contrario a las agujas del reloj.
Programa para mostrar cómo podemos hacer diferentes polígonos en kivy por Ellipse.
Archivo principal.py:
Python3
# Code to create different polygons using Ellipse

# import kivy module
import kivy

# this restrict the kivy version i.e
# below this kivy version you cannot
# use the app or software
kivy.require("1.9.1")

# base Class of your App inherits from the App class.
# app:always refers to the instance of your application
from kivy.app import App

# The GridLayout arranges children in a matrix.
# It takes the available space and
# divides it into columns and rows,
# then adds widgets to the resulting “cells”.
from kivy.uix.gridlayout import GridLayout

# creating the Layout class
class Ellipsekv(GridLayout):
    pass

# creating the App class
class EllipseApp(App):
    def build(self):
        return Ellipsekv()

# run the App
if __name__=='__main__':
    EllipseApp().run()
Archivo Ellipse.kv
Python3
# Ellipse.kv file of the code

###################################################

# For the arcs, we have to give the start,
# and the end angle. We use default number of segments,
# 180, and 5, for the two ellipse arcs.
# The rest of the kv file, corresponds, to the other,
# 6 ellipse arcs, following the same pattern.

#:set angle_start_row2 240
#:set angle_end_row2 480
#:set angle_start_row3 120
#:set angle_end_row3 240

#################################################


<Ellipsekv>:

    # Setting column to 4
    cols:4

##################################################

# Row 1

    # Creating Canvas
    canvas:
        Color:
            rgb: 0, 0, 1
        Rectangle:
            pos: self.pos
            size: self.size

    # This will create the circle
    # as no segment is fixed in Ellipse
    # so by default it creates the circle
    RelativeLayout:
        canvas:
            Color:
                rgb: 1, .8, .5
            Ellipse:
                pos: 0, 0
                size: self.size

    # This will create pentagon as
    # segment = 5
    RelativeLayout:
        canvas:
            Ellipse:
                segments: 5
                pos: 0, 0
                size: self.size

    # This will create square shape as
    # segment = 4
    RelativeLayout:
        canvas:
            Ellipse:
                segments: 4
                pos: 0, 0
                size: self.size

    # This will create triangle as
    # segment = 3
    RelativeLayout:
        canvas:
            Ellipse:
                segments: 3
                pos: 0, 0
                size: self.size

#################################################

# Row 2

    RelativeLayout:
        canvas:
            # Assigning colour to all in row 2
            Color:
                rgb: 1, .59, .86

            # Creating the arc as assigned above
            Ellipse:
                angle_start: angle_start_row2
                angle_end: angle_end_row2
                pos: 0, 0
                size: self.size


    # Creating the arc as assigned above
    # segment 5
    RelativeLayout:
        canvas:
            Ellipse:
                angle_start: angle_start_row2
                angle_end: angle_end_row2
                segments: 5
                pos: 0, 0
                size: self.size

    # Creating the arc as assigned above
    # segment 4
    RelativeLayout:
        canvas:
            Ellipse:
                angle_start: angle_start_row2
                angle_end: angle_end_row2
                segments: 4
                pos: 0, 0
                size: self.size

    # Creating the arc as assigned above
    # segment 5
    RelativeLayout:
        canvas:
            Ellipse:
                angle_start: angle_start_row2
                angle_end: angle_end_row2
                segments: 3
                pos: 0, 0
                size: self.size

#################################################

# Row 3

    RelativeLayout:
        canvas:
            Color:
                rgb: .5, .5, .5
            Ellipse:
                angle_start: angle_start_row3
                angle_end: angle_end_row3
                pos: 0, 0
                size: self.size

    RelativeLayout:
        canvas:
            Ellipse:
                angle_start: angle_start_row3
                angle_end: angle_end_row3
                segments: 5
                pos: 0, 0
                size: self.size

    RelativeLayout:
        canvas:
            Ellipse:
                angle_start: angle_start_row3
                angle_end: angle_end_row3
                segments: 4
                pos: 0, 0
                size: self.size

    RelativeLayout:
        canvas:
            Ellipse:
                angle_start: angle_start_row3
                angle_end: angle_end_row3
                segments: 3
                pos: 0, 0
                size: self.size
Producción:
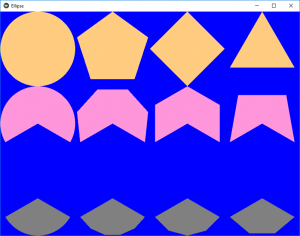
Este es el resultado. Tenemos 3 filas y 4 columnas. Las filas 2 y 3 son formas de arco, mientras que la fila 1 tiene los ángulos predeterminados, 0 y 360 para formar un círculo completo. Al cambiar el tamaño de la ventana manualmente, podemos obtener óvalos y formas basadas en ellos. Para el arco, el número de segmentos corresponde al número de líneas que aproximan la porción circular.
Publicación traducida automáticamente
Artículo escrito por YashKhandelwal8 y traducido por Barcelona Geeks. The original can be accessed here. Licence: CCBY-SA