Kivy es una herramienta GUI independiente de la plataforma en Python. Como se puede ejecutar en Android, IOS, Linux y Windows, etc. Básicamente se usa para desarrollar la aplicación de Android, pero eso no significa que no se pueda usar en aplicaciones de escritorio.
Disposición relativa:
- El diseño relativo es similar al FloatLayout, la diferencia es que su widget secundario se coloca en relación con el diseño.
- Este diseño funciona de la misma manera que FloatLayout, pero las propiedades de posicionamiento (x, y, center_x, right, y, center_y y top) son relativas al tamaño del diseño y no al tamaño de la ventana.
- En realidad, independientemente del posicionamiento absoluto y relativo, los widgets se mueven cuando cambia la posición del diseño.
- Cuando el widget con posición = (0, 0) se agrega a RelativeLayout, ahora, si se cambia la posición de RelativeLayout, el widget secundario también se moverá. Las coordenadas del widget secundario siguen siendo las mismas, es decir (0, 0), ya que siempre son relativas al diseño principal.
- Las teclas pos_hint disponibles (x, center_x, right, y, center_y y top) son útiles para alinear los bordes o centrar.
Por ejemplo:
pos_hint: {‘center_x’:.5, ‘center_y’:.5} alinearía un Widget en el medio, sin importar el tamaño de la ventana.
Lo primero que debemos hacer para usar un RelativeLayout es importarlo.
from kivy.uix.relativelayout import RelativeLayout
Nota:
este diseño le permite establecer coordenadas relativas para los niños. Si desea un posicionamiento absoluto, use FloatLayout. En RelativeLayout, se debe proporcionar el tamaño y la posición de cada widget secundario. Esto también hace la colocación dinámica.
We can do relative positioning by:
pos_hint: provide hint of position
We can define upto 8 keys i.e. it takes arguments in form of dictionary.
pos_hint = {“x”:1, “y”:1, “left”:1, “right”:1, "center_x":1, "center_y":1,
           “top”:1, “bottom”:1("top":0)}
Nota:
Floatlayout y RelativeLayout admiten posicionamiento absoluto y relativo dependiendo de si se usa pos_hint o pos. Pero si desea un posicionamiento absoluto, use FloatLayout.
Basic Approach to create Relative Layout:

1) import kivy
2) import kivyApp
3) import button
4) import Relativelayout
5) Set minimum version(optional)
6) create App class:
        - define build() function
7) return Layout/widget/Class(according to requirement)
8) Run an instance of the class
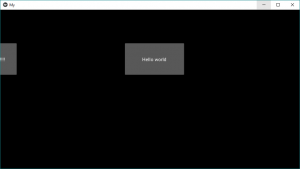
Implementación de enfoque usando pos :
Simplemente asigna la posición al botón. Como Relativelayout no depende del tamaño de la ventana, ahora se fija en esa posición si hace que el tamaño de la ventana sea pequeño, puede desaparecer en lugar de ajustarse.
Python3
# Sample Python application demonstrating the
# working of RelativeLayout in Kivy

# import modules
import kivy

# base Class of your App inherits from the App class.
# app:always refers to the instance of your application
from kivy.app import App

# creates the button in kivy
# if not imported shows the error
from kivy.uix.button import Button

# This layout allows you to set relative coordinates for children.
from kivy.uix.relativelayout import RelativeLayout

# To change the kivy default settings
# we use this module config
from kivy.config import Config

# 0 being off 1 being on as in true / false
# you can use 0 or 1 && True or False
Config.set('graphics', 'resizable', True)

# creating the App class
class MyApp(App):

    def build(self):

        # creating Relativelayout
        Rl = RelativeLayout()

        # creating button
        # a button 30 % of the width and 20 %
        # of the height of the layout and
        # positioned at (x, y), you can do
        # The position does not depend on window size
        # it just positioned at the given places:
        btn = Button(text ='Hello world',
                 size_hint =(.2, .2),
                 pos =(396.0, 298.0))
        btn1 = Button(text ='Hello world !!!!!!!!!',
                 size_hint =(.2, .2),
                 pos =(-137.33, 298.0))

        # adding widget i.e button
        Rl.add_widget(btn)
        Rl.add_widget(btn1)

        # return the layout
        return Rl

# run the App
if __name__ == "__main__":
    MyApp().run()
Producción:
Ahora, si desea que el botón se ajuste solo de acuerdo con la ventana , se usa pos_hint .
Enfoque de implementación usando pos_hint
Python3
# Sample Python application demonstrating the
# working of RelativeLayout in Kivy

# import modules
import kivy

# base Class of your App inherits from the App class.
# app:always refers to the instance of your application
from kivy.app import App

# creates the button in kivy
# if not imported shows the error
from kivy.uix.button import Button

# This layout allows you to set relative coordinates for children.
from kivy.uix.relativelayout import RelativeLayout

# To change the kivy default settings
# we use this module config
from kivy.config import Config

# 0 being off 1 being on as in true / false
# you can use 0 or 1 && True or False
Config.set('graphics', 'resizable', True)

# creating the App class
class Relative_Layout(App):

    def build(self):

        # creating Relativelayout
        rl = RelativeLayout()

        # creating button
        # size of button is 20 % by height and width of layout
        # position is bottom left i.e x = 0, y = 0
        b1 = Button(size_hint =(.2, .2),
                    pos_hint ={'x':0, 'y':0},
                    text ="B1")

        # position is bottom right i.e right = 1, y = 0
        b2 = Button(size_hint =(.2, .2),
                    pos_hint ={'right':1, 'y':0},
                    text ="B2")

        b3 = Button(size_hint =(.2, .2),
                    pos_hint ={'center_x':.5, 'center_y':.5},
                    text ="B3")

        b4 = Button(size_hint =(.2, .2),
                    pos_hint ={'x':0, 'top':1},
                    text ="B4")

        b5 = Button(size_hint =(.2, .2),
                    pos_hint ={'right':1, 'top':1},
                    text ="B5")


        # adding button to widget
        rl.add_widget(b1)
        rl.add_widget(b2)
        rl.add_widget(b3)
        rl.add_widget(b4)
        rl.add_widget(b5)


        # returning widget
        return rl
# run the App
if __name__  == "__main__":
    Relative_Layout().run()
Producción:

Publicación traducida automáticamente
Artículo escrito por YashKhandelwal8 y traducido por Barcelona Geeks. The original can be accessed here. Licence: CCBY-SA