Kivy es una herramienta GUI independiente de la plataforma en Python. Como se puede ejecutar en Android, IOS, Linux y Windows, etc. Básicamente se usa para desarrollar la aplicación de Android, pero eso no significa que no se pueda usar en aplicaciones de escritorio.
Widget emergente:
- El widget Popup se utiliza para crear ventanas emergentes. De forma predeterminada, la ventana emergente cubrirá toda la ventana «principal». Cuando está creando una ventana emergente, debe al menos configurar un Popup.title y Popup.content.
- Los cuadros de diálogo emergentes se utilizan cuando tenemos que transmitir ciertos mensajes obvios al usuario. Los mensajes para el usuario a través de las barras de estado, así como los mensajes específicos que deben decirse con énfasis, aún se pueden hacer a través de los cuadros de diálogo emergentes.
- Tenga en cuenta que el tamaño predeterminado de un widget es size_hint=(1, 1).
- Si no desea que su ventana emergente esté en pantalla completa, debe proporcionar sugerencias de tamaño con valores inferiores a 1 (por ejemplo, size_hint=(.8, .8)) o desactivar size_hint y usar atributos de tamaño fijo.
Para usar la ventana emergente, debe importar:
from kivy.uix.popup import Popup
Nota: Popup es un widget especial. No intente agregarlo como elemento secundario a ningún otro widget. Si lo hace, Popup se manejará como un widget normal y no se creará oculto en segundo plano.
Basic Approach :

1) import kivy
2) import kivyApp
3) import Label
4) import button
5) import Gridlayout
6) import popup
7) Set minimum version(optional)
8) create App class
9) return Layout/widget/Class(according to requirement)
10) In the App class create the popup
11) Run an instance of the class
Código #1:
En el primer código, la ventana emergente cubrirá toda la ventana «principal».
# Kivy example for the Popup widget

# Program to Show how to create a switch
# import kivy module
import kivy

# base Class of your App inherits from the App class.
# app:always refers to the instance of your application
from kivy.app import App

# this restrict the kivy version i.e
# below this kivy version you cannot
# use the app or software
kivy.require('1.9.0')

# The Button is a Label with associated actions
# that is triggered when the button
# is pressed (or released after a click/touch).
from kivy.uix.button import Button


# The GridLayout arranges children in a matrix.
# It takes the available space and
# divides it into columns and rows,
# then adds widgets to the resulting “cells”.
from kivy.uix.gridlayout import GridLayout

# Popup widget is used to create popups.
# By default, the popup will cover
# the whole “parent” window.
# When you are creating a popup,
# you must at least set a Popup.title and Popup.content.
from kivy.uix.popup import Popup

# The Label widget is for rendering text.
from kivy.uix.label import Label

# to change the kivy default settings we use this module config
from kivy.config import Config

# 0 being off 1 being on as in true / false
# you can use 0 or 1 && True or False
Config.set('graphics', 'resizable', True)

# Make an app by deriving from the kivy provided app class
class PopupExample(App):
    # override the build method and return the root widget of this App

    def build(self):
        # Define a grid layout for this App
        self.layout = GridLayout(cols = 1, padding = 10)


        # Add a button
        self.button = Button(text ="Click for pop-up")
        self.layout.add_widget(self.button)

        # Attach a callback for the button press event
        self.button.bind(on_press = self.onButtonPress)

        return self.layout

    # On button press - Create a popup dialog with a label and a close button
    def onButtonPress(self, button):

        layout = GridLayout(cols = 1, padding = 10)

        popupLabel = Label(text = "Click for pop-up")
        closeButton = Button(text = "Close the pop-up")

        layout.add_widget(popupLabel)
        layout.add_widget(closeButton)

        # Instantiate the modal popup and display
        popup = Popup(title ='Demo Popup',
                      content = layout)
        popup.open()

        # Attach close button press with popup.dismiss action
        closeButton.bind(on_press = popup.dismiss)

# Run the app
if __name__ == '__main__':
    PopupExample().run()
Producción:
Cuando haga clic en la ventana emergente de la pantalla se abrirá así: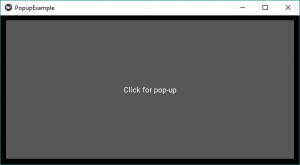
Al hacer clic en Cerrar, la ventana emergente se cerrará.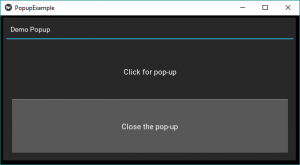
Código #2:
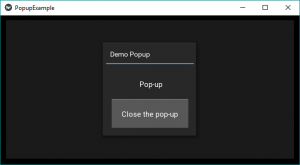
En el segundo código, cuando usamos size_hint y el tamaño, podemos dar el tamaño correspondiente. En esto, simplemente agregue algo como en el siguiente código en la línea número 75.
# Kivy example for the Popup widget

# Program to Show how to create a switch
# import kivy module
import kivy

# base Class of your App inherits from the App class.
# app:always refers to the instance of your application
from kivy.app import App

# this restrict the kivy version i.e
# below this kivy version you cannot
# use the app or software
kivy.require('1.9.0')

# The Button is a Label with associated actions
# that is triggered when the button
# is pressed (or released after a click/touch).
from kivy.uix.button import Button


# The GridLayout arranges children in a matrix.
# It takes the available space and
# divides it into columns and rows,
# then adds widgets to the resulting “cells”.
from kivy.uix.gridlayout import GridLayout

# Popup widget is used to create popups.
# By default, the popup will cover
# the whole “parent” window.
# When you are creating a popup,
# you must at least set a Popup.title and Popup.content.
from kivy.uix.popup import Popup

# The Label widget is for rendering text.
from kivy.uix.label import Label

# to change the kivy default settings we use this module config
from kivy.config import Config

# 0 being off 1 being on as in true / false
# you can use 0 or 1 && True or False
Config.set('graphics', 'resizable', True)

# Make an app by deriving from the kivy provided app class
class PopupExample(App):
    # override the build method and return the root widget of this App

    def build(self):
        # Define a grid layout for this App
        self.layout = GridLayout(cols = 1, padding = 10)


        # Add a button
        self.button = Button(text ="Click for pop-up")
        self.layout.add_widget(self.button)

        # Attach a callback for the button press event
        self.button.bind(on_press = self.onButtonPress)

        return self.layout

    # On button press - Create a popup dialog with a label and a close button
    def onButtonPress(self, button):

        layout = GridLayout(cols = 1, padding = 10)

        popupLabel = Label(text = "Click for pop-up")
        closeButton = Button(text = "Close the pop-up")

        layout.add_widget(popupLabel)
        layout.add_widget(closeButton)

        # Instantiate the modal popup and display
        popup = Popup(title ='Demo Popup',
                      content = layout,
                      size_hint =(None, None), size =(200, 200))
        popup.open()

        # Attach close button press with popup.dismiss action
        closeButton.bind(on_press = popup.dismiss)

# Run the app
if __name__ == '__main__':
    PopupExample().run()
Salida:
el tamaño de la ventana emergente será más pequeño que el tamaño de la ventana.
Referencia: https://kivy.org/doc/stable/api-kivy.uix.popup.html
Publicación traducida automáticamente
Artículo escrito por YashKhandelwal8 y traducido por Barcelona Geeks. The original can be accessed here. Licence: CCBY-SA