Requisitos previos: Introducción a tkinter | Transliteración de texto del inglés a los idiomas indios: el uso de la transliteración índica
Python ofrece múltiples opciones para desarrollar una GUI (interfaz gráfica de usuario). De todos los métodos GUI, tkinter es el método más utilizado. Es una interfaz estándar de Python para el kit de herramientas Tk GUI que se envía con Python. Python con tkinter produce la forma más rápida y sencilla de crear aplicaciones GUI. Ahora, depende de la imaginación o la necesidad de un desarrollador, lo que quiere desarrollar con este conjunto de herramientas.
Para crear un tkinter:
- Importando el módulo – tkinter
- Crear la ventana principal (contenedor)
- Agregue cualquier cantidad de widgets a la ventana principal.
- Aplique el evento Trigger en los widgets.
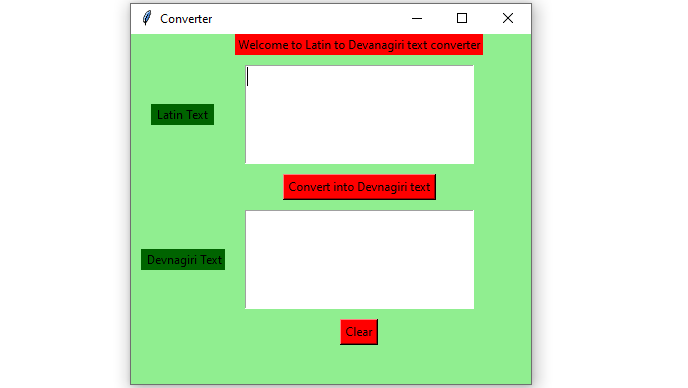
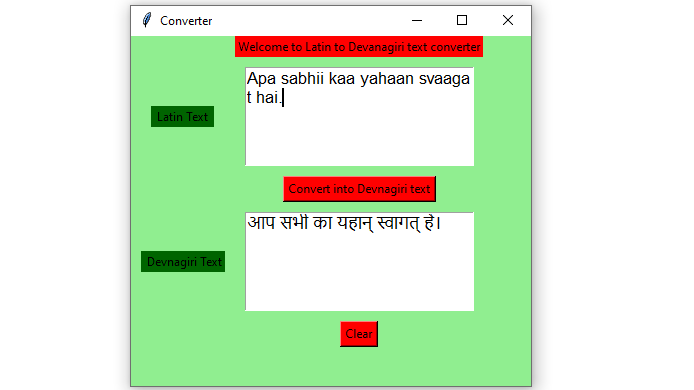
Vamos a crear una aplicación de conversión de texto de inglés (latín) a hindi (devanagari) basada en GUI que pueda convertir la entrada de texto proporcionada por el usuario en texto devanagari.
A continuación se muestra la implementación:
Python3
# import sanscript class from the indic_transliteration module
from indic_transliteration import sanscript

# import transliterate method from sanscript
# class of the indic_transliteration module
from indic_transliteration.sanscript import transliterate

# import all functions from the tkinter
from tkinter import *

# Function to clear both the text areas
def clearAll() :
    # whole content of text area  is deleted
    text1_field.delete(1.0, END)
    text2_field.delete(1.0, END)

# Function to convert into Devanagari text
def convert() :

    # get a whole input content from text box
    # ignoring \n from the text box content
    input_text = text1_field.get("1.0", "end")[:-1]

    # converted into the given devanagari
    # transliterated text
    output_text = transliterate(input_text, sanscript.ITRANS,
                                            sanscript.DEVANAGARI)

    text2_field.insert('end -1 chars', output_text)


# Driver code
if __name__ == "__main__" :

    # Create a GUI window
    root = Tk()

    # Set the background colour of GUI window
    root.configure(background = 'light green')

    # Set the configuration of GUI window (WidthxHeight)
    root.geometry("400x350")

    # set the name of tkinter GUI window
    root.title("Converter")

    # Create Welcome to Latin to Devanagiri text converter
    headlabel = Label(root, text = 'Welcome to Latin to Devanagiri text converter',
                      fg = 'black', bg = "red")

    # Create a " Latin Text " label
    label1 = Label(root, text = " Latin Text ",
                 fg = 'black', bg = 'dark green')

    # Create a " Devanagiri Text " label
    label2 = Label(root, text = " Devnagiri Text",
                   fg = 'black', bg = 'dark green')


    # grid method is used for placing
    # the widgets at respective positions
    # in table like structure .
    headlabel.grid(row = 0, column = 1)

    # padx keyword argument used to set padding along x-axis .
    # pady keyword argument used to set padding along y-axis .
    label1.grid(row = 1, column = 0, padx = 10, pady = 10)
    label2.grid(row = 3, column = 0, padx = 10, pady = 10)


    # Create a text area box
    # for filling or typing the information.
    text1_field = Text(root, height = 5, width = 25, font = "lucida 13")
    text2_field = Text(root, height = 5, width = 25, font = "lucida 13")

    # padx keyword argument used to set padding along x-axis .
    # pady keyword argument used to set padding along y-axis .
    text1_field.grid(row = 1, column = 1, padx = 10, pady = 10)
    text2_field.grid(row = 3, column = 1, padx = 10, pady = 10)


    # Create a Convert Button and attached
    # with convert function
    button1 = Button(root, text = "Convert into Devnagiri text",
                     bg = "red", fg = "black", command = convert)

    button1.grid(row = 2, column = 1)

    # Create a Clear Button and attached
    # with clearAll function
    button2 = Button(root, text = "Clear", bg = "red",
                     fg = "black", command = clearAll)

    button2.grid(row = 4, column = 1)

    # Start the GUI
    root.mainloop()
Producción :