En este artículo veremos cómo podemos obtener una función etiquetada a partir de una función binaria en mahotas. Las imágenes etiquetadas son imágenes enteras donde los valores corresponden a diferentes regiones. Es decir, la región 1 son todos los píxeles que tienen valor 1, la región dos son los píxeles con valor 2, y así sucesivamente. Por convención, la región 0 es el fondo y, a menudo, se maneja de manera diferente.
Para hacer esto usaremos el método mahotas.label
Sintaxis: mahotas.label (regiones)
Argumento: toma el objeto numpy.ndarray como argumento
Retorno: devuelve el objeto numpy.ndarray y el valor entero
Ejemplo 1:
Python3
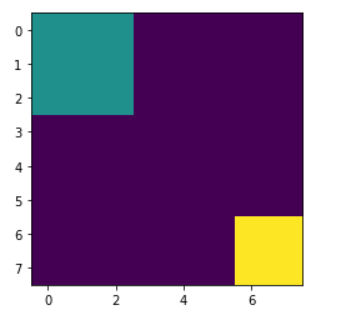
# importing required libraries
import mahotas as mh
import numpy as np
from pylab import imshow, show

# creating region
# numpy.ndarray
regions = np.zeros((8, 8), bool)

# setting 1 value to the region
regions[:3, :3] = 1
regions[6:, 6:] = 1

# getting labelled function
labelled, nr_objects = mh.label(regions)

# showing the image with interpolation = 'nearest'
imshow(labelled, interpolation ='nearest')
show()
Producción :
Ejemplo 2:
Python3
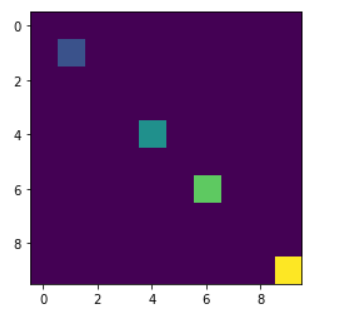
# importing required libraries
import mahotas as mh
import numpy as np
from pylab import imshow, show

# creating region
# numpy.ndarray
regions = np.zeros((10, 10), bool)

# setting 1 value in the region
regions[1, 1] = 1
regions[6, 6] = 1
regions[4, 4] = 1
regions[9, 9] = 1

# getting labelled function
labelled, nr_objects = mh.label(regions)

# showing the image with interpolation = 'nearest'
imshow(labelled, interpolation ='nearest')
show()
Producción :
Publicación traducida automáticamente
Artículo escrito por rakshitarora y traducido por Barcelona Geeks. The original can be accessed here. Licence: CCBY-SA