Kivy es una herramienta GUI independiente de la plataforma en Python. Como se puede ejecutar en Android, IOS, Linux y Windows, etc. Básicamente se usa para desarrollar la aplicación de Android, pero eso no significa que no se pueda usar en aplicaciones de escritorio.
????????? Tutorial de Kivy: aprenda Kivy con ejemplos .
Diseño de pila:
Para usar StackLayout, primero importe StackLayout con el siguiente comando:
from kivy.uix.stacklayout import StackLayout
El StackLayout organiza a los niños vertical u horizontalmente, tantos como el diseño pueda caber. El tamaño de los widgets secundarios individuales no tiene que ser uniforme. Hay 4 orientaciones de fila y 4 de columna.
StackLayout Orientation (2D):
 - right to left or left to right
 - top to bottom or bottom to top
 - 'rl-bt', 'rl-tb', lr-bt', 'lr-tb'(Row wise)
 - 'bt-rl', 'bt-lr', 'tb-rl', 'tb-lr'(Column wise)
Basic Approach to create Stack layout :

1) import kivy
2) import kivyApp
3) import Button
4) import Stacklayout
5) Set minimum version(optional)
6) Create the StackLayout class
7) Create the App class
8) Set up .kv file (name same as App class)
9) return StackLayout Class
10) Run an instance of the class
A continuación se muestra la implementación de las orientaciones por fila y la orientación por columna:
archivo main.py –
Python3
# code to show how to use StackLayout using .kv file

# base Class of your App inherits from the App class.
# app:always refers to the instance of your application
from kivy.app import App

# creates the button in kivy
# if not imported shows the error
from kivy.uix.button import Button

# The StackLayout arranges children vertically
# or horizontally, as many as the layout can fit.
from kivy.uix.stacklayout import StackLayout

# creating the root widget used in .kv file
class StackLayout(StackLayout):
    pass

# class in which name .kv file must be named Slider.kv.
# or creating the App class
class StackApp(App):
    def build(self):
        # returning the instance of StackLayout class
        return StackLayout()

# run the app
if __name__=='__main__':
    StackApp().run()
El nombre del archivo .kv debe ser el mismo que el de la clase de aplicación, es decir
, el archivo Stack.kv .kv –
Python3
<StackLayout>:

  # Different orientation
  # ['lr-tb', 'tb-lr', 'rl-tb', 'tb-rl', 'lr-bt', 'bt-lr', 'rl-bt', 'bt-rl']
  orientation: 'lr-tb'

  # Creating Multiple Buttons
  Button:
    text: 'B1'
    size_hint: [.2, .1]

  Button:
    text: 'B2'
    size_hint: [.2, .1]

  Button:
    text: 'B3'
    size_hint: [.2, .1]

  Button:
    text: 'B4'
    size_hint: [.2, .1]

  Button:
    text: 'B5'
    size_hint: [.2, .1]

  Button:
    text: 'B6'
    size_hint: [.2, .1]

  Button:
    text: 'B7'
    size_hint: [.2, .1]

  Button:
    text: 'B8'
    size_hint: [.2, .1]

  Button:
    text: 'B9'
    size_hint: [.2, .1]

  Button:
    text: 'B10'
    size_hint: [.2, .1]
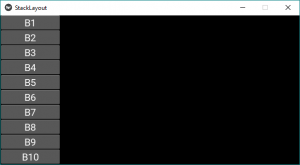
Producción:
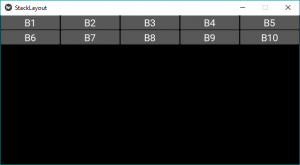
Esto es para la orientación ‘lr-tb’. Primero, los widgets se agregan de izquierda a derecha y luego de arriba a abajo.
Nota: si desea cambiar la orientación, simplemente cambie la orientación en la línea 04 del archivo .kv con cualquiera de las siguientes orientaciones:
For row wise orientation use:
  -'lr-tb'
  -'lr-bt'
  -'rl-tb'
  -'rl-bt'

For column wise orientation use:
  -'tb-lr'
  -'tb-rl'
  -'bt-lr'
  -'bt-rl'
A continuación, se muestran todas las orientaciones de la imagen de arriba:
para usar la orientación por filas:
'lr-tb'
Producción:
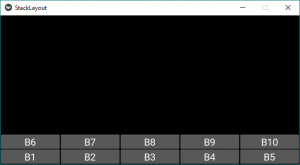
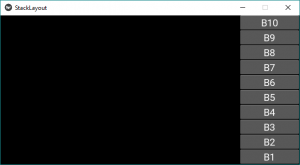
'lr-bt'
Producción:
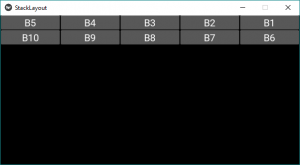
'rl-tb'
Producción:
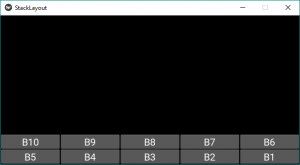
'rl-bt'
Producción:
Para la orientación de la columna, use:
'tb-lr'
Producción:
'tb-rl'
Producción:

'bt-lr'
Producción:

'bt-rl'
Producción:
Publicación traducida automáticamente
Artículo escrito por YashKhandelwal8 y traducido por Barcelona Geeks. The original can be accessed here. Licence: CCBY-SA