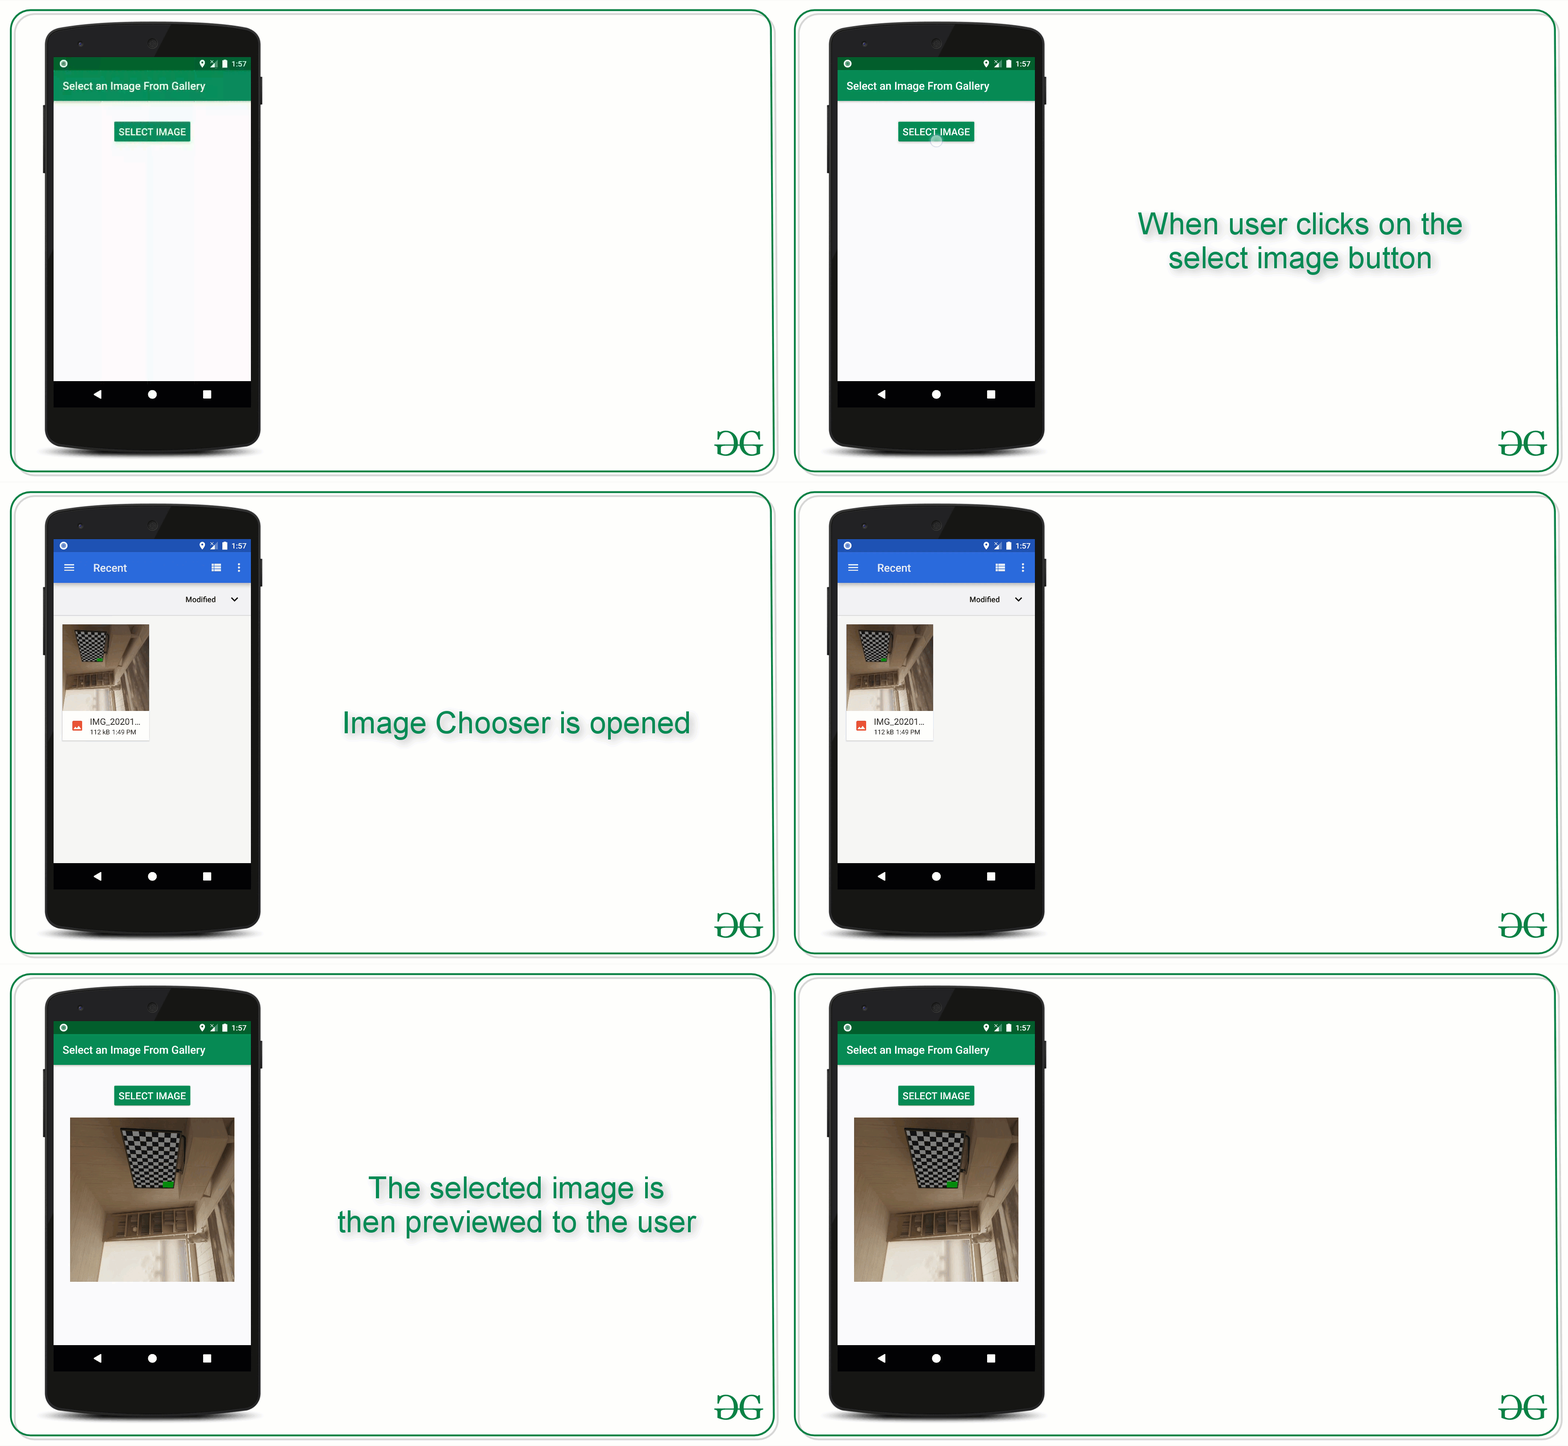
Se requiere seleccionar una imagen de una galería en Android cuando el usuario tiene que cargar o configurar su imagen como una imagen de perfil o el usuario quiere enviar una foto al otro. Entonces, en este artículo, se ha discutido paso a paso cómo seleccionar una imagen de la galería y obtener una vista previa de la imagen seleccionada. Eche un vistazo a la siguiente imagen de lo que se ha discutido más adelante en este artículo.

Pasos para implementar la selección de imágenes desde la galería
Paso 1: crear un proyecto de actividad vacío
- Cree una actividad vacía Proyecto de Android Studio. Y seleccione Java como lenguaje de programación.
- Consulte Android | ¿Cómo crear/comenzar un nuevo proyecto en Android Studio? para saber cómo crear una actividad vacía Android Studio Project.
Paso 2: Trabajando con activity_main.xml
- El diseño principal de la aplicación incluye un botón para abrir el selector de imágenes y una vista de imagen para obtener una vista previa de la imagen seleccionada de la galería.
- Para implementar el diseño de la aplicación, invoque el siguiente código dentro del archivo activity_main.xml .
XML
<?xml version="1.0" encoding="utf-8"?>
<RelativeLayout
    xmlns:android="http://schemas.android.com/apk/res/android"
    xmlns:tools="http://schemas.android.com/tools"
    android:layout_width="match_parent"
    android:layout_height="match_parent"
    tools:context=".MainActivity"
    tools:ignore="HardcodedText">

    <!--Button to open the image selector-->
    <Button
        android:id="@+id/BSelectImage"
        android:layout_width="wrap_content"
        android:layout_height="wrap_content"
        android:layout_centerHorizontal="true"
        android:layout_marginTop="32dp"
        android:backgroundTint="@color/colorPrimary"
        android:text="SELECT IMAGE"
        android:textColor="@android:color/white"
        android:textSize="18sp" />

    <!--ImageView to preview the selected image-->
    <ImageView
        android:id="@+id/IVPreviewImage"
        android:layout_width="match_parent"
        android:layout_height="300dp"
        android:layout_below="@id/BSelectImage"
        android:layout_marginStart="16dp"
        android:layout_marginTop="16dp"
        android:layout_marginEnd="16dp" />

</RelativeLayout>
Interfaz de usuario de salida:

Paso 3: trabajar con el archivo MainActivity.java
- En este caso, imageChooser se activa con la intención del tipo «imagen» y la acción como ACTION_GET_CONTENT.
- Invoque el siguiente código para implementar lo mismo. Se agregan comentarios para una mejor comprensión.
Ejemplo
Java
import androidx.appcompat.app.AppCompatActivity;
import android.content.Intent;
import android.net.Uri;
import android.os.Bundle;
import android.view.View;
import android.widget.Button;
import android.widget.ImageView;

public class MainActivity extends AppCompatActivity {

    // One Button
    Button BSelectImage;

    // One Preview Image
    ImageView IVPreviewImage;

    // constant to compare
      // the activity result code
    int SELECT_PICTURE = 200;

    @Override
    protected void onCreate(Bundle savedInstanceState) {
        super.onCreate(savedInstanceState);
        setContentView(R.layout.activity_main);

        // register the UI widgets with their appropriate IDs
        BSelectImage = findViewById(R.id.BSelectImage);
        IVPreviewImage = findViewById(R.id.IVPreviewImage);

        // handle the Choose Image button to trigger
          // the image chooser function
        BSelectImage.setOnClickListener(new View.OnClickListener() {
            @Override
            public void onClick(View v) {
                imageChooser();
            }
        });
    }

    // this function is triggered when
      // the Select Image Button is clicked
    void imageChooser() {

        // create an instance of the
          // intent of the type image
        Intent i = new Intent();
        i.setType("image/*");
        i.setAction(Intent.ACTION_GET_CONTENT);

        // pass the constant to compare it
          // with the returned requestCode
        startActivityForResult(Intent.createChooser(i, "Select Picture"), SELECT_PICTURE);
    }

    // this function is triggered when user
      // selects the image from the imageChooser
    public void onActivityResult(int requestCode, int resultCode, Intent data) {
        super.onActivityResult(requestCode, resultCode, data);

        if (resultCode == RESULT_OK) {

            // compare the resultCode with the
              // SELECT_PICTURE constant
            if (requestCode == SELECT_PICTURE) {
                // Get the url of the image from data
                Uri selectedImageUri = data.getData();
                if (null != selectedImageUri) {
                    // update the preview image in the layout
                    IVPreviewImage.setImageURI(selectedImageUri);
                }
            }
        }
    }
}
Salida: ejecutar en el emulador
Código alternativo: en caso de que startActivityForResult esté en desuso
Java
private void imageChooser()
{
    Intent i = new Intent();
    i.setType("image/*");
    i.setAction(Intent.ACTION_GET_CONTENT);

    launchSomeActivity.launch(i);
}

ActivityResultLauncher<Intent> launchSomeActivity
    = registerForActivityResult(
        new ActivityResultContracts
            .StartActivityForResult(),
        result -> {
            if (result.getResultCode()
                == Activity.RESULT_OK) {
                Intent data = result.getData();
                // do your operation from here....
                if (data != null
                    && data.getData() != null) {
                    Uri selectedImageUri = data.getData();
                    Bitmap selectedImageBitmap;
                    try {
                        selectedImageBitmap
                            = MediaStore.Images.Media.getBitmap(
                                this.getContentResolver(),
                                selectedImageUri);
                    }
                    catch (IOException e) {
                        e.printStackTrace();
                    }
                    imageView.setImageBitmap(
                        selectedImageBitmap);
                }
            }
        });
Publicación traducida automáticamente
Artículo escrito por adityamshidlyali y traducido por Barcelona Geeks. The original can be accessed here. Licence: CCBY-SA