Kivy es una herramienta GUI independiente de la plataforma en Python. Como se puede ejecutar en Android, IOS, Linux y Windows, etc. Básicamente se usa para desarrollar la aplicación de Android, pero eso no significa que no se pueda usar en aplicaciones de escritorio.
En este artículo, vamos a discutir cómo podemos usar diseños en diseños básicamente múltiples Diseños, el ejemplo más básico.
La mayoría de las veces podemos usar un diseño pero tenemos dificultades para usar varios diseños.
En kivy hay muchos tipos de diseños:
- AnchorLayout: los widgets se pueden anclar en la parte superior, inferior, izquierda, derecha o central.
- BoxLayout: los widgets se organizan secuencialmente, ya sea en una orientación ‘vertical’ u ‘horizontal’.
- FloatLayout: los widgets esencialmente no tienen restricciones.
- RelativeLayout: los widgets secundarios se colocan en relación con el diseño.
- GridLayout: los widgets se organizan en una cuadrícula definida por las propiedades de filas y columnas.
- PageLayout : se utiliza para crear diseños simples de varias páginas, de una manera que permite pasar fácilmente de una página a otra usando bordes.
- ScatterLayout: los widgets se colocan de manera similar a RelativeLayout, pero se pueden traducir, rotar y escalar.
- StackLayout: los widgets se apilan en orden lr-tb (de izquierda a derecha y luego de arriba a abajo) o tb-lr.
Nota: Puede usar tantos como pueda en un solo archivo.
Enfoque básico para crear múltiples diseños en un archivo:
1) import kivy
2) import kivyApp
3) import BoxLayout
4) import
4) set minimum version(optional)
5) Extend the container class
6) set up .kv file :
7) create App class
8) return container class or layout
9) Run an instance of the class
Implementación del Enfoque –
archivo main.py
Nota:
si estaba utilizando el archivo .kv para crear varios diseños, no es necesario importar Gridlayout, Boxlayout, AnchorLayout, FloatLayout, StackLayout, PageLayout, Button, etc. Como el archivo .kv admite todo esto, ya que ya lo ha importado. Pero si hace esto sin el archivo .kv, debe importarlos.
Python3
## Sample Python application demonstrating the
## Program of How to use Multiple Layouts in Single file

########################################################################

# import kivy module
import kivy

# base Class of your App inherits from the App class.
# app:always refers to the instance of your application
from kivy.app import App

# this restrict the kivy version i.e
# below this kivy version you cannot
# use the app or software
kivy.require('1.9.0')

# creates the button in kivy
# if not imported shows the error
from kivy.uix.button import Button

# BoxLayout arranges children in a vertical or horizontal box.
# or help to put the childrens at the desired location.
from kivy.uix.boxlayout import BoxLayout

# The GridLayout arranges children in a matrix.
# It takes the available space and
# divides it into columns and rows,
# then adds widgets to the resulting “cells”.
from kivy.uix.gridlayout import GridLayout

# The PageLayout class is used to create
# a simple multi-page layout,
# in a way that allows easy flipping from
# one page to another using borders.
from kivy.uix.pagelayout import PageLayout


########################################################################

# creating the root widget used in .kv file
class MultipleLayout(PageLayout):
    pass

########################################################################

# creating the App class in which name
#.kv file is to be named PageLayout.kv
class Multiple_LayoutApp(App):
    # defining build()
    def build(self):
        # returning the instance of root class
        return MultipleLayout()

########################################################################

# creating object of Multiple_LayoutApp() class
MlApp = Multiple_LayoutApp()

# run the class
MlApp.run()
En este archivo, estamos creando/usando todo el diseño, ya que es más fácil de construir/usar todo esto en el archivo
.kv . Archivo .kv del código.
Python3
# Program of How to use Multiple Layouts in Single .kv file
########################################################################
# creating page Layout
<PageLayout>:
#########################################################################
# Creating Page 1
# Using BoxLayout inside PageLayout
BoxLayout:
# creating Canvas
canvas:
Color:
rgba: 216 / 255., 195 / 255., 88 / 255., 1
Rectangle:
pos: self.pos
size: self.size
# Providing orientation to the BoxLayout
orientation: 'vertical'
# Adding Label to Page 1
Label:
size_hint_y: None
height: 1.5 * self.texture_size[1]
text: 'page 1'
# Creating Button
Button:
text: 'GFG :)'
# Adding On_press function
# i.e binding function to press / touch
on_press: print("This Is The First Page")
#########################################################################
# Creating Page 2
BoxLayout:
orientation: 'vertical'
canvas:
Color:
rgba: 109 / 255., 8 / 255., 57 / 255., 1
Rectangle:
pos: self.pos
size: self.size
Label:
text: 'page 2'
# This Image is directly from the websource
# By using AsyncImage you can use that
AsyncImage:
source: 'http://kivy.org / logos / kivy-logo-black-64.png'
##########################################################################
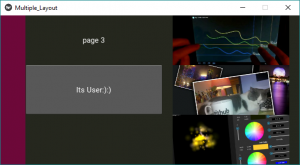
# Creating Page 3
# Using The Second Layout
# Creating GridLayout
GridLayout:
canvas:
Color:
rgba: 37 / 255., 39 / 255., 30 / 255., 1
Rectangle:
pos: self.pos
size: self.size
# Adding grids to Page 3
# It may be row or column
cols: 2
# In first Grid
# Adding Label + Image
Label:
text: 'page 3'
AsyncImage:
source: 'http://kivy.org/slides/kivyandroid-thumb.jpg'
# In Second Grid
# Adding Button + Image
Button:
text: 'Its User:):)'
on_press: print("Heloo User This is the Last Page")
AsyncImage:
source: 'http://kivy.org/slides/kivypictures-thumb.jpg'
# In third grid
# Adding Widget + Image
Widget
AsyncImage:
source: 'http://kivy.org/slides/particlepanda-thumb.jpg'
Salida:
Imagen 1:
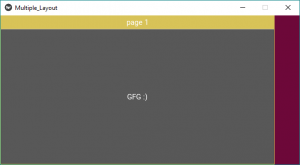
Imagen 2:
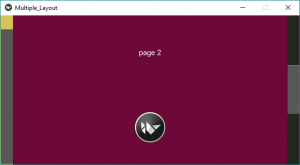
Imagen 3:
Salida de vídeo:
Referencia: https://kivy.org/doc/stable/gettingstarted/layouts.html
Publicación traducida automáticamente
Artículo escrito por YashKhandelwal8 y traducido por Barcelona Geeks. The original can be accessed here. Licence: CCBY-SA