Kivy es una herramienta GUI independiente de la plataforma en Python. Como se puede ejecutar en Android, IOS, Linux y Windows, etc. Básicamente se usa para desarrollar la aplicación de Android, pero no significa que no se pueda usar en aplicaciones de escritorio.
????????? Tutorial de Kivy: aprenda Kivy con ejemplos .
Ahora, en este artículo, aprenderemos sobre el uso del widget BoxLayout en kivy y cómo agregarle algunas características como color, tamaño, etc.
BoxLayout:
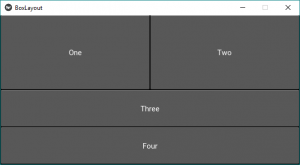
BoxLayout organiza los widgets de forma vertical, uno encima de otro, o de forma horizontal, uno tras otro. Cuando no proporcione ninguna sugerencia de tamaño, los widgets secundarios dividen el tamaño de su widget principal en partes iguales o en consecuencia.
Enfoque básico a seguir al crear el botón:
1) importar kivy
2) importar kivyApp
3) importar BoxLayout
4) establecer la versión mínima (opcional)
5) Agregar widgets
6) Extender la clase
7) Devolver el diseño
8) Ejecutar una instancia de la clase
A continuación se muestra el código para usar BoxLayout:
Python3
# code to show how to use nested boxlayouts.

# import kivy module
import kivy

# this restricts the kivy version i.e
# below this kivy version you cannot
# use the app or software
kivy.require("1.9.1")

# base Class of your App inherits from the App class.
# app:always refers to the instance of your application
from kivy.app import App

# creates the button in kivy
# if not imported shows the error
from kivy.uix.button import Button

# BoxLayout arranges children in a vertical or horizontal box.
# or help to put the children at the desired location.
from kivy.uix.boxlayout import BoxLayout

# class in which we are creating the button by using boxlayout
# defining the App class
class BoxLayoutApp(App):

    def build(self):

        # To position oriented widgets again in the proper orientation
        # use of vertical orientation to set all widgets
        superBox = BoxLayout(orientation ='vertical')

        # To position widgets next to each other,
        # use a horizontal BoxLayout.
        HB = BoxLayout(orientation ='horizontal')

        btn1 = Button(text ="One")
        btn2 = Button(text ="Two")

        # HB represents the horizontal boxlayout orientation
        # declared above
        HB.add_widget(btn1)
        HB.add_widget(btn2)

        # To position widgets above/below each other,
        # use a vertical BoxLayout.
        VB = BoxLayout(orientation ='vertical')

        btn3 = Button(text ="Three")
        btn4 = Button(text ="Four")

        # VB represents the vertical boxlayout orientation
        # declared above
        VB.add_widget(btn3)
        VB.add_widget(btn4)

        # superbox used to again align the oriented widgets
        superBox.add_widget(HB)
        superBox.add_widget(VB)

        return superBox

# creating the object root for BoxLayoutApp() class
root = BoxLayoutApp()

# run function runs the whole program
# i.e run() method which calls the
# target function passed to the constructor.
root.run()
Producción:
Algunas modificaciones como agregar color, corregir el tamaño en el widget de diseño de cuadro:
Python3
# code to show how to use nested boxlayouts.

# import kivy module
import kivy

# to choose the colors randomly
# every time you run it shows different color
import random

# this restricts the kivy version i.e
# below this kivy version you cannot
# use the app or software
kivy.require("1.9.1")

# base Class of your App inherits from the App class.
# app:always refers to the instance of your application
from kivy.app import App

# creates the button in kivy
# if not imported shows the error
from kivy.uix.button import Button

# BoxLayout arranges children in a vertical or horizontal box.
# or help to put the children at the desired location.
from kivy.uix.boxlayout import BoxLayout

# declaring the colours you can use directly also
red = [1, 0, 0, 1]
green = [0, 1, 0, 1]
blue =  [0, 0, 1, 1]
purple = [1, 0, 1, 1]

# class in which we are creating the button
class BoxLayoutApp(App):

    def build(self):

        # To position oriented widgets again in the proper orientation
        # use of vertical orientation to set all widgets
        superBox = BoxLayout(orientation ='vertical')

        # To position widgets next to each other,
        # use a horizontal BoxLayout.
        HB = BoxLayout(orientation ='horizontal')

        colors = [red, green, blue, purple]

        # styling the button boxlayout
        btn1 = Button(text ="One",
                      background_color = random.choice(colors),
                      font_size = 32,
                      size_hint =(0.7, 1))
        btn2 = Button(text ="Two",
                      background_color = random.choice(colors),
                      font_size = 32,
                      size_hint =(0.7, 1))

        # HB represents the horizontal boxlayout orientation
        # declared above
        HB.add_widget(btn1)
        HB.add_widget(btn2)

        # To position widgets above/below each other,
        # use a vertical BoxLayout.
        VB = BoxLayout(orientation ='vertical')

        btn3 = Button(text ="Three",
                      background_color = random.choice(colors),
                      font_size = 32,
                      size_hint =(1, 10))
        btn4 = Button(text ="Four",
                      background_color = random.choice(colors),
                      font_size = 32,
                      size_hint =(1, 15))

        # VB represents the vertical boxlayout orientation
        # declared above
        VB.add_widget(btn3)
        VB.add_widget(btn4)

        # superbox used to again align the oriented widgets
        superBox.add_widget(HB)
        superBox.add_widget(VB)

        return superBox

# creating the object root for BoxLayoutApp() class
root = BoxLayoutApp()

# run function runs the whole program
# i.e run() method which calls the
# target function passed to the constructor.
root.run()
Salida:
Imagen 1:
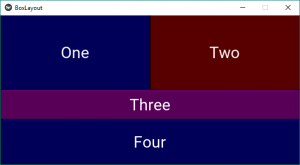
Imagen 2:
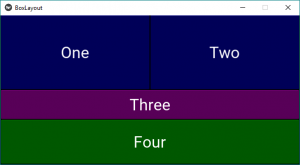
Nota: Cada vez que ejecuta el código, le proporciona las diferentes salidas de color como en las imágenes.
Publicación traducida automáticamente
Artículo escrito por YashKhandelwal8 y traducido por Barcelona Geeks. The original can be accessed here. Licence: CCBY-SA