Kivy es una herramienta GUI independiente de la plataforma en Python. Como se puede ejecutar en Android, IOS, Linux y Windows, etc. Básicamente se usa para desarrollar la aplicación de Android, pero eso no significa que no se pueda usar en aplicaciones de escritorio.
AnchorLayout:
AnchorLayout alinea sus elementos secundarios con un borde (superior, inferior, izquierda, derecha) o centro. La clase dada a continuación se utiliza para implementar el diseño de anclaje.
kivy.uix.anchorlayout.AnchorLayout
AnchorLayout se puede inicializar con parámetros:
anchor_x
Parameters can be passed: “left”, “right” and “center”.

anchor_y
Parameters can be passed:“top”,  “bottom” and “center”.
para seleccionar el lugar donde se colocan los widgets en el contenedor principal.
Hay 9 regiones de diseño diferentes donde se puede colocar Anchorlayout para lograr un efecto:
Arriba a la izquierda, arriba al centro, arriba a la derecha, centro a la izquierda, centro al centro, centro a la derecha, abajo a la izquierda, abajo al centro y abajo a la derecha.
Basic Approach:

1) import kivy
2) import kivyApp
3) import gridlayout(not necessary according to requirement)
4) import Anchorlayout
5) Set minimum version(optional)
6) create Layout class
7) create App class
8) Set up .kv file
9) Return the instance of layout class
10) Run an instance of the Appclass
En el siguiente código de ejemplo, hemos utilizado a GridLayoutcomo nuestra clase de widget raíz. El GridLayout será el padre de 9 AnchorLayouts. Los 9 AnchorLayouts se anclarán en las 9 posiciones de anclaje diferentes, es decir, estamos usando las 9 posiciones de Anchorlayout en un solo programa con la ayuda de 9 Botones .
Implementación del Enfoque:
archivo principal.py –
# Sample Python application demonstrating the
# working of AnchorLayout in Kivy using .kv file

###################################################

# base Class of your App inherits from the App class.
# app:always refers to the instance of your application
from kivy.app import App

# GridLayout arranges children in a matrix.
# It takes the available space and
# divides it into columns and rows,
# then adds widgets to the resulting “cells”.
from kivy.uix.gridlayout import GridLayout

# to change the kivy default settings
# we use this module config
from kivy.config import Config

# 0 being off 1 being on as in true / false
# you can use 0 or 1 && True or False
Config.set('graphics', 'resizable', True)


# creating the root widget used in .kv file
class Anchor_Layout(GridLayout):
    pass

# class in which name .kv file must be named Anchor_Layout.kv
class Anchor_LayoutApp(App):
    def build(self):
        # returning the instance of root class
        return Anchor_Layout()

# run the app
if __name__=='__main__':
    Anchor_LayoutApp().run()
archivo .kv –
# Implementation of .kv file of Anchor layout

################################################


# creating the features of Button
<MyButton@Button>:
    size_hint: [None, None]
    size: [100, 100]

# creating the root of .kv
<Anchor_Layout>:

    # Assigning grids
    rows: 3

    # Anchor Layout 1
    AnchorLayout:

        # position of Anchor Layout
        anchor_x: 'left'
        anchor_y: 'top'

        # creating Canvas
        canvas:
            Color:
                rgb: [.5, .324, .384]
            Rectangle:
                pos: self.pos
                size: self.size

        # creating Button
        MyButton:
            text: 'B1'

    # Anchor Layout 2
    AnchorLayout:
        anchor_x: 'center'
        anchor_y: 'top'
        canvas:
            Color:
                rgb: [.5, .692, .498]
            Rectangle:
                pos: self.pos
                size: self.size
        MyButton:
            text: 'B2'

    # Anchor Layout 3
    AnchorLayout:
        anchor_x: 'right'
        anchor_y: 'top'
        canvas:
            Color:
                rgb: [.5, .692, 1]
            Rectangle:
                pos: self.pos
                size: self.size
        MyButton:
            text: 'B3'

    # Anchor Layout 4
    AnchorLayout:
        anchor_x: 'left'
        anchor_y: 'center'
        canvas:
            Color:
                rgb: [.789, .5, .699]
            Rectangle:
                pos: self.pos
                size: self.size
        MyButton:
            text: 'B4'

    # Anchor Layout 5
    AnchorLayout:
        anchor_x: 'center'
        anchor_y: 'center'
        canvas:
            Color:
                rgb: [.333, .5, .673]
            Rectangle:
                pos: self.pos
                size: self.size
        MyButton:
            text: 'B5'

    # Anchor Layout 6
    AnchorLayout:
        anchor_x: 'right'
        anchor_y: 'center'
        canvas:
            Color:
                rgb: [.180, .5, .310]
            Rectangle:
                pos: self.pos
                size: self.size
        MyButton:
            text: 'B6'

    # Anchor Layout 7
    AnchorLayout:
        anchor_x: 'left'
        anchor_y: 'bottom'
        canvas:
            Color:
                rgb: [.180, .398, .5]
            Rectangle:
                pos: self.pos
                size: self.size
        MyButton:
            text: 'B7'

    # Anchor Layout 8
    AnchorLayout:
        anchor_x: 'center'
        anchor_y: 'bottom'
        canvas:
            Color:
                rgb: [.438, .329, .5]
            Rectangle:
                pos: self.pos
                size: self.size
        MyButton:
            text: 'B8'

    # Anchor Layout 9
    AnchorLayout:
        anchor_x: 'right'
        anchor_y: 'bottom'
        canvas:
            Color:
                rgb: [.611, .021, .5]
            Rectangle:
                pos: self.pos
                size: self.size
        MyButton:
            text: 'B9'
Producción: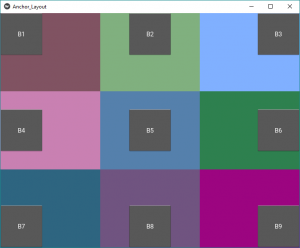
Publicación traducida automáticamente
Artículo escrito por YashKhandelwal8 y traducido por Barcelona Geeks. The original can be accessed here. Licence: CCBY-SA