FlowLayout se utiliza para organizar los componentes en una secuencia, uno tras otro. El diseño predeterminado del applet y el panel es FlowLayout.
Constructores :
- FlowLayout() : Construirá un nuevo FlowLayout con alineación centrada. El espacio horizontal y vertical será de 5 píxeles.
- FlowLayout (int align) : construirá un nuevo FlowLayout con la alineación dada. El espacio horizontal y vertical será de 5 píxeles.
- FlowLayout(int align, int HorizontalGap, int VerticalGap) : Construirá un nuevo FlowLayout con la alineación dada, el espacio horizontal y vertical dado entre los componentes.
- JLabel(String text) : Creará una instancia de JLabel con el texto especificado.
Métodos comúnmente utilizados:
- setTitle(String Text) : este método se utiliza para establecer el título de JFrame. El título que desea establecer se pasa como una string.
- getAlignment() : Devuelve la alineación para este diseño.
- setAlignment(int align) : se utiliza para establecer la alineación de este diseño.
- removeLayoutComponent(Component comp) : Se utiliza para eliminar el componente pasado como argumento del diseño.
Los siguientes programas ilustrarán el Ejemplo de FlowLayout en Java.
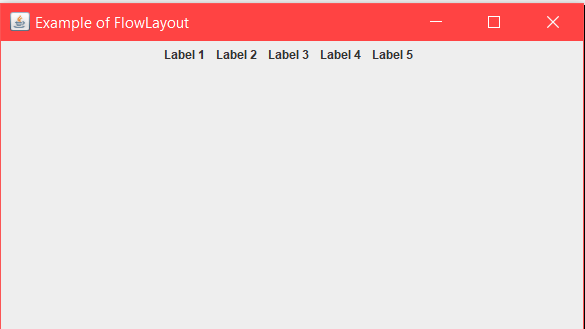
- Programa 1: El siguiente programa ilustra el uso de FlowLayout organizando varios componentes JLabel en un JFrame, cuya clase de instancia se denomina «Ejemplo». Creamos 5 componentes JLabel llamados “l1”, “l2″… “l5” y luego los agregamos al JFrame con el método this.add(). Establecemos el título y los límites del marco mediante el método setTitle y setBounds.
El diseño se establece mediante el método setLayout();// Java program to show Example of FlowLayout.// in java. Importing different Package.importjava.awt.*;importjava.awt.event.*;importjavax.swing.*;classExampleextendsJFrame {// Declaration of objects of JLabel class.JLabel l1, l2, l3, l4, l5;// Constructor of Example class.publicExample(){// Creating Object of "FlowLayout" classFlowLayout layout =newFlowLayout();// this Keyword refers to current object.// Function to set Layout of JFrame.this.setLayout(layout);// Initialization of object "l1" of JLabel class.l1 =newJLabel("Label 1 ");// Initialization of object "l2" of JLabel class.l2 =newJLabel("Label 2 ");// Initialization of object "l3" of JLabel class.l3 =newJLabel("Label 3 ");// Initialization of object "l4" of JLabel class.l4 =newJLabel("Label 4 ");// Initialization of object "l5" of JLabel class.l5 =newJLabel("Label 5 ");// this Keyword refers to current object.// Adding Jlabel "l1" on JFrame.this.add(l1);// Adding Jlabel "l2" on JFrame.this.add(l2);// Adding Jlabel "l3" on JFrame.this.add(l3);// Adding Jlabel "l4" on JFrame.this.add(l4);// Adding Jlabel "l5" on JFrame.this.add(l5);}}classMainFrame {// Driver codepublicstaticvoidmain(String[] args){// Creating Object of Example class.Example f =newExample();// Function to set title of JFrame.f.setTitle("Example of FlowLayout");// Function to set Bounds of JFrame.f.setBounds(200,100,600,400);// Function to set visible status of JFrame.f.setVisible(true);}}Salida :
Podemos controlar la alineación de los componentes en una disposición de diseño de flujo mediante el uso de estos campos FlowLayout.
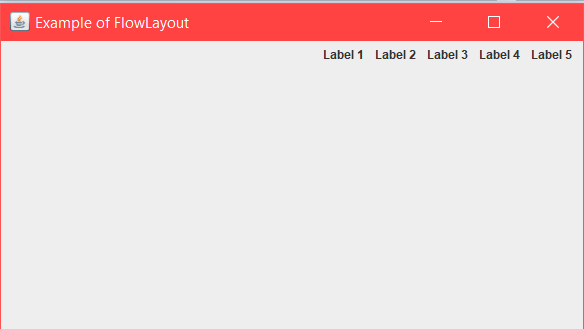
1) DERECHA : – Cada fila de componentes se desplaza hacia la derecha.
2) IZQUIERDA : – Cada fila de componentes se desplaza hacia la izquierda. - Programa 2: El siguiente programa ilustra el uso de FlowLayout usando la alineación a la derecha pasando el argumento FlowLayout.RIGHT en el constructor de FLowLayout. Creamos 5 componentes JLabel llamados “l1”, “l2″… “l5” y luego los agregamos al JFrame con el método this.add(). Establecemos el título y los límites del marco mediante el método setTitle y setBounds.
El diseño se establece mediante el método setLayout();// Java program to show example of// FlowLayout and using RIGHT alignmentimportjava.awt.*;importjava.awt.event.*;importjavax.swing.*;classExampleextendsJFrame {// Declaration of objects of JLabel class.JLabel l1, l2, l3, l4, l5;// Constructor of Example class.publicExample(){// Creating Object of "FlowLayout" class, passing// RIGHT alignment through constructor.FlowLayout layout =newFlowLayout(FlowLayout.RIGHT);// this Keyword refers to current object.// Function to set Layout of JFrame.this.setLayout(layout);// Initialization of object "l1" of JLabel class.l1 =newJLabel("Label 1 ");// Initialization of object "l2" of JLabel class.l2 =newJLabel("Label 2 ");// Initialization of object "l3" of JLabel class.l3 =newJLabel("Label 3 ");// Initialization of object "l4" of JLabel class.l4 =newJLabel("Label 4 ");// Initialization of object "l5" of JLabel class.l5 =newJLabel("Label 5 ");// this Keyword refers to current object.// Adding Jlabel "l1" on JFrame.this.add(l1);// Adding Jlabel "l2" on JFrame.this.add(l2);// Adding Jlabel "l3" on JFrame.this.add(l3);// Adding Jlabel "l4" on JFrame.this.add(l4);// Adding Jlabel "l5" on JFrame.this.add(l5);}}classMainFrame {// Driver codepublicstaticvoidmain(String[] args){// Creating Object of Example class.Example f =newExample();// Function to set title of JFrame.f.setTitle("Example of FlowLayout");// Function to set Bounds of JFrame.f.setBounds(200,100,600,400);// Function to set visible status of JFrame.f.setVisible(true);}}Salida :
Referencia : https://www.geeksforgeeks.org/message-dialogs-java-gui/
Publicación traducida automáticamente
Artículo escrito por Amaninder.Singh y traducido por Barcelona Geeks. The original can be accessed here. Licence: CCBY-SA