En este artículo, la tarea es dibujar un rectángulo usando OpenCV en C++ . Se utilizará la función rectángulo() de la biblioteca OpenCV C++ .
Sintaxis:
rectángulo (img, pt1, pt2, color, grosor, tipo de línea, cambio)
Parámetros:
- imagen: Es la imagen sobre la que se va a dibujar el rectángulo.
- start(pt1): Es la esquina superior izquierda del rectángulo representado como la tupla de dos coordenadas, es decir, (coordenada x, coordenada y).
- end(pt2): Es la esquina inferior derecha del rectángulo representado como la tupla de dos coordenadas, es decir, (coordenada x, coordenada y).
- color: Es el color del borde del rectángulo a dibujar. Una tupla que representa 3 colores (B, G, R) , es decir, (Azul, Verde, Rojo).
- grosor: Es el grosor del borde del rectángulo en px . El grosor de -1 px llenará la forma del rectángulo con el color especificado.
- lineType: Tipo de línea. Hay 3 tipos de línea:
- LINE_4: La línea se dibujó utilizando 4 algoritmos de Bresenham conectados.
- LINE_8: La línea se dibujó usando 8 algoritmos de Bresenham conectados.
- LINE_AA: Dibuja líneas suavizadas formadas mediante el uso de un filtro gaussiano .
- shift: El número de bits fraccionarios en las coordenadas del punto.
Valor devuelto: Devuelve una imagen.
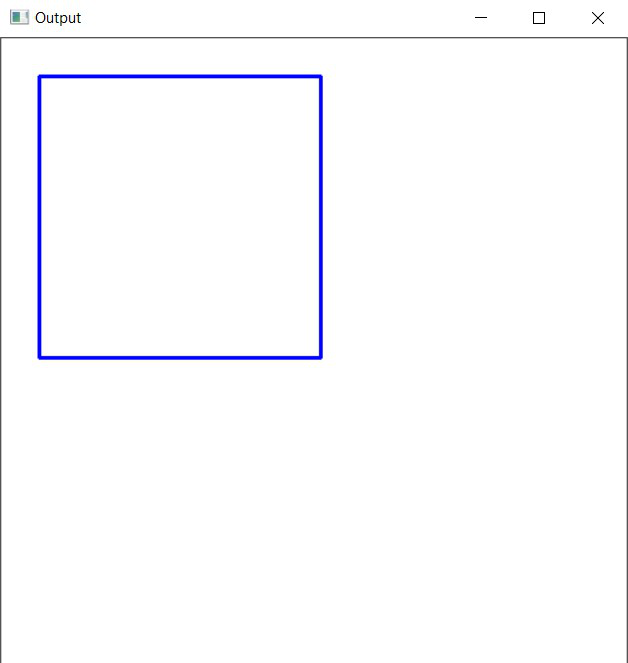
Programa 1:
A continuación se muestra el programa C++ que demuestra cómo dibujar un rectángulo sobre una imagen de fondo autoformada:
C++
// C++ program to demonstrate rectangle
// over a self-formed background image

#include <iostream>
#include <opencv2/core/core.hpp>

// Drawing shapes
#include <opencv2/imgproc.hpp>

#include <opencv2/highgui/highgui.hpp>
using namespace cv;
using namespace std;

// Driver Code
int main(int argc, char** argv)
{
    // Creating a blank image with
    // white background
    Mat image(500, 500, CV_8UC3,
              Scalar(255, 255, 255));

    // Check if the image is created
    // successfully or not
    if (!image.data) {
        std::cout << "Could not open or "
                  << "find the image\n";

        return 0;
    }

    // Top Left Corner
    Point p1(30, 30);

    // Bottom Right Corner
    Point p2(255, 255);

    int thickness = 2;

    // Drawing the Rectangle
    rectangle(image, p1, p2,
              Scalar(255, 0, 0),
              thickness, LINE_8);

    // Show our image inside a window
    imshow("Output", image);
    waitKey(0);

    return 0;
}
Producción:
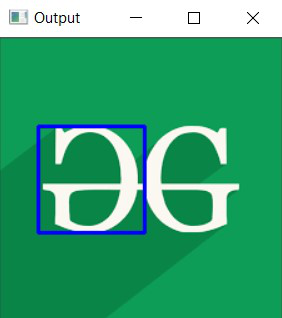
Programa 2:
A continuación se muestra el programa C++ que demuestra cómo dibujar un rectángulo sobre la imagen del logotipo de GFG:
C++
// C++ program to demonstrate rectangle
// over a loaded image of GFG logo

#include <iostream>
#include <opencv2/core/core.hpp>

// Drawing shapes
#include <opencv2/imgproc.hpp>

#include <opencv2/highgui/highgui.hpp>
using namespace cv;
using namespace std;

// Driver Code
int main(int argc, char** argv)
{
    // Reading the Image
    Mat image = imread("C:/Users/harsh/Downloads/geeks.png",
                       IMREAD_COLOR);

    // Check if the image is created
    // successfully or not
    if (!image.data) {
        std::cout << "Could not open or "
                  << "find the image\n";
        return 0;
    }

    // Top Left Coordinates
    Point p1(30, 70);

    // Bottom Right Coordinates
    Point p2(115, 155);

    int thickness = 2;

    // Drawing the Rectangle
    rectangle(image, p1, p2,
              Scalar(255, 0, 0),
              thickness, LINE_8);

    // Show our image inside a window
    imshow("Output", image);
    waitKey(0);

    return 0;
}
Producción:
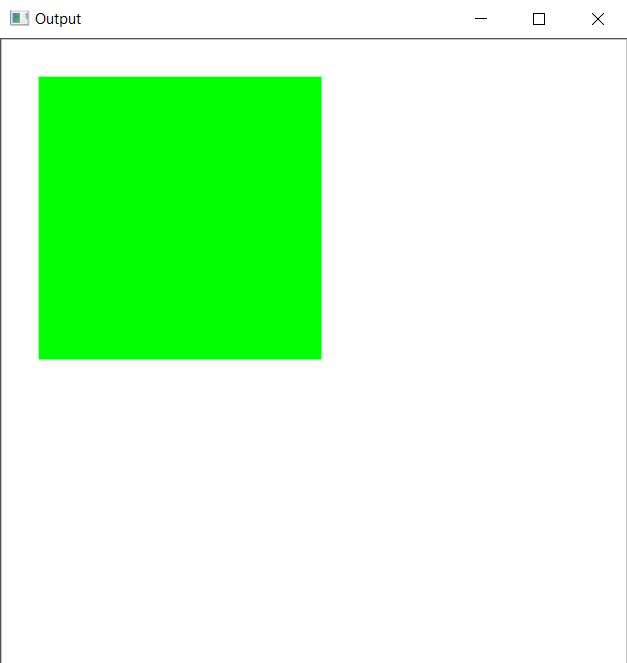
Programa 3:
A continuación se muestra el programa C++ que demuestra cómo dibujar un rectángulo lleno de color:
C++
// C++ program to demonstrate rectangle
// filled with any color

#include <iostream>
#include <opencv2/core/core.hpp>

// Drawing shapes
#include <opencv2/imgproc.hpp>

#include <opencv2/highgui/highgui.hpp>
using namespace cv;
using namespace std;

// Driver Code
int main(int argc, char** argv)
{
    // Creating a blank image with
    // white background
    Mat image(500, 500, CV_8UC3,
              Scalar(255, 255, 255));

    // Check if the image is created
    // successfully or not
    if (!image.data) {
        std::cout << "Could not open or "
                  << "find the image\n";

        return 0;
    }

    // Top Left Corner
    Point p1(30, 30);

    // Bottom Right Corner
    Point p2(255, 255);

    int thickness = -1;

    // Drawing the Rectangle
    rectangle(image, p1, p2,
              Scalar(0, 255, 0),
              thickness, LINE_8);

    // Show our image inside a window
    imshow("Output", image);
    waitKey(0);

    return 0;
}
Producción:
Publicación traducida automáticamente
Artículo escrito por Captain_JackSparrow y traducido por Barcelona Geeks. The original can be accessed here. Licence: CCBY-SA