En este artículo, veremos cómo enviar un solo mensaje a cualquier número de personas. Solo tenemos que proporcionar una lista de usuarios. Usaremos selenium para esta tarea.
Paquetes necesarios
- Selenium: es una herramienta de código abierto que automatiza los navegadores web. Proporciona una única interfaz que le permite escribir scripts de prueba en lenguajes de programación como Ruby, Java, NodeJS, PHP, Perl, Python y C#, entre otros. Personalmente, prefiero Python porque es muy fácil escribir código en Python. Luego, un controlador de navegador ejecuta estos scripts en una instancia de navegador en su dispositivo. Para instalar este módulo, ejecute este comando en su terminal.
pip install selenium
- webdriver-manager : proporciona una forma de administrar automáticamente los controladores para diferentes navegadores. Para instalar este módulo, ejecute este comando en su terminal.
pip install webdriver-manager
- ChromeDriver: ChromeDriver es un ejecutable separado que Selenium WebDriver usa para controlar Chrome.
- Google Chrome
Paso 1: Importación de todas las bibliotecas necesarias.
Python3
from selenium import webdriver
import os
import time
from selenium.webdriver.common.by import By
from selenium.webdriver.support.ui import WebDriverWait
from selenium.webdriver.support import expected_conditions
from selenium.webdriver.common.keys import Keys
from webdriver_manager.chrome import ChromeDriverManager
Paso 2: usar Chrome con este código siempre funcionará (no hay necesidad de preocuparse por actualizar la versión de Chromedriver)
Python3
driver = webdriver.Chrome(ChromeDriverManager().install())
Paso 3: Antes de declarar una clase, haremos una lista de usuarios (cualquier número de usuarios en este código, estoy usando tres usuarios). En esa lista, debe enviar el nombre de usuario de la persona a la que desea enviar un mensaje y el mensaje que queremos enviar a todos los usuarios.
Python3
# you can take any valid username
audience = [ 'sundarpichai','virat.kholi','rudymancuso']
message = "testing of a bot"
Paso 4: Aquí estoy creando una función de clase, todo el código se escribirá dentro de esta clase, así que, al final, solo tenemos que llamar a esta clase. Vamos a crear una función __init__ a la que se pueda llamar cuando se crea un objeto a partir de la clase, __init__ proporcionará el acceso necesario para inicializar los atributos de la clase.
Python3
class bot:

    def __init__(self, username, password, audience, message):

        # initializing the username
        self.username = username

        # initializing the password
        self.password = password

        # passing the list of user or initializing
        self.user = user

        # passing the message of user or initializing
        self.message = message

        # initializing the base url.
        self.base_url = 'https://www.instagram.com/'

        # here it calls the driver to open chrome web browser.
        self.bot = driver

        # initializing the login function we will create
        self.login()
Paso 5: Creación de una función de inicio de sesión donde se escribirán todos los pasos
Python3
def login(self):

    self.bot.get(self.base_url)

    # ENTERING THE USERNAME FOR LOGIN INTO INSTAGRAM
    enter_username = WebDriverWait(self.bot, 20).until(
        expected_conditions.presence_of_element_located((By.NAME, 'username')))

    enter_username.send_keys(self.username)

    # ENTERING THE PASSWORD FOR LOGIN INTO INSTAGRAM
    enter_password = WebDriverWait(self.bot, 20).until(
        expected_conditions.presence_of_element_located((By.NAME, 'password')))
    enter_password.send_keys(self.password)

    # RETURNING THE PASSWORD and login into the account
    enter_password.send_keys(Keys.RETURN)
    time.sleep(5)
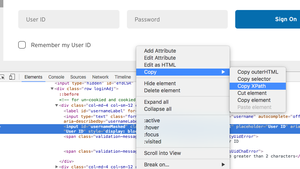
Nota: para encontrar el XPath, haga clic con el botón derecho en el elemento y luego verá la opción de inspección en un navegador web.

Selección de xpath
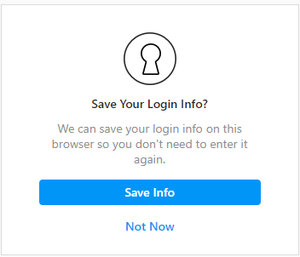
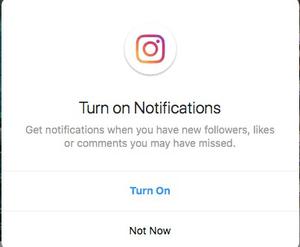
Paso 6: MANEJO DE CUADROS EMERGENTES: cuando inicie sesión en Instagram, encontrará dos cuadros emergentes como se muestra en las imágenes. El primero le preguntará si desea guardar información o no, hará clic en no ahora. El segundo le pedirá que desactive las notificaciones o no, por lo que nuevamente haremos clic en no ahora como se muestra en el código dado.
Python3
# first pop-up box
self.bot.find_element_by_xpath(
    '//*[@id="react-root"]/section/main/div/div/div/div/button').click()
time.sleep(3)

# 2nd pop-up box
self.bot.find_element_by_xpath(
    '/html/body/div[4]/div/div/div/div[3]/button[2]').click()

time.sleep(4)

1er cuadro emergente

segundo cuadro emergente
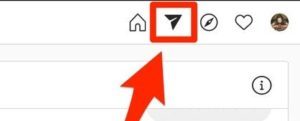
Paso 7: Haciendo clic en la opción de mensaje en la esquina derecha

Botón de mensaje (botón directo)
Nota: Esto hará clic en la opción de mensaje (directo).
Python3
# this will click on message(direct) option.
self.bot.find_element_by_xpath(
    '//a[@class="xWeGp"]/*[name()="svg"][@aria-label="Direct"]').click()

time.sleep(3)
Paso 8: Haciendo clic en la opción de lápiz aquí escribimos el nombre del usuario.
Python3
# This will click on the pencil icon as shown in the figure.
self.bot.find_element_by_xpath(
    '//*[@id="react-root"]/section/div/div[2]/div/div/div[2]/div/button').click()
time.sleep(2)

Paso 9: Aquí está la parte principal del código donde tomamos un nombre de usuario de la lista, lo buscamos y le enviamos un mensaje a esa persona. Este proceso está en el bucle para tomar el nombre de usuario.
Python3
for i in user:

    # enter the username
    self.bot.find_element_by_xpath(
        '/html/body/div[4]/div/div/div[2]/div[1]/div/div[2]/input').send_keys(i)
    time.sleep(2)

    # click on the username
    self.bot.find_element_by_xpath(
        '/html/body/div[4]/div/div/div[2]/div[2]/div').click()
    time.sleep(2)

    # next button
    self.bot.find_element_by_xpath(
        '/html/body/div[4]/div/div/div[1]/div/div[2]/div/button').click()
    time.sleep(2)

    # click on message area
    send = self.bot.find_element_by_xpath(
        '/html/body/div[1]/section/div/div[2]/div/div/div[2]/div[2]/div/div[2]/div/div/div[2]/textarea')

    # types message
    send.send_keys(self.message)
    time.sleep(1)

    # send message
    send.send_keys(Keys.RETURN)
    time.sleep(2)

    # clicks on pencil icon
    self.bot.find_element_by_xpath(
        '/html/body/div[1]/section/div/div[2]/div/div/div[1]/div[1]/div/div[3]/button').click()
    time.sleep(2)
    # here will take the next username from the user's list.
Paso 10: Finalmente hemos completado el código. Es hora de crear una función donde pasaremos el nombre de usuario y la contraseña de la cuenta en la que queremos iniciar sesión y llamar a nuestra clase aquí.
Python3
def init():

    # you can even enter your personal account.
    bot('username', 'password', user, message_)
    input("DONE")
Paso 11: Llamemos a nuestra función
Python3
# calling this function will message everyone's
# that is on your user's list...:)
init()
Pongamos todo el código junto
Python3
# importing module
from selenium import webdriver
import os
import time
from selenium.webdriver.common.by import By
from selenium.webdriver.support.ui import WebDriverWait
from selenium.webdriver.support import expected_conditions
from selenium.webdriver.common.keys import Keys
from webdriver_manager.chrome import ChromeDriverManager

driver = webdriver.Chrome(ChromeDriverManager().install())

# enter receiver user name
user = ['User_name', 'User_name ']
message_ = ("final test")


class bot:
    def __init__(self, username, password, user, message):
        self.username = username
        self.password = password
        self.user = user
        self.message = message
        self.base_url = 'https://www.instagram.com/'
        self.bot = driver
        self.login()

    def login(self):
        self.bot.get(self.base_url)

        enter_username = WebDriverWait(self.bot, 20).until(
            expected_conditions.presence_of_element_located((By.NAME, 'username')))
        enter_username.send_keys(self.username)
        enter_password = WebDriverWait(self.bot, 20).until(
            expected_conditions.presence_of_element_located((By.NAME, 'password')))
        enter_password.send_keys(self.password)
        enter_password.send_keys(Keys.RETURN)
        time.sleep(5)

        # first pop-up
        self.bot.find_element_by_xpath(
            '//*[@id="react-root"]/section/main/div/div/div/div/button').click()
        time.sleep(3)

        # 2nd pop-up
        self.bot.find_element_by_xpath(
            '/html/body/div[4]/div/div/div/div[3]/button[2]').click()
        time.sleep(4)

        # direct button
        self.bot.find_element_by_xpath(
            '//a[@class="xWeGp"]/*[name()="svg"][@aria-label="Direct"]').click()
        time.sleep(3)

        # clicks on pencil icon
        self.bot.find_element_by_xpath(
            '//*[@id="react-root"]/section/div/div[2]/div/div/div[2]/div/button').click()
        time.sleep(2)
        for i in user:

            # enter the username
            self.bot.find_element_by_xpath(
                '/html/body/div[4]/div/div/div[2]/div[1]/div/div[2]/input').send_keys(i)
            time.sleep(2)

            # click on the username
            self.bot.find_element_by_xpath(
                '/html/body/div[4]/div/div/div[2]/div[2]/div').click()
            time.sleep(2)

            # next button
            self.bot.find_element_by_xpath(
                '/html/body/div[4]/div/div/div[1]/div/div[2]/div/button').click()
            time.sleep(2)

            # click on message area
            send = self.bot.find_element_by_xpath(
                '/html/body/div[1]/section/div/div[2]/div/div/div[2]/div[2]/div/div[2]/div/div/div[2]/textarea')

            # types message
            send.send_keys(self.message)
            time.sleep(1)

            # send message
            send.send_keys(Keys.RETURN)
            time.sleep(2)

            # clicks on direct option or pencl icon
            self.bot.find_element_by_xpath(
                '/html/body/div[1]/section/div/div[2]/div/div/div[1]/div[1]/div/div[3]/button').click()
            time.sleep(2)


def init():
    bot('username', 'password', user, message_)

    # when our program ends it will show "done".
    input("DONE")


# calling the function
init()
Publicación traducida automáticamente
Artículo escrito por prachibindal2925 y traducido por Barcelona Geeks. The original can be accessed here. Licence: CCBY-SA