Kivy es una herramienta GUI independiente de la plataforma en Python. Como se puede ejecutar en Android, IOS, Linux y Windows, etc. Básicamente se usa para desarrollar la aplicación de Android, pero eso no significa que no se pueda usar en aplicaciones de escritorio.
Widget de la barra de progreso:
El widget ProgressBar se utiliza para visualizar el progreso de alguna tarea. Actualmente solo se admite el modo horizontal: el modo vertical aún no está disponible.
La barra de progreso no tiene elementos interactivos y es un widget de solo visualización.
Para usarlo, simplemente asigne un valor para indicar el progreso actual:
Python3
from kivy.uix.progressbar import ProgressBar
pb = ProgressBar(max = 1000)

# this will update the graphics automatically (75 % done)
pb.value = 750
Para trabajar con el widget de la barra de progreso, debe importarlo con el comando:
de kivy.uix.progressbar importar ProgressBar
La barra de progreso toma dos argumentos:
1) max: Valor máximo permitido por valor. Es una propiedad numérica y el valor predeterminado es 100.
2) valor: valor actual para el control deslizante
Basic Approach:

1) import kivy
2) import kivyApp
3) import progressbar
4) import Boxlayout(according to need)
5) Set minimum version(optional)
6) Create Layout class:
7) Create App class
8) return Layout/widget/Class(according to requirement)
9) Run an instance of the class
Nota: este código es para una barra de progreso de trabajo completa y debe concentrarse solo en la creación y el funcionamiento de la barra de progreso, no es necesario enfatizar otras propiedades que cubriré en el futuro.
Primero debe hacer clic en el botón que se hace en el archivo y luego se mostrará la barra de progreso.
Implementación del Enfoque:
Python3
# Program to Show how to create a Progressbar in .kv file

# import kivy module
import kivy

# base Class of your App inherits from the App class.
# app:always refers to the instance of your application
from kivy.app import App

# this restrict the kivy version i.e
# below this kivy version you cannot
# use the app or software
kivy.require('1.9.0')

# The ProgressBar widget is used to
# visualize the progress of some task
from kivy.uix.progressbar import ProgressBar

# BoxLayout arranges children in a vertical or horizontal box.
# or help to put the children at the desired location.
from kivy.uix.boxlayout import BoxLayout

# The Clock object allows you to schedule a
# function call in the future
from kivy.clock import Clock

# The Button is a Label with associated actions
# that is triggered when the button
# is pressed (or released after a click / touch).
from kivy.uix.button import Button

# Popup widget is used to create popups.
# By default, the popup will cover
# the whole “parent” window.
# When you are creating a popup,
# you must at least set a Popup.title and Popup.content.
from kivy.uix.popup import Popup

# A Widget is the base building block
# of GUI interfaces in Kivy.
# It provides a Canvas that
# can be used to draw on screen.
from kivy.uix.widget import Widget

# ObjectProperty is a specialised sub-class
# of the Property class, so it has the same
# initialisation parameters as it:
# By default, a Property always takes a default
# value[.] The default value must be a value
# that agrees with the Property type.
from kivy.properties import ObjectProperty


# Create the widget class
class MyWidget(Widget):

    progress_bar = ObjectProperty()

    def __init__(self, **kwa):
        super(MyWidget, self).__init__(**kwa)

        self.progress_bar = ProgressBar()
        self.popup = Popup(
            title ='Download',
            content = self.progress_bar
        )
        self.popup.bind(on_open = self.puopen)
        self.add_widget(Button(text ='Download', on_release = self.pop))

    # the function which works when you click = k the button
    def pop(self, instance):
        self.progress_bar.value = 1
        self.popup.open()

    # To continuously increasing the value of pb.
    def next(self, dt):
        if self.progress_bar.value>= 100:
            return False
        self.progress_bar.value += 1

    def puopen(self, instance):
        Clock.schedule_interval(self.next, 1 / 25)

# Create the App class
class MyApp(App):
    def build(self):
        return MyWidget()

# run the App
if __name__ in ("__main__"):
    MyApp().run()
Producción:
Imagen 1: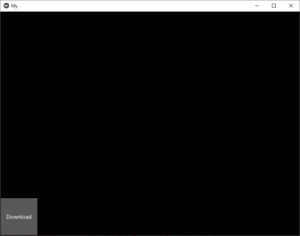
Imagen 2: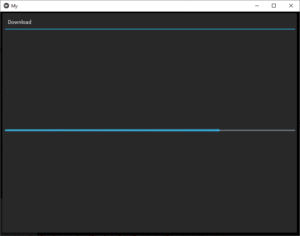
Publicación traducida automáticamente
Artículo escrito por YashKhandelwal8 y traducido por Barcelona Geeks. The original can be accessed here. Licence: CCBY-SA