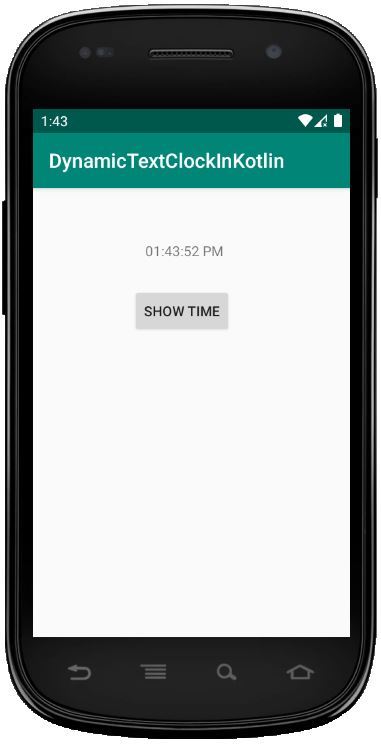
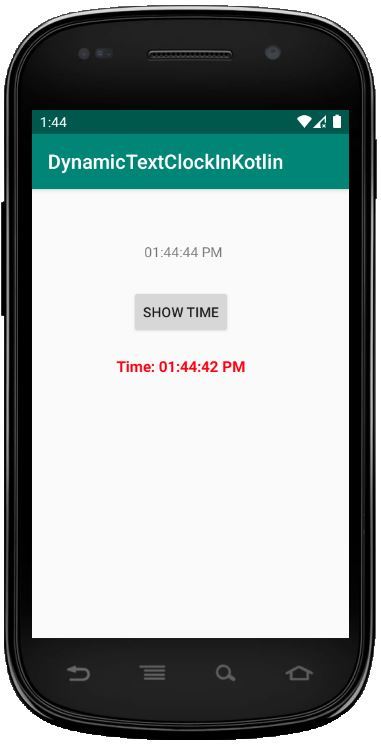
Android TextClock es un control de interfaz de usuario que se utiliza para mostrar la fecha/hora en formato de string.
Proporciona la hora en dos modos, el primero es mostrar la hora en formato de 24 horas y el otro es mostrar la hora en formato de 12 horas. Podemos usar fácilmente el método is24HourModeEnabled() para mostrar el sistema usando TextClock en formato de 24 horas o 12 horas.
Aquí, crearemos TextClock mediante programación en el archivo Kotlin.
Primero creamos un nuevo proyecto siguiendo los siguientes pasos:
- Haga clic en Archivo , luego en Nuevo => Nuevo proyecto .
- Después de eso, incluya el soporte de Kotlin y haga clic en siguiente.
- Seleccione el SDK mínimo según su conveniencia y haga clic en el botón siguiente .
- Luego seleccione la actividad vacía => siguiente => finalizar .
Modificar archivo activity_main.xml
En este archivo, usamos TextView y Button y establecemos los atributos de todos los widgets.
XML
<?xml version="1.0" encoding="utf-8"?>
<?xml version="1.0" encoding="utf-8"?>
<RelativeLayout xmlns:android="http://schemas.android.com/apk/res/android"
    xmlns:tools="http://schemas.android.com/tools"
    android:layout_width="wrap_content"
    android:layout_height="wrap_content"
    tools:context=".MainActivity">

    <LinearLayout xmlns:android="http://schemas.android.com/apk/res/android"
        android:id="@+id/linear_layout"
        android:layout_width="wrap_content"
        android:layout_height="wrap_content"
        android:gravity="center"
        android:orientation="vertical" />

    <Button
        android:id="@+id/btn"
        android:layout_width="wrap_content"
        android:layout_height="wrap_content"
        android:layout_marginLeft="100dp"
        android:layout_marginTop="100dp"
        android:text="Show Time" />

    <TextView
        android:id="@+id/textview"
        android:layout_width="wrap_content"
        android:layout_height="wrap_content"
        android:layout_below="@+id/btn"
        android:layout_marginLeft="85dp"
        android:layout_marginTop="20dp"
        android:textSize="15dp"
        android:textStyle="bold"
        android:textColor="#ff0012"/>
</RelativeLayout>
Actualizar el archivo strings.xml
Aquí, actualizamos el nombre de la aplicación usando la etiqueta de string.
XML
<resources>
    <string name="app_name">DynamicTextClockInKotlin</string>
</resources>
Crear TextClock en el archivo MainActivity.kt
Primero, creamos una variable para crear TextClock como este
val textClock = TextClock(this)
luego, establezca el formato de visualización del reloj en el diseño.
textClock.format12Hour = "hh:mm:ss a"
Tenemos que agregar el reloj de texto en el diseño lineal usando
val linearLayout = findViewById(R.id.linear_layout)
        //add textClock in Linear Layout
        linearLayout?.addView(textClock)
Kotlin
package com.geeksforgeeks.myfirstkotlinapp

import androidx.appcompat.app.AppCompatActivity

import android.os.Bundle
import android.view.ViewGroup
import android.widget.Button
import android.widget.LinearLayout
import android.widget.TextClock
import android.widget.TextView


class MainActivity : AppCompatActivity() {

    override fun onCreate(savedInstanceState: Bundle?) {
        super.onCreate(savedInstanceState)
        setContentView(R.layout.activity_main)

        //create TextClock programmatically
        val textClock = TextClock(this)
        val layoutParams = LinearLayout.LayoutParams(
            ViewGroup.LayoutParams.WRAP_CONTENT,
            ViewGroup.LayoutParams.WRAP_CONTENT)
        layoutParams.setMargins(140, 80, 80, 80)
        textClock.layoutParams = layoutParams
        textClock.format12Hour = "hh:mm:ss a"


        val linearLayout = findViewById<LinearLayout>(R.id.linear_layout)
        //add textClock in Linear Layout
        linearLayout?.addView(textClock)

        val txtView = findViewById<TextView>(R.id.textview)

        val btn = findViewById<Button>(R.id.btn)
        // display time when click the button
        btn?.setOnClickListener {
            txtView?.text = "Time: " + textClock?.text
        }
    }
}
Archivo AndroidManifest.xml
XML
<?xml version="1.0" encoding="utf-8"?>
<manifest xmlns:android="http://schemas.android.com/apk/res/android"
package="com.geeksforgeeks.myfirstkotlinapp">

<application
    android:allowBackup="true"
    android:icon="@mipmap/ic_launcher"
    android:label="@string/app_name"
    android:roundIcon="@mipmap/ic_launcher_round"
    android:supportsRtl="true"
    android:theme="@style/AppTheme">
    <activity android:name=".MainActivity">
        <intent-filter>
            <action android:name="android.intent.action.MAIN" />

            <category android:name="android.intent.category.LAUNCHER" />
        </intent-filter>
    </activity>
</application>

</manifest>
Ejecutar como emulador:


Publicación traducida automáticamente
Artículo escrito por Praveenruhil y traducido por Barcelona Geeks. The original can be accessed here. Licence: CCBY-SA