La lista de clases de control de formulario en W3.CSS es la siguiente:
- entrada w3
- w3-cheque
- w3-radio
- w3-seleccionar
- w3-animate-entrada
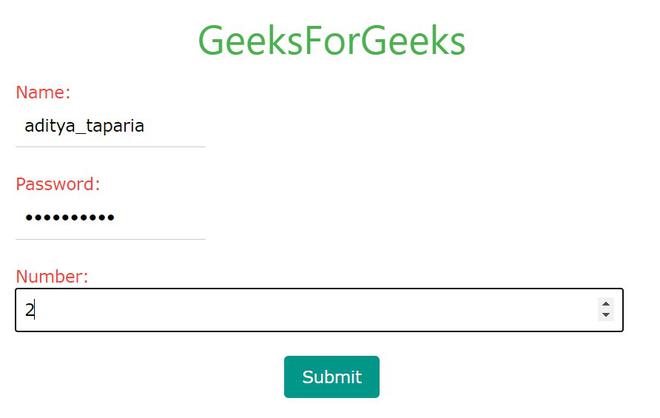
Clase de entrada w3: esta clase se puede usar en el texto, contraseña, número, fecha y hora, fecha y hora local, fecha, mes, hora, semana, correo electrónico, URL, búsqueda, teléfono y color, lo que significa que es compatible con todas las entradas de HTML5 tipos Se utiliza para establecer el ancho del elemento de entrada al 100%.
Ejemplo:
HTML
<!DOCTYPE html>
<html>

<head>

    <!-- Adding W3.CSS file through external link -->
    <link rel="stylesheet"
          href="https://www.w3schools.com/w3css/4/w3.css">

</head>

<body>
    <!-- w3-container is used to add
         16px padding to any HTML element.  -->
    <!-- w3-center is used to set the
         content of the element to the center. -->
    <div class="w3-container w3-center">
        <!-- w3-text-green sets the text
            color to green. -->
        <!-- w3-xxlarge sets font size to 32px. -->
        <h2 class="w3-text-green w3-xxlarge">
            GeeksForGeeks
        </h2>
    </div>

    <!-- Form in W3.CSS -->
    <div class="w3-container w3-text-red">
      <form>
         <!-- Text Field -->
         <label for="usr">Name:</label>
         <input type="text"
                class="w3-input"
                id="usr"
                name="username">
         <br>

         <!-- Password Field -->
         <label for="pwd">Password:</label>
         <input type="password"
                class="w3-input"
                id="pwd"
                name="password">
         <br>

         <!-- Number Field -->
         <label for="number">Number:</label>
         <input type="number"
                class="w3-input"
                id="number">
         <br>
         <div class="w3-center">
             <button type="submit"
                 class="w3-teal w3-hover-green
                 w3-round w3-button">
                     Submit
             </button>
         </div>
      </form>
    </div>
</body>
</html>
Producción:

Clase w3-check: las casillas de verificación se utilizan para seleccionar elementos específicos de la lista proporcionada. Esta clase se usa solo en casillas de verificación.
Ejemplo:
HTML
<!DOCTYPE html>
<html>
<head>

    <!-- Adding W3.CSS file through external link -->
    <link rel="stylesheet"
          href="https://www.w3schools.com/w3css/4/w3.css">

</head>
<body>
    <!-- w3-container is used to add 16px
         padding to any HTML element.  -->
    <!-- w3-center is used to set the content
         of the element to the center. -->
    <div class="w3-container w3-center">
        <!-- w3-text-green sets the text colour to green. -->
        <!-- w3-xxlarge sets font size to 32px. -->
        <h2 class="w3-text-green w3-xxlarge">
          GeeksForGeeks
      </h2>
    </div>

    <!-- Form in W3.CSS -->
    <div class="w3-container w3-text-red w3-center">
      <form>
         <!-- Checked Checkbox -->
          <label for="check1">
          <input type="checkbox"
                 class="w3-check"
                 id="check1"
                 name="option1"
                 value="something"
                 checked>
             Option 1
          </label>
         <br>

         <!-- Disabled Checkbox -->
         <label for="check2">
         <input type="checkbox"
                class="w3-check"
                id="check2"
                disabled>
             Option 2
         </label>
         <br>

         <!-- Normal Checkbox -->
         <label>
         <input type="checkbox"
                class="w3-check"
                name="option2"
                value="something">
            Option 3
         </label>
         <br><br>

         <!-- button -->
         <button type="submit"
             class="w3-teal w3-hover-green
             w3-round w3-button">
             Submit
         </button>
      </form>
    </div>
</body>
</html>
Producción:

El formulario de arriba contiene tres casillas de verificación. La primera opción está marcada de forma predeterminada y la segunda opción está deshabilitada. Para usar casillas de verificación en línea, simplemente elimine la etiqueta <br> entre ellas.
Clase w3-radio: El botón de radio se utiliza para seleccionar la única opción de múltiples opciones por parte del usuario. Es similar a las casillas de verificación, solo elimine la «casilla de verificación» del tipo de entrada y coloque «radio». Esta clase se usa solo con botones de radio.
Ejemplo:
HTML
<!DOCTYPE html>
<html>
<head>

    <!-- Adding W3.CSS file through external link -->
    <link rel="stylesheet"
          href="https://www.w3schools.com/w3css/4/w3.css">

</head>
<body>
    <!-- w3-container is used to add 16px
         padding to any HTML element.  -->
    <!-- w3-center is used to set the content
         of the element to the center. -->
    <div class="w3-container w3-center">
        <!-- w3-text-green sets the text color to green. -->
        <!-- w3-xxlarge sets font size to 32px. -->
        <h2 class="w3-text-green w3-xxlarge">GeeksForGeeks</h2>
    </div>

    <!-- Form in W3.CSS -->
    <div class="w3-container w3-text-red w3-center">
      <form>
         <!-- Checked Radio Button -->
         <label for="radio1">
         <input type="radio" class="w3-radio" id="radio1"
                name="optradio" value="option1" checked>
            Option 1
         </label>
         <br>
         <!-- Normal Radio Button -->
         <label for="radio2">
         <input type="radio" class="w3-radio" id="radio2"
                name="optradio" value="option2">
            Option 2
         </label>
         <br>
         <!-- Disabled Radio Button -->
         <label>
         <input type="radio"
                class="w3-radio"
                disabled>
            Option 3
        </label>
         <br><br>

         <!-- Button -->
         <button type="submit"
             class="w3-teal w3-hover-green
             w3-round w3-button">
             Submit
         </button>
      </form>
    </div>
</body>
</html>
Producción:

El formulario de arriba contiene tres botones de radio. La primera opción está marcada de forma predeterminada y la última opción está deshabilitada. Para usar los botones de radio en línea, simplemente elimine la etiqueta <br> entre ellos.
Clase w3-select: aquí hay dos tipos de lista de selección, seleccionando un solo elemento de una lista y seleccionando dos o más elementos de la lista para seleccionar varios elementos simplemente manteniendo presionada la tecla Mayús y seleccionando los elementos uno por uno.
Ejemplo: Lista de selección con una sola selección posible.
HTML
<!DOCTYPE html>
<html>
<head>

    <!-- Adding W3.CSS file through external link -->
    <link rel="stylesheet"
          href="https://www.w3schools.com/w3css/4/w3.css">

</head>
<body>
    <!-- w3-container is used to add 16px
         padding to any HTML element.  -->
    <!-- w3-center is used to set the content
         of the element to the center. -->
    <div class="w3-container w3-center">
        <!-- w3-text-green sets the text colour to green. -->
        <!-- w3-xxlarge sets font size to 32px. -->
        <h2 class="w3-text-green w3-xxlarge">GeeksForGeeks</h2>
    </div>

    <!-- Form in W3.CSS -->
    <div class="w3-container w3-text-red w3-center">
      <form>
         <!-- Single Selection list -->
         <select class="w3-select" name="option">
            <option value="" disabled selected>
              Choose your option
           </option>
            <option value="1">Option 1</option>
            <option value="2">Option 2</option>
            <option value="3">Option 3</option>
          </select>
         <br><br>

         <!-- Button -->
         <button type="submit"
             class="w3-teal w3-hover-green
             w3-round w3-button">
             Submit
         </button>
      </form>
    </div>
</body>
</html>
Producción:

Ejemplo: Lista de selección con múltiples selecciones posibles.
HTML
<!DOCTYPE html>
<html>
<head>

    <!-- Adding W3.CSS file through external link -->
    <link rel="stylesheet"
          href="https://www.w3schools.com/w3css/4/w3.css">

</head>
<body>
    <!-- w3-container is used to add 16px
          padding to any HTML element.  -->
    <!-- w3-center is used to set the content
         of the element to the center. -->
    <div class="w3-container w3-center">
        <!-- w3-text-green sets the text colour to green. -->
        <!-- w3-xxlarge sets font size to 32px. -->
        <h2 class="w3-text-green w3-xxlarge">GeeksForGeeks</h2>
    </div>

    <!-- Form in W3.CSS -->
    <div class="w3-container w3-text-red w3-center">
      <form>
         <!-- Multiple Selection list -->
         <select multiple class="w3-select" name="option">
            <option value="" disabled selected>
              Choose your option
           </option>
            <option value="1">Option 1</option>
            <option value="2">Option 2</option>
            <option value="3">Option 3</option>
          </select>
         <br><br>

         <!-- Button -->
         <button type="submit" class="w3-teal
             w3-hover-green w3-round w3-button">
               Submit
         </button>
      </form>
    </div>
</body>
</html>
Producción:

Clase w3-animate-input: esta clase es similar a la clase w3-input y, por lo tanto, se puede usar con todos los elementos de formulario HTML5. Esta clase transforma el ancho del elemento de destino al 100%.
Ejemplo:
HTML
<!DOCTYPE html>
<html>
<head>

    <!-- Adding W3.CSS file through external link -->
    <link rel="stylesheet"
          href="https://www.w3schools.com/w3css/4/w3.css">
</head>

<body>
    <!-- w3-container is used to add 16px
           padding to any HTML element.  -->
    <!-- w3-center is used to set the content
            of the element to the center. -->
    <div class="w3-container w3-center">

        <!-- w3-text-green sets the text color to green. -->
        <!-- w3-xxlarge sets font size to 32px. -->
        <h2 class="w3-text-green w3-xxlarge">GeeksForGeeks</h2>
    </div>

    <!-- Form in W3.CSS -->
    <div class="w3-container w3-text-red">
      <form>
         <!-- Text Field -->
         <label for="usr">Name:</label>
         <input type="text"
                class="w3-input w3-animate-input"
                id="usr"
                name="username"
                style="width: 30%;">
         <br>

         <!-- Password Field -->
         <label for="pwd">Password:</label>
         <input type="password"
                class="w3-input w3-animate-input"
                id="pwd"
                name="password"
                style="width: 30%;">
         <br>

         <!-- Number Field -->
         <label for="number">Number:</label>
         <input type="number"
                class="w3-input w3-animate-input"
                id="number"
                style="width: 30%;">
         <br>
         <div class="w3-center">
             <button type="submit" class="w3-teal
                 w3-hover-green w3-round w3-button">
                    Submit
             </button>
         </div>
      </form>
    </div>
</body>
</html>
Producción:
Puede ver que el ancho del elemento seleccionado es del 100% mientras que otros tienen un ancho del 30%.
Publicación traducida automáticamente
Artículo escrito por aditya_taparia y traducido por Barcelona Geeks. The original can be accessed here. Licence: CCBY-SA