Cuando creamos sitios web basados en JavaScript, a menudo tenemos la necesidad de proporcionar comentarios a nuestros usuarios para informarles si la acción que han realizado ha tenido éxito o no. En los primeros días de la web, los desarrolladores solían crear mensajes usando la función window.alert(). Si bien alert() funciona en la práctica y también es consistente en todos los navegadores, no es muy flexible y, para ser honesto, su apariencia es terrible. Hoy en día se han adoptado varios enfoques que van desde modales hasta mensajes en línea. En este artículo, le presentaré sweetAlert, una biblioteca que actúa como reemplazo de la función de alerta() de JavaScript.
Biblioteca SweetAlert CDN: SweetAlert es un reemplazo de la función window.alert() de JavaScript que muestra ventanas modales muy bonitas. Es una biblioteca independiente que no tiene dependencias y está hecha de un archivo JavaScript más un archivo CSS.
Sweet Alert se utiliza para hacer que un cuadro de alerta sea más atractivo y fácil de diseñar. El dulce JS proporciona métodos sencillos para diseñar y agregar muchas funcionalidades al cuadro de alerta del sitio web simplemente llamando a la función de alerta dulce (en resumen SWAL()).
¡Un hermoso reemplazo para JavaScript confirma el mensaje! Reemplazará el feo mensaje de confirmación con un hermoso modal personalizable y completamente funcional.
Sweet Alert es una forma de personalizar las alertas en tus juegos y sitios web. Le permite cambiar desde un botón estándar de JavaScript. Podemos agregar botones, cambiar el color del texto e incluso agregar alertas adicionales que cambian según el clic del usuario. También podemos poner iconos con nuestras alertas. También podemos usar la función setTimeout de JavaScript para configurar el tiempo de visualización de la alerta
Instalación:
- Usando NPM:
npm install sweetalert --save
Enlace CDN:
https://cdnjs.cloudflare.com/ajax/libs/sweetalert/2.1.0/sweetalert.min.js
Sintaxis:
swal("add title Text","Add simple text","add icon",
       {Json Format To add other swal function})
Nota: El swal() acepta el texto del título (está en negrita y tiene un tamaño de fuente más grande que el texto simple), texto simple e ícono como parámetro predeterminado. Puede usar JSON para usar cualquier otra función de Sweetalert. Si solo se proporciona un texto dentro de swal(), entonces será texto simple. Si hay dos textos, el primero será el texto del título y el segundo será el texto simple
Los siguientes ejemplos ilustran el funcionamiento de SweetAlert.
Ejemplo 1:
html
<!DOCTYPE html>
<html>
<head>
  <title>GeeksForGeeks Sweet alert</title>
  <script src=
"https://cdnjs.cloudflare.com/ajax/libs/sweetalert/2.1.0/sweetalert.min.js">
  </script>

</head>
<body>
  <script>
    swal("Here's a title", "Here's some text", "success", {
      button: "I am new button",

    });
  </script>
</body>
</html>
Producción:
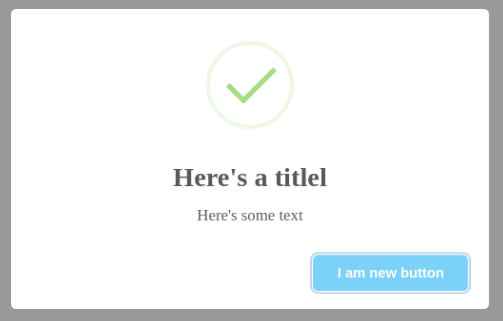
Ejemplo 2:
HTML
<!DOCTYPE html>
<html>
<head>
  <title>GeeksForGeeks Sweet alert</title>
  <script src=
"https://cdnjs.cloudflare.com/ajax/libs/sweetalert/2.1.0/sweetalert.min.js">
  </script>

</head>
<body>
  <script>
    swal("Are You want To Delete", {
      dangerMode: true,
      buttons: true,
    }    );
  </script>
</body>
</html>
Producción:
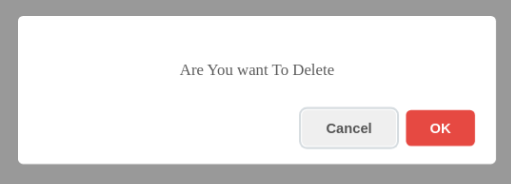
Lista de atributos JSON de Sweet Alert:
- Título: se usa para escribir el título dentro del cuadro de alerta si el título se proporciona como primer parámetro en Swal(), entonces el título del atributo JSON sobrescribirá ese valor objetivo
- Texto: este atributo se usa para escribir texto dentro del cuadro de alerta. Si Swal() contiene texto simple fuera del atributo JSON, sobrescribirá ese texto.
- Iconos: se utiliza para mostrar iconos. SweetAlert viene con 4 íconos incorporados que puede usar:
- advertencia
- error
- éxito
- información
Ejemplo 3: Pero puede agregar imágenes de íconos poniendo la dirección de la imagen entre comillas como:
HTML
<!DOCTYPE html>
<html>
<head>
  <title>GeeksForGeeks Sweet alert</title>
  <script src=
"https://cdnjs.cloudflare.com/ajax/libs/sweetalert/2.1.0/sweetalert.min.js">
  </script>

</head>
<body>
  <script>
  swal("Here's a title!", "Here's some text","success",{
        title:"i am New title",
        text:"I am New Text",
        icon:'https://dl.dropbox.com/s/qe98k2xvmqivxwz/google_apps.png',
  });
  </script>
</body>
</html>
Producción:
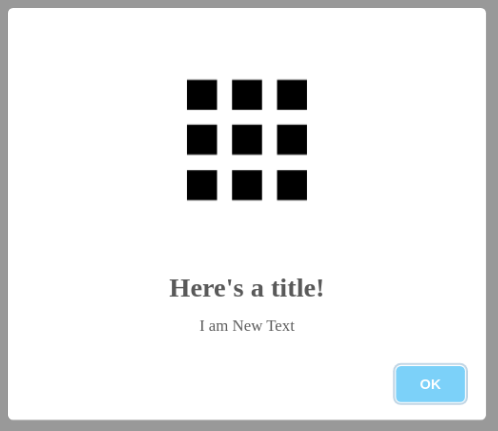
- Botón y botones: el botón se usa para crear un solo botón, mientras que los botones se usan para crear más de 1 botón. Por defecto, los botones tienen dos botones “cancelar” y “ok” con la configuración por defecto.
Ejemplo 4: puede agregar el atributo className tanto al botón como al swal para cambiar el estilo del botón y el cuadro de diálogo como se muestra en la siguiente figura:
HTML
<!DOCTYPE html>
<html>
    <head>
        <title>GeeksForGeeks Sweet alert</title>
        <script src=
"https://cdnjs.cloudflare.com/ajax/libs/sweetalert/2.1.0/sweetalert.min.js">
        </script>
        <style>
            .buttonstyle {
                color: Yellow;
                background-color: black;
            }

            .boxstyle {
                background: rgba(256, 10, 20, 0.5);
            }
        </style>
    </head>

    <body>
        <script>
            swal("Here's a title", "Here's some text", "success", {
                className: "boxstyle",

                buttons: {
                    cancel: true,

                    New: {
                        text: "I am new button",

                        value: "new button data",

                        visible: true,
                    },

                    New2: {
                        text: " styleButton",

                        value: "new button data",

                        visible: true,

                        className: "buttonstyle",
                    },
                },
            });
        </script>
    </body>
</html>
Producción:
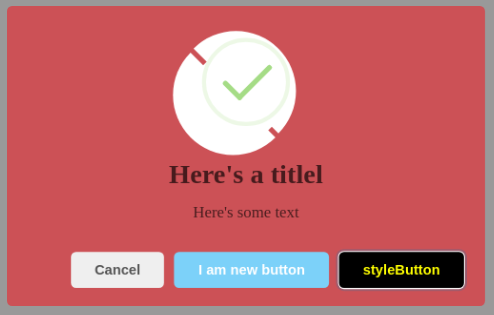
Ejemplo 5:
HTML
<!DOCTYPE html>
<html>
    <head>
        <title>GeeksFor Geeks Sweet alert</title>
        <script src=
"https://cdnjs.cloudflare.com/ajax/libs/sweetalert/2.1.0/sweetalert.min.js">
        </script>
        <style>
            .p {
                background-color: red;
                width: 190px;
                margin: auto;
                text-align: center;
                font-size: 22px;
            }
        </style>
    </head>

    <body>
        <script>
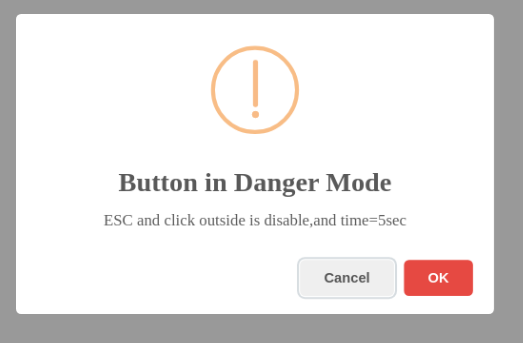
            swal("Button in Danger Mode",
                 "ESC and click outside is disable,and time=5sec",
                 "warning", {
                dangerMode: true,
                buttons: true,
                closeOnClickOutside: false,
                timer: 5000,
            });
        </script>
    </body>
</html>
Producción:
- contenido: Esto se usa para agregar cualquier elemento como elemento P, elemento H1, botón, área de texto, entrada, división, etc. El atributo de contenido contiene dos nombres de elementos y su atributo, atributo significa propiedades internas de un elemento como estilo en línea, ancho , altura, marcador de posición, className, etc. Los siguientes son un código de ejemplo del elemento de entrada.
swal({
  content: {
    element: "input",
    attributes: {
      placeholder: "Enter any Number",
      // Type can be range,can be
      // password and can be text
      type: "number",
     },
  },
});
Crear elemento de párrafo:
swal({
  content: {
    element: "p",
    attributes: {
     innerText:"hello",
     style:"color:blue;",
     className:"p",

    },
  },
});
Ejemplo 6: Creación de elementos de párrafo.
HTML
<!DOCTYPE html>
<html>
    <head>
        <title>GeeksFor Geeks Sweet alert</title>
        <script src=
"https://cdnjs.cloudflare.com/ajax/libs/sweetalert/2.1.0/sweetalert.min.js">
        </script>
        <style>
             h1{
                 color: green;
                 text-align: center;
             }
            .p {
                width: 100%;
                margin: auto;
                text-align: center;
                font-size: 22px;
            }
        </style>
    </head>

    <body>
        <h1>GeeksforGeeks</h1>
        <script>
            swal({
                content: {
                    element: "p",
                    attributes: {
                        innerText: "A Computer Science Portal for Geeks",
                        style: "color: black;",
                        className: "p",
                    },
                },
            });
        </script>
    </body>
</html>
Producción:

Referencia: https://sweetalert.js.org/
Publicación traducida automáticamente
Artículo escrito por karnalrohit y traducido por Barcelona Geeks. The original can be accessed here. Licence: CCBY-SA