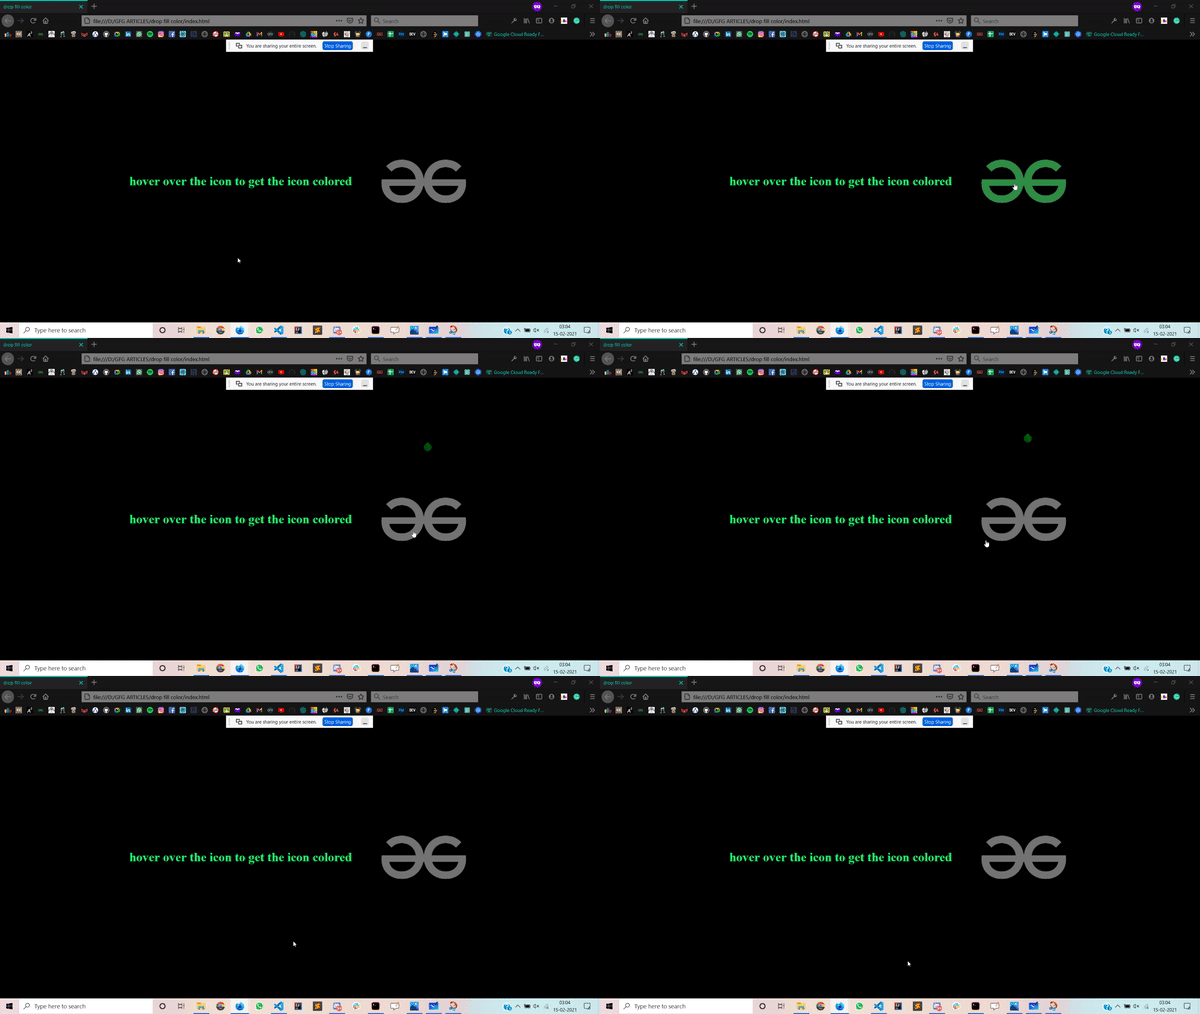
En este artículo, vamos a crear un efecto de gota de color de relleno utilizando HTML y CSS en el que la imagen se colorea cuando pasamos el cursor sobre ella. Aparece cuando pasa el cursor sobre la imagen, cae una gota de color sobre la imagen que cambia el color de la imagen de gris a color.
Acercarse:
- Crea un archivo HTML en el que agregamos el texto y un div para la imagen.
- Luego, tenemos que usar la propiedad de desplazamiento para colorear nuestra imagen.
- También usamos pseudoclases como ::before y ::after en nuestro proyecto.
- Uso de @keyframes para el movimiento de nuestra gota.
Código HTML:
- Primero, cree un archivo HTML (index.html).
- Luego vincule el archivo CSS que proporciona todo el efecto de la animación a nuestro HTML. También se coloca dentro de la sección <head>.
- Llegando a la sección del cuerpo de nuestro código HTML:
- Primero, tenemos que crear un div principal.
- Luego, le damos una clase al div principal y creamos otro div dentro del div presente para ponerle una imagen.
HTML
<!DOCTYPE html>
<html lang="en">

<head>

    <link rel="stylesheet" href="style.css">
</head>

<body>
    <h1>
        hover over the icon to
        get the icon colored
    </h1>

    <div class="main_box">
        <div class="img"></div>
    </div>
</body>

</html>
Código CSS: CSS se usa para dar diferentes tipos de animaciones y efectos a nuestra página HTML para que parezca interactiva para todos los usuarios.
En CSS tenemos que recordar los siguientes puntos:
- Restaura todos los efectos del navegador.
- Utilice clases e identificadores para dar efectos a los elementos HTML.
- Uso de :hover para usar efectos de desplazamiento.
- Uso de @keyframes para el movimiento de nuestra gota.
- Uso de pseudoclases.
HTML
/* Restoring the browser effects */
*{
    margin: 0;
    padding: 0;
    box-sizing: border-box;
}

/* Applying all of the same
functionalities to the body */
body{
    display: flex;
    justify-content: center;
    align-items: center;
    background-color: #000;
    height: 100vh;
}

h1{
    color: rgb(0, 255, 115);
    margin-right: 2em;
}

.main_box{
    width: 15em;
    height: 15em;
    position: relative;
    cursor: pointer;
}

.img,.main_box::before{
    width: 100%;
    height: 100%;
    background-image: url(gfg.jpg);
    background-size: cover;
    background-position: center;
    background-repeat: no-repeat;
}

/* Changing the image to gray color */
.img{
    filter: grayscale(100%);
}


/* Code for drop of color */
.main_box::before{
    content: '';
    position: absolute;
    top: 0;
    left: 0;
    clip-path: circle(0 at 50% 0);
    transition: all .3s;
    z-index: 1;
}

.main_box::after{
    content: '';
    position: absolute;
    top: -6em;
    left: 50%;
    transform: translateX(-50%);
    width: 1.25em;
    height: 1.25em;
    background-image: linear-gradient(#006800 , #014716);
    border-radius: 0 10em 10em 10em;
    opacity: 0;
    transform: rotate(45deg);
}

.main_box:hover::after{
    animation: neeche 0.5s cubic-bezier(1,0,1,.81);
}

.main_box:hover::before{
    clip-path: circle(31em at 50% 0);
    transition-delay: .5s;
}

@keyframes neeche{
    from{
        opacity: 1;
    }
    to{
        opacity: 0;
        top: 6em;
    }
}
Código completo:
HTML
<!DOCTYPE html>
<html lang="en">

<head>
    <style>

        /* Restoring the browser effects */

        * {
            margin: 0;
            padding: 0;
            box-sizing: border-box;
        }

        /* Applying all of the same
        functionalities to the body */
        body {
            display: flex;
            justify-content: center;
            align-items: center;
            background-color: #000;
            height: 100vh;
        }

        h1 {
            color: rgb(0, 255, 115);
            margin-right: 2em;
        }

        .main_box {
            width: 15em;
            height: 15em;
            position: relative;
            cursor: pointer;
        }

        .img,
        .main_box::before {
            width: 100%;
            height: 100%;
            background-image: url(
https://media.geeksforgeeks.org/wp-content/uploads/20210215161411/geeksforgeeksremovebgpreview.jpg);
            background-size: cover;
            background-position: center;
            background-repeat: no-repeat;
        }

        /* Changing the image to gray color */
        .img {
            filter: grayscale(100%);
        }

        /* Code for drop of color */
        .main_box::before {
            content: '';
            position: absolute;
            top: 0;
            left: 0;
            clip-path: circle(0 at 50% 0);
            transition: all .3s;
            z-index: 1;
        }

        .main_box::after {
            content: '';
            position: absolute;
            top: -6em;
            left: 50%;
            transform: translateX(-50%);
            width: 1.25em;
            height: 1.25em;
            background-image: linear-gradient(
                        #006800, #014716);

            border-radius: 0 10em 10em 10em;
            opacity: 0;
            transform: rotate(45deg);
        }

        .main_box:hover::after {
            animation: neeche 0.5s
                cubic-bezier(1, 0, 1, .81);
        }

        .main_box:hover::before {
            clip-path: circle(31em at 50% 0);
            transition-delay: .5s;
        }

        @keyframes neeche {
            from {
                opacity: 1;
            }
            to {
                opacity: 0;
                top: 6em;
            }
        }
    </style>
</head>

<body>
    <h1>
        hover over the icon to
        get the icon colored
    </h1>

    <div class="main_box">
        <div class="img"></div>
    </div>
</body>

</html>
Producción :

Publicación traducida automáticamente
Artículo escrito por rahulmahajann y traducido por Barcelona Geeks. The original can be accessed here. Licence: CCBY-SA