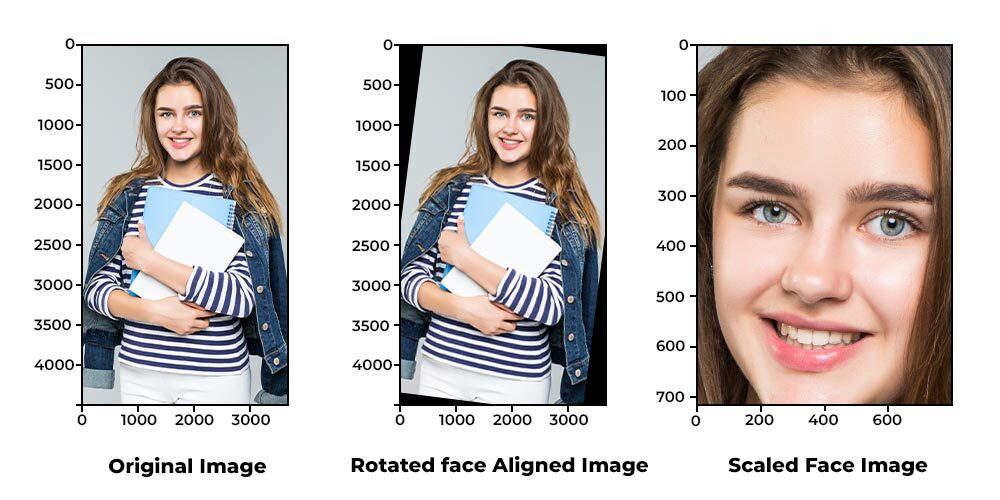
Face Alignment es la técnica en la que se gira la imagen de la persona según el ángulo de los ojos . Esta técnica en realidad se usa como parte del proceso de tubería en el que se realiza la detección facial usando la imagen. Esta implementación de la alineación de caras se puede hacer fácilmente con la ayuda del módulo cv2 de python (visión por computadora). Tiene tantas características incluidas en él.
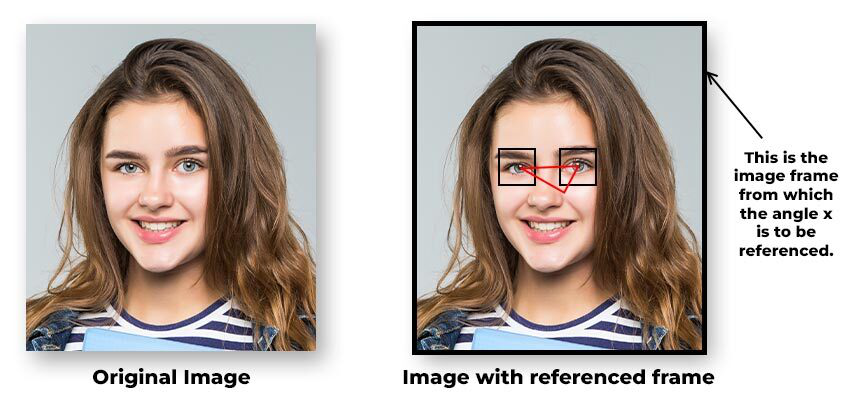
Supongamos que si los ojos de la persona en la imagen están en un ángulo x (x! = 180 grados) con referencia al marco de la imagen, esta técnica rotará la imagen de acuerdo con el ángulo donde el ángulo x será igual a 180 grados con referencia al marco de la imagen.

Imagen original y marco de referencia
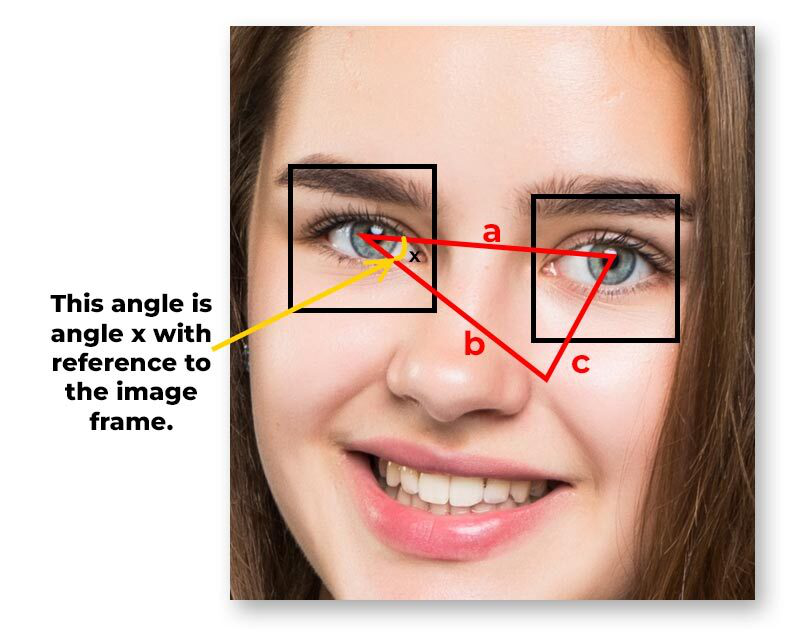
Ahora el ángel x se puede calcular fácilmente a partir del triángulo formado por los ojos y el marco de referencia usando trigonometría. Aplicando la distancia euclidiana podemos obtener el valor del ángulo x.
cos(x) = (b 2 + c 2 – a 2 ) / (2bc)

Trigonometría para calcular el ángulo x
Pasos necesarios para la alineación de la cara
Paso 1: Primero necesitamos detectar la cara en la imagen.
Python3
# Face detection function to
# detect the face and return images
def face_detection(img):
    faces = face_detector.detectMultiScale(img, 1.1, 4)
    if (len(faces) <= 0):
        img_gray = cv2.cvtColor(img, cv2.COLOR_BGR2GRAY)
        return img, img_gray
    else:
        X, Y, W, H = faces[0]
        img = img[int(Y):int(Y+H), int(X):int(X+W)]
        return img, cv2.cvtColor(img, cv2.COLOR_BGR2BGRA)
Paso 2: Luego necesitamos encontrar el par de ojos más grande en la imagen de referencia.
Python3
# finding the largest pair of
# eyes in the image
if len(eyes) >= 2:
    eye = eyes[:, 2]
    container1 = []
    for i in range(0, len(eye)):
        container = (eye[i], i)
        container1.append(container)
    df = pd.DataFrame(container1, columns=[
                      "length", "idx"]).sort_values(by=['length'])
    eyes = eyes[df.idx.values[0:2]]
Paso 3: Capturando los ojos.
Python3
# center of right eye
right_eye_center = (
    int(right_eye[0] + (right_eye[2]/2)),
  int(right_eye[1] + (right_eye[3]/2)))
right_eye_x = right_eye_center[0]
right_eye_y = right_eye_center[1]
cv2.circle(img, right_eye_center, 2, (255, 0, 0), 3)

# center of left eye
left_eye_center = (
    int(left_eye[0] + (left_eye[2] / 2)),
  int(left_eye[1] + (left_eye[3] / 2)))
left_eye_x = left_eye_center[0]
left_eye_y = left_eye_center[1]
cv2.circle(img, left_eye_center, 2, (255, 0, 0), 3)

# finding rotation direction
if left_eye_y > right_eye_y:
    print("Rotate image to clock direction")
    point_3rd = (right_eye_x, left_eye_y)
    direction = -1  # rotate image direction to clock
else:
    print("Rotate to inverse clock direction")
    point_3rd = (left_eye_x, right_eye_y)
    direction = 1  # rotate inverse direction of clock
Paso 4: Usar la trigonometría para calcular la longitud de todas las aristas del triángulo formado.
Python3
# Calculate the length of all the edges
def trignometry_for_distance(a, b):
    return math.sqrt(((b[0] - a[0]) * (b[0] - a[0])) \
                     + ((b[1] - a[1]) * (b[1] - a[1])))
Paso 5: Ahora calcularemos el ángulo xa como se discutió en el ejemplo anterior.
Python3
# calculating the angle between a, b, c
cv2.circle(img, point_3rd, 2, (255, 0, 0), 2)
a = trignometry_for_distance(left_eye_center, point_3rd)
b = trignometry_for_distance(right_eye_center, point_3rd)
c = trignometry_for_distance(right_eye_center, left_eye_center)
cos_a = (b*b + c*c - a*a)/(2*b*c)
angle = (np.arccos(cos_a) * 180) / math.pi
Paso 6: Gire la imagen de acuerdo con el marco de referencia de la imagen.
Python3
# rotate images
new_img = Image.fromarray(img_raw)
new_img = np.array(new_img.rotate(direction * angle))
Paso 7: Por último escala la imagen para ver la imagen de la cara.
Python3
# scale the image
test_set = ["pic.png"]
for i in test_set:
    alignedFace = Face_Alignment(i)
    pl.imshow(alignedFace[:, :, ::-1])
    pl.show()
    img, gray_img = face_detection(alignedFace)
    pl.imshow(img[:, :, ::-1])
    pl.show()
A continuación se muestra la implementación completa
Python3
# install and import above modules first
import os
import cv2
import math
import matplotlib.pyplot as pl
import pandas as pd
from PIL import Image
import numpy as np

# Detect face
def face_detection(img):
    faces = face_detector.detectMultiScale(img, 1.1, 4)
    if (len(faces) <= 0):
        img_gray = cv2.cvtColor(img, cv2.COLOR_BGR2GRAY)
        return img, img_gray
    else:
        X, Y, W, H = faces[0]
        img = img[int(Y):int(Y+H), int(X):int(X+W)]
        return img, cv2.cvtColor(img, cv2.COLOR_BGR2BGRA)


def trignometry_for_distance(a, b):
    return math.sqrt(((b[0] - a[0]) * (b[0] - a[0])) +\
                     ((b[1] - a[1]) * (b[1] - a[1])))

# Find eyes
def Face_Alignment(img_path):
    pl.imshow(cv2.imread(img_path)[:, :, ::-1])
    pl.show()
    img_raw = cv2.imread(img_path).copy()
    img, gray_img = face_detection(cv2.imread(img_path))
    eyes = eye_detector.detectMultiScale(gray_img)

    # for multiple people in an image find the largest
    # pair of eyes
    if len(eyes) >= 2:
        eye = eyes[:, 2]
        container1 = []
        for i in range(0, len(eye)):
            container = (eye[i], i)
            container1.append(container)
        df = pd.DataFrame(container1, columns=[
                          "length", "idx"]).sort_values(by=['length'])
        eyes = eyes[df.idx.values[0:2]]

        # deciding to choose left and right eye
        eye_1 = eyes[0]
        eye_2 = eyes[1]
        if eye_1[0] > eye_2[0]:
            left_eye = eye_2
            right_eye = eye_1
        else:
            left_eye = eye_1
            right_eye = eye_2

        # center of eyes
        # center of right eye
        right_eye_center = (
            int(right_eye[0] + (right_eye[2]/2)),
          int(right_eye[1] + (right_eye[3]/2)))
        right_eye_x = right_eye_center[0]
        right_eye_y = right_eye_center[1]
        cv2.circle(img, right_eye_center, 2, (255, 0, 0), 3)

        # center of left eye
        left_eye_center = (
            int(left_eye[0] + (left_eye[2] / 2)),
          int(left_eye[1] + (left_eye[3] / 2)))
        left_eye_x = left_eye_center[0]
        left_eye_y = left_eye_center[1]
        cv2.circle(img, left_eye_center, 2, (255, 0, 0), 3)

        # finding rotation direction
        if left_eye_y > right_eye_y:
            print("Rotate image to clock direction")
            point_3rd = (right_eye_x, left_eye_y)
            direction = -1  # rotate image direction to clock
        else:
            print("Rotate to inverse clock direction")
            point_3rd = (left_eye_x, right_eye_y)
            direction = 1  # rotate inverse direction of clock

        cv2.circle(img, point_3rd, 2, (255, 0, 0), 2)
        a = trignometry_for_distance(left_eye_center,
                                     point_3rd)
        b = trignometry_for_distance(right_eye_center,
                                     point_3rd)
        c = trignometry_for_distance(right_eye_center,
                                     left_eye_center)
        cos_a = (b*b + c*c - a*a)/(2*b*c)
        angle = (np.arccos(cos_a) * 180) / math.pi

        if direction == -1:
            angle = 90 - angle
        else:
            angle = -(90-angle)

        # rotate image
        new_img = Image.fromarray(img_raw)
        new_img = np.array(new_img.rotate(direction * angle))

    return new_img


opencv_home = cv2.__file__
folders = opencv_home.split(os.path.sep)[0:-1]
path = folders[0]
for folder in folders[1:]:
    path = path + "/" + folder
path_for_face = path+"/data/haarcascade_frontalface_default.xml"
path_for_eyes = path+"/data/haarcascade_eye.xml"
path_for_nose = path+"/data/haarcascade_mcs_nose.xml"

if os.path.isfile(path_for_face) != True:
    raise ValueError(
        "opencv is not installed pls install using pip install opencv ",
      detector_path, " violated.")

face_detector = cv2.CascadeClassifier(path_for_face)
eye_detector = cv2.CascadeClassifier(path_for_eyes)
nose_detector = cv2.CascadeClassifier(path_for_nose)

# Name of the image for face alignment if on
# the other folder kindly paste the name of
# the image with path included
test_set = ["pic.png"]
for i in test_set:
    alignedFace = Face_Alignment(i)
    pl.imshow(alignedFace[:, :, ::-1])
    pl.show()
    img, gray_img = face_detection(alignedFace)
    pl.imshow(img[:, :, ::-1])
    pl.show()
Producción:

Publicación traducida automáticamente
Artículo escrito por abhilashgaurav003 y traducido por Barcelona Geeks. The original can be accessed here. Licence: CCBY-SA