Kivy es una herramienta GUI independiente de la plataforma en Python. Como se puede ejecutar en Android, IOS, Linux y Windows, etc. Básicamente se usa para desarrollar la aplicación de Android, pero eso no significa que no se pueda usar en aplicaciones de escritorio.
Ahora, en este artículo, aprenderemos cómo podemos crear un tipo de botón similar al botón de acción flotante usando kivy python.
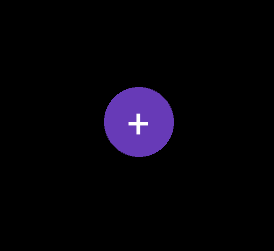
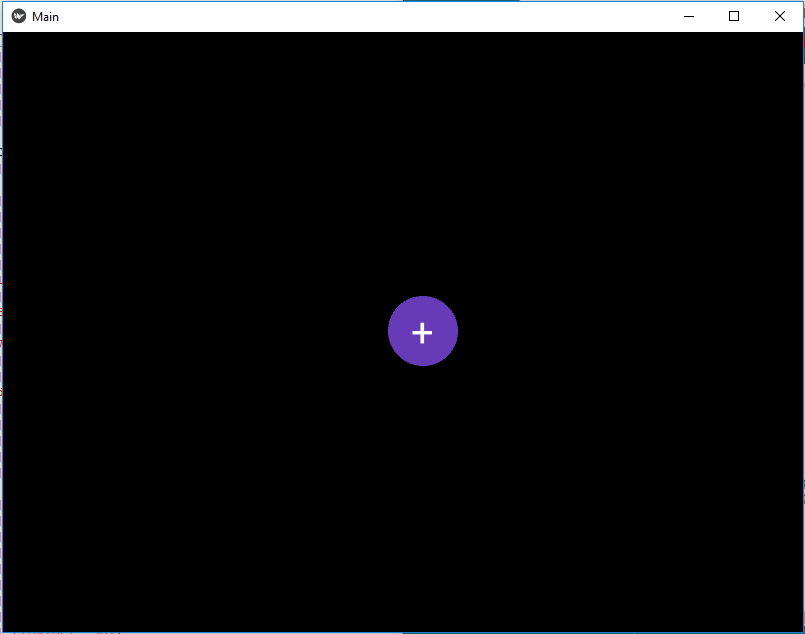
¿Qué es el botón de acción flotante?
Un botón de acción flotante (FAB) realiza la acción principal o más común en una pantalla. Aparece delante de todo el contenido de la pantalla, normalmente como una forma circular con un icono en el centro.
Para aprender a crear esto, debe tener un buen conocimiento sobre los diseños, el botón, el lienzo y la elipse en el lienzo. Estos son todos los que vamos a usar para crear el botón. Por lo tanto, estamos creando un botón como el que vemos en Gmail en el lado derecho, es decir, para escribir un nuevo correo electrónico en la aplicación móvil (no en el sitio web).

Basic Approach:

1) import kivy
2) import kivyApp
3) import Boxlayout
4) Set minimum version(optional)
5) create Layout class
6) create App class
7) Set up .kv file :
       1) Add Floating Button Properties
       2) Create Main Window
       3) Add Float Button
8) return Layout/widget/Class(according to requirement)
9) Run an instance of the class
Implementación del Enfoque –
main.py
Python3
## Sample Python application demonstrating that
## How to create a button like floating Action Button
## in Kivy using .kv file

###################################################
# import modules

import kivy

# base Class of your App inherits from the App class.
# app:always refers to the instance of your application
from kivy.app import App

# BoxLayout arranges widgets in either
# in a vertical fashion that
# is one on top of another or in a horizontal
# fashion that is one after another.
from kivy.uix.boxlayout import BoxLayout

# To change the kivy default settings
# we use this module config
from kivy.config import Config

# 0 being off 1 being on as in true / false
# you can use 0 or 1 && True or False
Config.set('graphics', 'resizable', True)

# creating the root widget used in .kv file
class MainWindow(BoxLayout):
    pass


# creating the App class in which name
#.kv file is to be named main.kv
class MainApp(App):
    # defining build()
    def build(self):
        # returning the instance of root class
        return MainWindow()

# run the app
if __name__ == '__main__':
    MainApp().run()
Implementación del archivo
.kv main.kv
Python3
#.kv file implementation of Float Button


# using Float Layout for the creation of Floatbutton
# Here we are creating the properties of button
# Button will be created in Main window Box Layout

<FloatButton@FloatLayout>
    id: float_root  # Giving id to button
    size_hint: (None, None)
    text: ''
    btn_size: (70, 70)
    size: (70, 70)
    bg_color: (0.404, 0.227, 0.718, 1.0)
    pos_hint: {'x': .6}

    # Adding shape and all, size, position to button
    Button:
        text: float_root.text
        markup: True
        font_size: 40
        size_hint: (None, None)
        size: float_root.btn_size
        pos_hint: {'x': 5.5, 'y': 3.8}
        background_normal: ''
        background_color: (0, 0, 0, 0)
        canvas.before:
            Color:
                rgba: (0.404, 0.227, 0.718, 1.0)
            Ellipse:
                size: self.size
                pos: self.pos

# Creation of main window
<MainWindow>:
    BoxLayout:

        # Creating the Float button
        FloatButton:
            text: '+'
            markup: True
            background_color: 1, 0, 1, 0
Producción:
Publicación traducida automáticamente
Artículo escrito por YashKhandelwal8 y traducido por Barcelona Geeks. The original can be accessed here. Licence: CCBY-SA