Agregar íconos en la parte inferior de la navegación de pestañas en React Native es una tarea bastante fácil. En este artículo, implementaremos una aplicación básica para aprender a usar íconos en nuestra pestaña de navegación. Para esto, primero debemos configurar la aplicación e instalar algunos paquetes.
Implementación: Ahora comencemos con la implementación:
-
Paso 1: Abra su terminal e instale expo-cli con el siguiente comando.
npm install -g expo-cli
-
Paso 2: ahora cree un proyecto con el siguiente comando.
expo init tab-navigation-icons
-
Paso 3: Ahora ve a la carpeta de tu proyecto, es decir, íconos de navegación de pestañas
cd tab-navigation-icons
Paso 4: instale los paquetes necesarios con el siguiente comando:
npm install --save react-navigation react-native-gesture-handler
npm install --save react-native-vector-icons
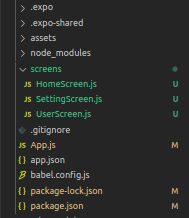
Estructura del proyecto: Tendrá el siguiente aspecto.

Ejemplo: Ahora, configuremos el Navegador de pestañas y agreguemos íconos, junto con algunos estilos CSS básicos para que los íconos se vean presentables. Habrá 3 pantallas en nuestra aplicación de demostración, a saber: pantalla de inicio, pantalla de usuario y pantalla de configuración. Así, tendremos 3 pestañas para navegar entre estas 3 pantallas, siendo nuestra Pantalla de Inicio la Pantalla predeterminada.
App.js
import React from "react";
import { Ionicons } from "@expo/vector-icons";
import { createAppContainer } from "react-navigation";
import { createBottomTabNavigator } from "react-navigation-tabs";

import HomeScreen from "./screens/HomeScreen";
import UserScreen from "./screens/UserScreen";
import SettingScreen from "./screens/SettingScreen";

const TabNavigator = createBottomTabNavigator({
  Home: {
    screen: HomeScreen,
    navigationOptions: {
      tabBarLabel: "Home",
      tabBarOptions: {
        activeTintColor: "#006600",
      },
      tabBarIcon: (tabInfo) => {
        return (
          <Ionicons
            name="md-home"
            size={24}
            color={tabInfo.focused ? "#006600" : "#8e8e93"}
          />
        );
      },
    },
  },
  User: {
    screen: UserScreen,
    navigationOptions: {
      tabBarLabel: "User",
      tabBarOptions: {
        activeTintColor: "#006600",
      },
      tabBarIcon: (tabInfo) => {
        return (
          <Ionicons
            name="md-person-circle-outline"
            size={24}
            color={tabInfo.focused ? "#006600" : "#8e8e93"}
          />
        );
      },
    },
  },
  Setting: {
    screen: SettingScreen,
    navigationOptions: {
      tabBarLabel: "Setting",
      tabBarOptions: {
        activeTintColor: "#006600",
      },
      tabBarIcon: (tabInfo) => {
        return (
          <Ionicons
            name="md-settings-outline"
            size={24}
            color={tabInfo.focused ? "#006600" : "#8e8e93"}
          />
        );
      },
    },
  },
});

const Navigator = createAppContainer(TabNavigator);

export default function App() {
  return (
    <Navigator>
      <HomeScreen />
    </Navigator>
  );
}
El código anterior contiene la lógica de nuestro Navegador de pestañas con íconos en la parte inferior de la Navegación de pestañas. Ahora, necesitamos las pantallas a las que debemos navegar.
HomeScreen.js
import React from "react";
import { Text, View } from "react-native";
import { Ionicons } from "@expo/vector-icons";

const Home = () => {
  return (
    <View style={{ flex: 1, alignItems: "center", justifyContent: "center" }}>
      <Text style={{ color: "#006600", fontSize: 40 }}>Home Screen!</Text>
      <Ionicons name="md-home" size={80} color="#006600" />
    </View>
  );
};

export default Home;
UserScreen
import React from "react";
import { Text, View } from "react-native";
import { Ionicons } from "@expo/vector-icons";

const User = () => {
  return (
    <View style={{ flex: 1, alignItems: "center", justifyContent: "center" }}>
      <Text style={{ color: "#006600", fontSize: 40 }}>User Screen!</Text>
      <Ionicons name="md-person-circle-outline" size={80} color="#006600" />
    </View>
  );
};

export default User;
SettingsScreen.js
import React from "react";
import { Text, View } from "react-native";
import { Ionicons } from "@expo/vector-icons";

const Settings = () => {
  return (
    <View style={{ flex: 1, alignItems: "center", justifyContent: "center" }}>
      <Text style={{ color: "#006600", fontSize: 40 }}>Settings Screen!</Text>
      <Ionicons name="md-settings-outline" size={80} color="#006600" />
    </View>
  );
};

export default Settings;
Inicie el servidor utilizando el siguiente comando.
npm run android
Salida: si su emulador no se abrió automáticamente, debe hacerlo manualmente. Primero, vaya a su estudio de Android y ejecute el emulador. Ahora inicie el servidor de nuevo.

Referencia: https://reactnavigation.org/docs/tab-based-navigation/
Publicación traducida automáticamente
Artículo escrito por verma_anushka y traducido por Barcelona Geeks. The original can be accessed here. Licence: CCBY-SA