Requisito previo: GUI de Python – tkinter
En este artículo, veremos cómo podemos usar Python para extraer información del vehículo de su número VIN (Número de identificación del vehículo). Un VIN consta de 17 caracteres (dígitos y letras mayúsculas) que actúan como un identificador único para el vehículo. Es un código único que se asigna a cada vehículo de motor cuando se fabrica. El VIN se puede utilizar para extraer información sobre un vehículo, como el país en el que se fabricó, su fabricante, etc.
Antes de comenzar, necesitamos instalar el módulo vininfo . Ejecute este código en su terminal para la instalación:
pip install vininfo
A continuación se muestra la implementación.
Python3
# importing module
from vininfo import Vin

# Pass the VIN number into Vin methods
vin = Vin('MAJGERTYKGHG56037')

# prints vehicle's country
print(vin.country)

# prints vehicle's manufacturer
print(vin.manufacturer)

# prints vehicle manufacturer's region
print(vin.region)
Producción:
India
FordS
Asia
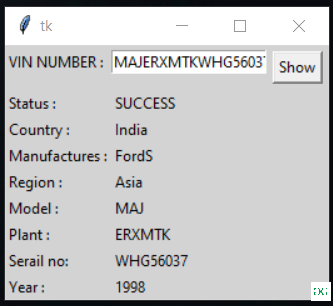
Programa para extraer información de la aplicación del número de VIN con Tkinter. Este script implementa la implementación anterior pero en GUI.
Python3
# import modules
from tkinter import *
from vininfo import Vin
from tkinter import messagebox


def check_vin():
    try:
        vin = Vin(str(e.get()))
        country.set(vin.country)
        manufacturer.set(vin.manufacturer)
        region.set(vin.region)
        model.set(vin.wmi)
        Plant.set(vin.vds)
        Serial.set(vin.vis)
        year.set(vin.years)
        res.set("SUCCESS")
    except:
        messagebox.showerror("showerror", "VIN not found")


# object of tkinter
# and background set for light grey
master = Tk()
master.configure(bg='light grey')

# Variable Classes in tkinter
country = StringVar()
manufacturer = StringVar()
region = StringVar()
model = StringVar()
Plant = StringVar()
Serial = StringVar()
year = StringVar()
res = StringVar()

# Creating label for each information
# name using widget Label
Label(master, text="VIN NUMBER :", bg="light grey").grid(row=0, sticky=W)
Label(master, text="Status :", bg="light grey").grid(row=3, sticky=W)
Label(master, text="Country :", bg="light grey").grid(row=4, sticky=W)
Label(master, text="Manufactures :", bg="light grey").grid(row=5, sticky=W)
Label(master, text="Region :", bg="light grey").grid(row=6, sticky=W)
Label(master, text="Model :", bg="light grey").grid(row=7, sticky=W)
Label(master, text="Plant :", bg="light grey").grid(row=8, sticky=W)
Label(master, text="Serial no:", bg="light grey").grid(row=9, sticky=W)
Label(master, text="Year :", bg="light grey").grid(row=10, sticky=W)


# Creating label for class variable
# name using widget Entry
Label(master, text="", textvariable=res, bg="light grey").grid(
    row=3, column=1, sticky=W)
Label(master, text="", textvariable=country,
      bg="light grey").grid(row=4, column=1, sticky=W)
Label(master, text="", textvariable=manufacturer,
      bg="light grey").grid(row=5, column=1, sticky=W)
Label(master, text="", textvariable=region,
      bg="light grey").grid(row=6, column=1, sticky=W)
Label(master, text="", textvariable=model,
      bg="light grey").grid(row=7, column=1, sticky=W)
Label(master, text="", textvariable=Plant,
      bg="light grey").grid(row=8, column=1, sticky=W)
Label(master, text="", textvariable=Serial,
      bg="light grey").grid(row=9, column=1, sticky=W)
Label(master, text="", textvariable=year, bg="light grey").grid(
    row=10, column=1, sticky=W)


e = Entry(master)
e.grid(row=0, column=1)

# creating a button using the widget
# Button that will call the submit function
b = Button(master, text="Show", command=check_vin)
b.grid(row=0, column=2, columnspan=2, rowspan=2, padx=5, pady=5)

mainloop()
Producción:

Publicación traducida automáticamente
Artículo escrito por kumar_satyam y traducido por Barcelona Geeks. The original can be accessed here. Licence: CCBY-SA