Kivy es una herramienta GUI independiente de la plataforma en Python. Como se puede ejecutar en Android, IOS, Linux y Windows, etc. Básicamente se usa para desarrollar la aplicación de Android, pero eso no significa que no se pueda usar en aplicaciones de escritorio.
En este artículo, aprenderemos cómo podemos agregar un botón con la entrada de texto en kivy usando un archivo .kv en python como el mismo que tenemos en el botón de entrada y envío. Entonces, para hacer esto, primero debe saber sobre el widget Textinput y Button en kivy.
Entrada de texto: el widget Entrada de texto proporciona un cuadro para texto sin formato editable. Se admiten las funciones Unicode, multilínea, navegación con cursor, selección y portapapeles.
Botón: el botón es una etiqueta con acciones asociadas que se activan cuando se presiona el botón (o se suelta después de un clic/toque). Podemos agregar funciones detrás del botón y diseñar el botón.
Basic Approach -

1) import kivy
2) import kivyApp
3) import widget
4) import Boxlayout
5) import textinput and Button
6) Set minimum version(optional)
7) Create Widget class
8) Create App class
9) create .kv file (name same as the app class):
        1) create textinput
        2) create Button
10) return Layout/widget/Class(according to requirement)
11) Run an instance of the class
Implementación del
archivo Approach main.py
Python3
# Program to Show how to create textinput
# with button in kivy using .kv file

##################################################
# import kivy module
import kivy

# base Class of your App inherits from the App class.
# app:always refers to the instance of your application
from kivy.app import App

# this restrict the kivy version i.e
# below this kivy version you cannot
# use the app or software
kivy.require('1.9.1')

# Widgets are elements
# of a graphical user interface
# that form part of the User Experience.
from kivy.uix.widget import Widget

# The TextInput widget provides a
# box for editable plain text
from kivy.uix.textinput import TextInput

# BoxLayout arranges widgets in either
# in a vertical fashion that is
# one on top of another or in a horizontal
# fashion that is one after another.
from kivy.uix.boxlayout import BoxLayout

# to change the kivy default settings we use this module config
from kivy.config import Config

# 0 being off 1 being on as in true / false
# you can use 0 or 1 && True or False
Config.set('graphics', 'resizable', True)

# creating the root widget used in .kv file
class BtnTextInput(BoxLayout):
    pass

# class in which we are creating the Textinput and btn
# in .kv file to be named main.kv
class MainApp(App):
    # defining build()
    def build(self):
        # returning the instance of root class
        return BtnTextInput()

# run function runs the whole program
# i.e run() method which calls the target
# function passed to the constructor.
if __name__ == '__main__':
    MainApp().run()
Implementación del archivo .kv
Python3
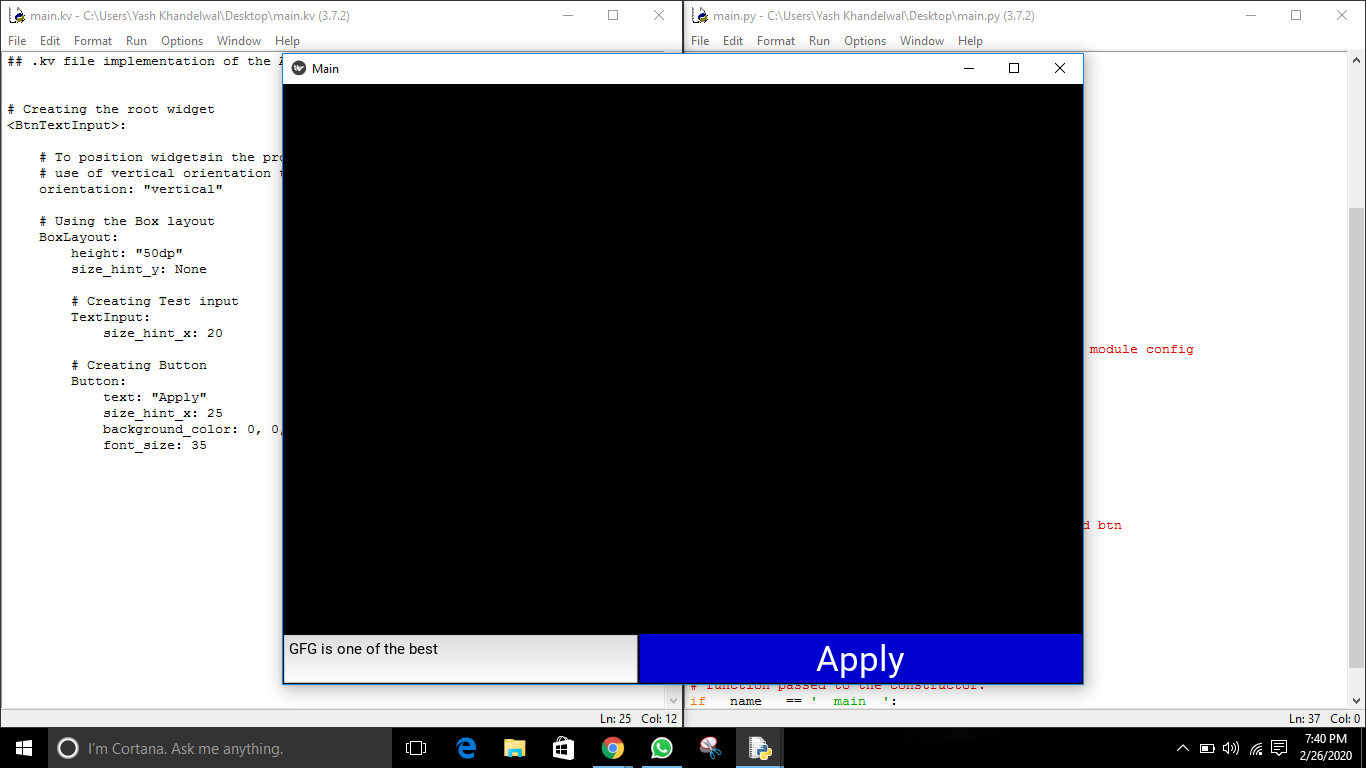
## .kv file implementation of the App class


# Creating the root widget
<BtnTextInput>:

    # To position widgetsin the proper orientation
    # use of vertical orientation to set all widgets
    orientation: "vertical"

    # Using the Box layout
    BoxLayout:
        height: "50dp"
        size_hint_y: None

        # Creating Test input
        TextInput:
            size_hint_x: 20

        # Creating Button
        Button:
            text: "Apply"
            size_hint_x: 25
            background_color: 0, 0, 1, 1
            font_size: 35
Salida:
Se presiona el botón
Botón no presionado

Vista simple (Cerrar)

Publicación traducida automáticamente
Artículo escrito por YashKhandelwal8 y traducido por Barcelona Geeks. The original can be accessed here. Licence: CCBY-SA