En este artículo, aprenderemos a implementar la detección de objetos de propuesta de región con OpenCV, Keras y TensorFlow.
Instala todas las dependencias
Use el comando pip para instalar todas las dependencias
pip install tensorflow keras imutils
pip install opencv-contrib-python
Nota: asegúrese de instalar el paquete OpenCV anterior; de lo contrario, podría enfrentar errores de importación.
Paso 1: Lea la imagen y aplique el método de búsqueda selectiva de OpenCV
En este paso, leeremos la imagen y le aplicaremos el método de búsqueda selectiva de OpenCV. Este método devolverá una lista de rectángulos que son básicamente la región de interés. OpenCV nos proporciona dos métodos diferentes para esta búsqueda selectiva, uno es el método » RÁPIDO » y el otro es el método » Preciso «, debe decidir cuál usar según su caso de uso.
Ahora que tenemos los rectángulos antes de continuar, intentemos visualizar qué regiones de interés devuelve.
Python3
import numpy as np
import cv2

# this is the model we'll be using for
# object detection
from tensorflow.keras.applications import Xception

# for preprocessing the input
from tensorflow.keras.applications.xception import preprocess_input
from tensorflow.keras.applications import imagenet_utils
from tensorflow.keras.preprocessing.image import img_to_array
from imutils.object_detection import non_max_suppression

# read the input image
img = cv2.imread('Assets/img2.jpg')

# instanciate the selective search
# segmentation algorithm of opencv
search = cv2.ximgproc.segmentation.createSelectiveSearchSegmentation()

# set the base image as the input image
search.setBaseImage(img)

# since we'll use the fast method we set it as such
search.switchToSelectiveSearchFast()

# you can also use this for more accuracy:
# search.switchToSelectiveSearchQuality()
rects = search.process()  # process the image

roi = img.copy()
for (x, y, w, h) in rects:

    # Check if the width and height of
    # the ROI is atleast 10 percent
    # of the image dimensions and only then
    # show it
    if (w / float(W) < 0.1 or h / float(H) < 0.1):
        continue

    # Let's visualize all these ROIs
    cv2.rectangle(roi, (x, y), (x + w, y + h),
                  (0, 200, 0), 2)

roi = cv2.resize(roi, (640, 640))
final = cv2.hconcat([cv2.resize(img, (640, 640)), roi])
cv2.imshow('ROI', final)
cv2.waitKey(0)
Producción:
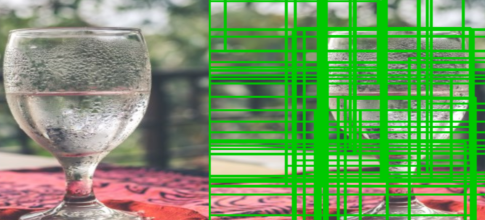
Estas son todas las Regiones de interés que recibe nuestra función después de filtrar los ROI que no son lo suficientemente grandes, es decir, si el ROI tiene menos del 10% de ancho o alto que el de la imagen entonces no lo consideraremos. .
Paso 2: cree una lista de arrays de entrada final y cuadros delimitadores utilizando ROI
Crearemos dos listas separadas que contengan la imagen en formato RGB y otra lista tendrá las coordenadas del cuadro delimitador. Estas listas se utilizarán para la predicción y la creación de cuadros delimitadores, respectivamente. También nos aseguraremos de que solo hagamos predicciones sobre un ROI lo suficientemente grande, por ejemplo, que tenga al menos el 20 % del ancho o el alto de nuestra imagen.
Python3
rois = []
boxes = []
(H, W) = img.shape[:2]
rois = []
boxes = []
(H, W) = img.shape[:2]

for (x, y, w, h) in rects:

    # check if the ROI has atleast
    # 20% the size of our image
    if w / float(W) < 0.2 or h / float(H) < 0.2:
        continue

    # Extract the Roi from image
    roi = img[y:y + h, x:x + w]

    # Convert it to RGB format
    roi = cv2.cvtColor(roi, cv2.COLOR_BGR2RGB)

    # Resize it to fit the input requirements of the model
    roi = cv2.resize(roi, (299, 299))

    # Further preprocessing
    roi = img_to_array(roi)
    roi = preprocess_input(roi)

    # Append it to our rois list
    rois.append(roi)

    # now let's store the box co-ordinates
    x1, y1, x2, y2 = x, y, x + w, y + h
    boxes.append((x1, y1, x2, y2))
Ahora que tenemos nuestra región de interés que hemos filtrado y también preprocesado, usémosla para crear predicciones usando nuestro modelo.
Paso 3: generar predicciones usando el modelo
Estamos usando el modelo ResNet50 de los modelos preentrenados de Keras, principalmente porque no es pesado para la máquina y también tiene una alta precisión. Entonces, primero, crearemos nuestra instancia de modelo y luego pasaremos nuestra entrada -> Lista de ROI y generaremos predicciones.
En código se vería así:
# —- Modelo—– #
modelo = Xception(pesos=’imagenet’)
# Convertir la lista de ROIS en arrays para predicciones
input_array = np.array(rois)
print(“La forma de la array de entrada es ;” ,input_array.shape)
#—- Hacer predicciones —#
preds = modelo.predecir(input_array)
preds = imagenet_utils.decode_predictions(preds, top=1)
Ahora que tenemos predicciones, mostremos el resultado en la imagen.
Paso 4: Crear diccionario de objetos
En este paso, crearemos un nuevo diccionario que básicamente contiene la etiqueta como la clave como el cuadro delimitador y la probabilidad como los valores. Esto nos permitirá acceder fácilmente a las predicciones para cada etiqueta y aplicarles non_max_suppression. Podemos hacer esto recorriendo las predicciones y filtrando las predicciones con más del 90% de confianza (puede cambiarlo según sus necesidades). Veamos el código:
Python3
# Initiate the dictionary
objects = {}
for (i, pred) in enumerate(preds):

    # extract the prediction tuple
    # and store it's values
     iD = pred[0][0]
    label = pred[0][1]
     prob = pred[0][2]

  if prob >= 0.9:

        # grab the bounding box associated
        # with the prediction and
        # convert the coordinates
        box = boxes[i]

        # create a tuple using box and probability
        value = objects.get(label, [])

        # append the value to the list for the label
        value.append((box, prob))

         # Add this tuple to the objects
        # dictionary that we initiated
        objects[label] = value
Producción:
{‘img’: [((126, 295, 530, 800), 0,5174897), ((166, 306, 497, 613), 0,510667), ((176, 484, 520, 656), 0,56631094), (( 161, 304, 499, 613), 0,55209666), ((161, 306, 504, 613), 0,6020483), ((161, 306, 499, 613), 0,54256636), ((140, 305, 499, 800) , 0,5012991), ((144, 305, 516, 800), 0,50028765), ((162, 305, 499, 642), 0,84315413), ((141, 306, 517, 800), 0,5257749), ((173, 433, 433, 610), 0,56347036)], ‘fósforo’: [((169, 633, 316, 800), 0,56465816), ((172, 633, 313, 800), 0,7206488), ((333, 639, 467, 800), 0,60068905), ((169, 633, 314, 800), 0,693922), ((172, 633, 314, 800), 0,70851576), ((167, 632, 314, 800), 0,6374499), ((172, 633, 316, 800), 0,5995729), ((169, 640, 307, 800), 0,67480534)], ‘guillotina’: [((149, 591, 341, 800), 0,59910816), (( 149, 591, 338, 800), 0,7370558), ((332, 633, 469, 800), 0,5568006), ((142, 591, 341, 800), 0,6165994),((332, 634, 468, 800), 0,63907826), ((332, 633, 468, 800), 0,57237893), ((142, 590, 321, 800), 0,6664309), ((331, 635, 467, 800), 0.5186203), ((332, 634, 467, 800), 0.58919555)], ‘water_tower’: [((144, 596, 488, 800), 0.50619787)], ‘barber_chair’: [((165, 465, 461, 576), 0.5565266)]}
Como puede ver, es un diccionario donde la etiqueta, ‘silla mecedora’, es la clave y tenemos una lista de tuplas que tienen cuadros delimitadores y probabilidades almacenadas para esta etiqueta como valores.
Paso 5: Muestre el objeto detectado en la imagen
Mire el diccionario de objetos nuevamente si aún no lo sabe, tenemos múltiples cuadros delimitadores para una sola etiqueta, entonces, ¿no habrá un grupo en la imagen si lo muestra directamente en la imagen?
Por lo tanto, necesitamos usar el método non_max_suppression que nos resolverá este problema. Pero para usar esta función necesitamos una array de cuadros delimitadores y una array de probabilidades, y nos devuelve una array de cuadros delimitadores.
Python3
# Loop through the labels
# for each label apply the non_max_suppression
for label in objects.keys():
# clone the original image
# o that we can draw on it
img_copy = img.copy()
boxes = np.array([pred[0] for pred in objects[label]])
proba = np.array([pred[1] for pred in objects[label]])
boxes = non_max_suppression(boxes, proba)
# Now unpack the co-ordinates of the bounding box
(startX, startY, endX, endY) = boxes[0]
# Draw the bounding box
cv2.rectangle(img_copy, (startX, startY),
(endX, endY), (0, 255, 0), 2)
y = startY - 10 if startY - 10 > 10 else startY + 10
# Put the label on the image
cv2.putText(img_copy, label, (startX, y),
cv2.FONT_HERSHEY_SIMPLEX, 0.45, (255, 0), 2)
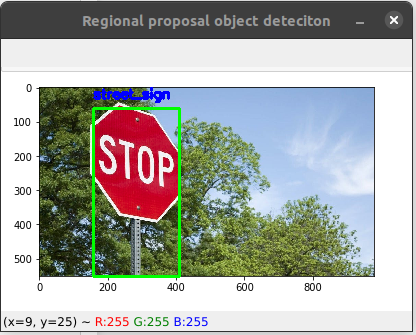
# Show the image
cv2.imshow("Regional proposal object detection", img_copy)
cv2.waitKey(0)
A continuación se muestra la implementación completa:
Python3
# import the packages
import numpy as np
import cv2

# this is the model we'll be using for
# object detection
from tensorflow.keras.applications import Xception

# for preprocessing the input
from tensorflow.keras.applications.xception import preprocess_input
from tensorflow.keras.applications import imagenet_utils
from tensorflow.keras.preprocessing.image import img_to_array
from imutils.object_detection import non_max_suppression

# read the input image
img = cv2.imread('/content/img4.jpg')

# instanciate the selective search
# segmentation algorithm of opencv
search = cv2.ximgproc.segmentation.createSelectiveSearchSegmentation()

# set the base image as the input image
search.setBaseImage(img)
search.switchToSelectiveSearchFast()

# you can also use this for more accuracy ->
# search.switchToSelectiveSearchQuality()
rects = search.process()  # process the image

rois = []
boxes = []
(H, W) = img.shape[:2]
for (x, y, w, h) in rects:

    # check if the ROI has atleast
    # 20% the size of our image
    if w / float(W) < 0.1 or h / float(H) < 0.1:
        continue

    # Extract the Roi from image
    roi = img[y:y + h, x:x + w]

    # Convert it to RGB format
    roi = cv2.cvtColor(roi, cv2.COLOR_BGR2RGB)

    # Resize it to fit the input requirements of the model
    roi = cv2.resize(roi, (299, 299))

    # Further preprocessing
    roi = img_to_array(roi)
    roi = preprocess_input(roi)

    # Append it to our rois list
    rois.append(roi)

    # now let's store the box co-ordinates
    x1, y1, x2, y2 = x, y, x + w, y + h
    boxes.append((x1, y1, x2, y2))

# ------------ Model--------------- #
model = Xception(weights='imagenet')


# Convert ROIS list to arrays for predictions
input_array = np.array(rois)
print("Input array shape is ;", input_array.shape)

#---------- Make Predictions -------#
preds = model.predict(input_array)
preds = imagenet_utils.decode_predictions(preds, top=1)


# Initiate the dictionary
objects = {}
for (i, pred) in enumerate(preds):

    # extract the prediction tuple
    # and store it's values
    iD = pred[0][0]
    label = pred[0][1]
    prob = pred[0][2]

    if prob >= 0.9:

        # grab the bounding box associated
        # with the prediction and
        # convert the coordinates
        box = boxes[i]

        # create a tuble using box and probability
        value = objects.get(label, [])

        # append the value to the list for the label
        value.append((box, prob))

        # Add this tuple to the objects dictionary
        # that we initiated
        objects[label] = value


# Loop through the labels
# for each label apply the non_max_suppression
for label in objects.keys():

    # clone the original image so that we can
    # draw on it
    img_copy = img.copy()
    boxes = np.array([pred[0] for pred in objects[label]])
    proba = np.array([pred[1] for pred in objects[label]])
    boxes = non_max_suppression(boxes, proba)

    # Now unpack the co-ordinates of the bounding box
    (startX, startY, endX, endY) = boxes[0]

    # Draw the bounding box
    cv2.rectangle(img_copy, (startX, startY),
                  (endX, endY), (0, 255, 0), 2)
    y = startY - 10 if startY - 10 > 10 else startY + 10

    # Put the label on the image
    cv2.putText(img_copy, label, (startX, y),
                cv2.FONT_HERSHEY_SIMPLEX, 0.45, (255, 0), 2)

    # Show the image
    cv2.imshow("Regional proposal object detection", img_copy)
    cv2.waitKey(0)
Producción:
Publicación traducida automáticamente
Artículo escrito por bobde_yagyesh y traducido por Barcelona Geeks. The original can be accessed here. Licence: CCBY-SA