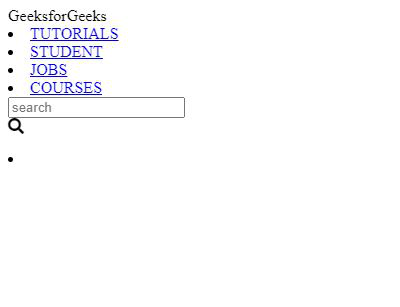
Una barra de navegación es uno de los componentes más importantes de un sitio web. Es la barra superior que generalmente contiene todos los enlaces esenciales en forma de menús.
En este tutorial, vamos a crear una barra de navegación con los siguientes componentes:
- Menús
- Una barra de búsqueda animada
- icono de inicio de sesión
- Logo
Pero antes de pasar al código, veamos qué lenguajes vamos a usar para el código, para la estructura básica y el estilo vamos a usar HTML CSS y JQuery para la barra de búsqueda animada.
Acercarse:
- Vincule el jquery y la hoja de estilo con el código HTML.
- Diseñe el código jquery para la barra de búsqueda animada utilizando la clase de alternancia .
- Uso de la clase nav para estructurar los elementos que se incluirán en la barra de navegación.
- Diseña cada elemento y toda la barra de navegación como un todo utilizando el CSS.
Aquí está la implementación del enfoque anterior:
El código:
HTML
<!DOCTYPE html>
<html lang="en" dir="ltr">

<head>
    <meta charset="utf-8">

    <!-- Linking the stylesheet -->
    <link rel="stylesheet" href=
"https://cdnjs.cloudflare.com/ajax/libs/font-awesome/4.7.0/css/font-awesome.min.css">

    <!-- Linking the Jquery script -->
    <script src="https://code.jquery.com/jquery-3.5.1.min.js"></script>

    <script>
        $(document).ready(function() {
            $(".fa-search").click(function() {
                $(".icon").toggleClass("active");
                $("input[type='text']").toggleClass("active");
            });
        });
    </script>

    <meta name="viewport" content=
        "width=device-width, initial-scale=1.0">
    <script src="https://kit.fontawesome.com/a076d05399.js"></script>

    <style>

        /* Importing the fonts */
        @import url(
'https://fonts.googleapis.com/css?family=Montserrat:400,500,600,700&display=swap');
        * {
            margin: 0;
            padding: 0;
            outline: none;
            box-sizing: border-box;
            font-family: 'Montserrat', sans-serif;
        }

        /* Body of the page */
        body {
            background: #f2f2f2;
        }

        /* Styling all the elements in nav as a whole */
        nav {
            background: #037729;
            display: flex;
            flex-wrap: wrap;
            align-items: center;
            justify-content: space-between;
            height: 70px;
            padding: 0 100px;
        }

        /* Styling the logo */
        nav .logo {
            color: #fff;
            font-size: 30px;
            font-weight: 600;
            letter-spacing: -1px;
        }

        /* Styling all the nav items as a whole */
        nav .nav-items {
            display: flex;
            flex: 1;
            padding: 0 0 0 200px;
        }

        /* Styling the list items in the nav tag */
        nav .nav-items li {
            list-style: none;
            padding: 0 10px;
        }

        /* Styling each list items */
        nav .nav-items li a {
            color: #fff;
            font-size: 15px;
            font-weight: 500;
            text-decoration: none;
        }

        /* Setting the hover colour on the list items*/

        nav .nav-items li a:hover {
            color: #19191b;
        }

        nav .searchbar {
            position: relative;
        }

        /* Styling the search box where the
            input would be given */
        nav .searchbar input[type="text"] {
            border: 0;
            padding: 0;
            width: 0px;
            height: 35px;
            border-radius: 3px;
            transition: all 0.3s ease;
        }

        /* Styling the search bar icon */
        nav .searchbar .icon {
            display: flex;
            position: absolute;
            top: 0;
            right: 0;
            width: 35px;
            height: 100%;
            background: none;
            border-radius: 3px;
            color: #fff;
            transition: all 0.5s 0.3s ease;
        }

        nav .searchbar .icon i {
            position: absolute;
            top: 50%;
            left: 50%;
            transform: translate(-50%, -50%);
            cursor: pointer;
        }

        nav .searchbar .icon.active {
            background: #062333;
            transition: all 0.3s ease;
        }

        nav .searchbar input[type="text"].active {
            width: 250px;
            padding: 0 10px;
            transition: all 0.5s 0.2s ease;
        }

        nav .licon li {
            list-style: none;
            display: flex;
        }

        nav .licon li a {
            padding: 0 20px;
        }

        /* Changing the colour of the login
            icon when hovered over*/

        .fa-user-circle:hover {
            color: #0e0d0d !important;
        }
    </style>
</head>

<body>
    <nav>
        <div class="logo">
            GeeksforGeeks
        </div>

        <div class="nav-items">

            <!-- The Menu items -->
            <li><a href="#">TUTORIALS</a></li>
            <li><a href="#">STUDENT</a></li>
            <li><a href="#">JOBS</a></li>
            <li><a href="#">COURSES</a></li>
        </div>

        <!-- Defining the search bars -->
        <div class="searchbar">
            <input type="text" placeholder="search">
            <div class="icon">
                <i class="fas fa-search"></i>
            </div>
        </div>

        <!-- Defining the login button -->
        <div class="licon">
            <li>
                <a href="#">
                    <i class="fas fa-user-circle
                        fa-2x" style="color: white;">
                    </i>
                </a>
            </li>
        </div>
    </nav>
</body>

</html>
Producción:
- Solo agregar el archivo HTML junto con jQuery produciría el siguiente resultado:
- Agregar la hoja de estilo CSS junto con el código HTML y jquery produciría el resultado final:

Publicación traducida automáticamente
Artículo escrito por debjani1413 y traducido por Barcelona Geeks. The original can be accessed here. Licence: CCBY-SA
