Hibernate por medio de una instalación de Native SQL, puede interactuar directamente con la base de datos como MySQL, Oracle, etc., y todas las consultas específicas de la base de datos se pueden ejecutar a través de esta instalación. Esta función es muy útil si la aplicación es una aplicación antigua y se ejecuta durante mucho tiempo. De repente, no podemos recuperar nuevos cambios, pero en cambio, con las instalaciones de Native SQL, podemos trabajar en eso. Principalmente para admitir aplicaciones más antiguas, podemos optar por Hibernate: SQL nativo
Proyecto de ejemplo
Estructura del proyecto:
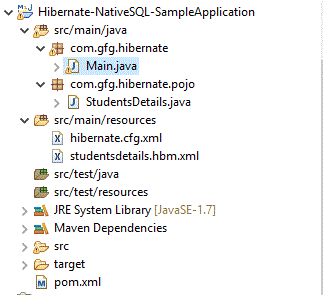
Vamos a ver un proyecto impulsado por expertos. Por lo tanto, como primer paso, veamos pom.xml que especifica todas las dependencias, propiedades, etc.
pom.xml
XML
<project xmlns="http://maven.apache.org/POM/4.0.0"
         xmlns:xsi="http://www.w3.org/2001/XMLSchema-instance"
         xsi:schemaLocation="http://maven.apache.org/POM/4.0.0
                             http://maven.apache.org/xsd/maven-4.0.0.xsd">
  <modelVersion>4.0.0</modelVersion>
  <groupId>Hibernate-NativeSQL-SampleApplication</groupId>
  <artifactId>Hibernate-NativeSQL-SampleApplication</artifactId>
  <version>0.0.1-SNAPSHOT</version>
    <dependencies>

          <!-- Much essential hibernate core dependency -->
        <dependency>
            <groupId>org.hibernate</groupId>
            <artifactId>hibernate-core</artifactId>
            <version>4.3.0.Final</version>
        </dependency>

        <!-- As we are connecting with MySQL, this is needed -->
        <dependency>
            <groupId>mysql</groupId>
            <artifactId>mysql-connector-java</artifactId>
            <version>5.1.34</version>
        </dependency>

    </dependencies>

    <!-- Higher java versions are preferred, atleast 1.8 -->
    <properties>
        <maven.compiler.source>1.8</maven.compiler.source>
        <maven.compiler.target>1.8</maven.compiler.target>
    </properties>

</project>
Archivos importantes para el proyecto.
hibernate.cfg.xml
Las propiedades de Hibernate se especifican aquí.
XML
<?xml version="1.0" encoding="UTF-8"?>
<!DOCTYPE hibernate-configuration PUBLIC "-//Hibernate/Hibernate Configuration DTD 3.0//EN"
          "http://hibernate.sourceforge.net/hibernate-configuration-3.0.dtd">
<hibernate-configuration>
    <session-factory>
        <!--  As we are connecting mysql, those driver classes,
              database name, username and password are specified
              Please change the information as per your requirement -->
        <property name="connection.driver_class">com.mysql.jdbc.Driver</property>
        <property name="connection.url">jdbc:mysql://localhost:3306/test?serverTimezone=UTC</property>
        <property name="connection.username">root</property>
        <property name="connection.password">admin</property>

        <!--  We are going to connect studentsdetails.hbm.xml
              which has the table information about studentsdetails
              which is present in mysql -->
        <mapping resource="studentsdetails.hbm.xml" />
    </session-factory>
</hibernate-configuration>
estudiantesdetalles.hbm.xml
XML
<?xml version="1.0" encoding="UTF-8"?>
<!DOCTYPE hibernate-mapping PUBLIC
  "-//Hibernate/Hibernate Mapping DTD 3.0//EN"
  "http://hibernate.sourceforge.net/hibernate-mapping-3.0.dtd">
<hibernate-mapping>
    <!--  studentsdetails is the mySQL table and corresponding
           POJO class is  com.gfg.hibernate.pojo.StudentsDetails-->
    <class name="com.gfg.hibernate.pojo.StudentsDetails" table="studentsdetails"
        schema="test">
        <id name="id" column="id">
            <generator class="increment" />
        </id>
        <property name="name" column="name" />
        <property name="caste" column="caste" />
        <property name="neetMarks" column="neetMarks" />
        <property name="gender" column="gender"/>
    </class>
</hibernate-mapping>
Veamos la clase POJO ahora
DetallesEstudiantes.java
Java
// Each and every column must represent the
// column of mysql table studentsDetails
public class StudentsDetails {
    private int id;
    private String name;
    private String caste;
    private int neetMarks;
    private String gender;

    // For all columns, corresponding
    // getter and setter are added
    public int getId()
    {
        return id;
    }
    public void setId(int id)
    {
        this.id = id;
    }
    public String getName()
    {
        return name;
    }
    public void setName(String name)
    {
        this.name = name;
    }
    public String getCaste()
    {
        return caste;
    }
    public void setCaste(String caste)
    {
        this.caste = caste;
    }
    public int getNeetMarks()
    {
        return neetMarks;
    }
    public void setNeetMarks(int neetMarks)
    {
        this.neetMarks = neetMarks;
    }
    public String getGender()
    {
        return gender;
    }
    public void setGender(String gender)
    {
        this.gender = gender;
    }
}
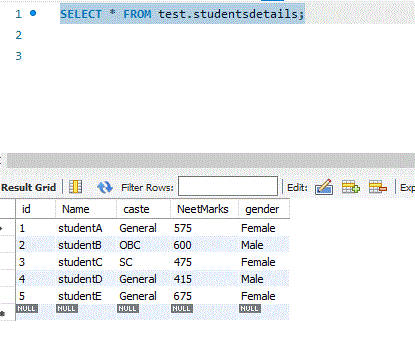
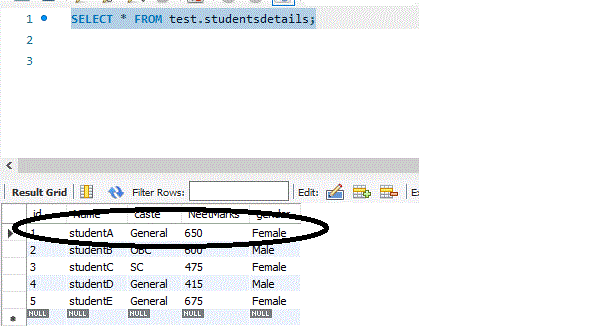
Entonces, los archivos enumerados anteriormente son medios de conexión. Veamos también la tabla MySQL

Supongamos que tenemos algún conjunto de registros en ese
Ahora, veamos la forma de escribir consultas para comunicarse con MySQL y obtener los detalles.
Java
package com.gfg.hibernate;

import java.util.Iterator;
import java.util.List;

import org.hibernate.Filter;
import org.hibernate.Hibernate;
import org.hibernate.Query;
import org.hibernate.SQLQuery;
import org.hibernate.Session;
import org.hibernate.SessionFactory;
import org.hibernate.Transaction;
import org.hibernate.boot.registry.StandardServiceRegistryBuilder;
import org.hibernate.cfg.Configuration;
import org.hibernate.type.IntegerType;
import org.hibernate.type.StringType;

import com.gfg.hibernate.pojo.StudentsDetails;

public class Main {

    public static void main(String[] args)
    {
        // Refer the hibernate.cfg.xml
        Configuration configuration = new Configuration()
                                          .configure("hibernate.cfg.xml");
        StandardServiceRegistryBuilder builder = new StandardServiceRegistryBuilder()
                                                     .applySettings(configuration.getProperties());

        // SessionFactory will contain all the database property
        // details which are pulled from above hibernate.cfg.xml file
        // As application refers the database, it is required.
        // It is a threadsafe object
        SessionFactory factory = configuration.buildSessionFactory(builder
                                                                       .build());

        // To get a physical connection
        Session session = factory.openSession();

        // Query the database by means of specific tablename
        // straightaway. SQL should be like how we do
        // from SQLCommandline or workbench
        String studentsQuery = "select * from studentsdetails";

        // New instance of Query for the given SQL
        SQLQuery sqlQuery1 = session.createSQLQuery(studentsQuery);

        // We will get the details via list
        List studentsList = sqlQuery1.list();

        Iterator studentsIterator = studentsList.iterator();

        while (studentsIterator.hasNext()) {
            Object[] object = (Object[])studentsIterator.next();
            System.out.println("Student Id : " + object[0] + " Student Name : " + object[1]
                               + " Caste : " + object[2]);
        }

        // Always good to clear
        // and close the session
        session.clear();
        session.close();
    }
}
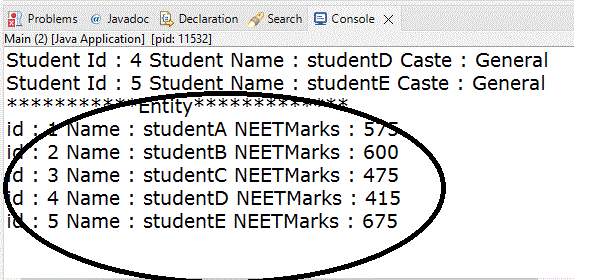
Podemos obtener todos los detalles gracias a la función Fila completa
// Query the database by means of specific tablename straightaway.
// SQL should be like how we do from SQLCommandline or workbench
String studentsQuery = "select * from studentsdetails";

// New instance of Query for the given SQL
SQLQuery sqlQuery1 = session.createSQLQuery(studentsQuery);
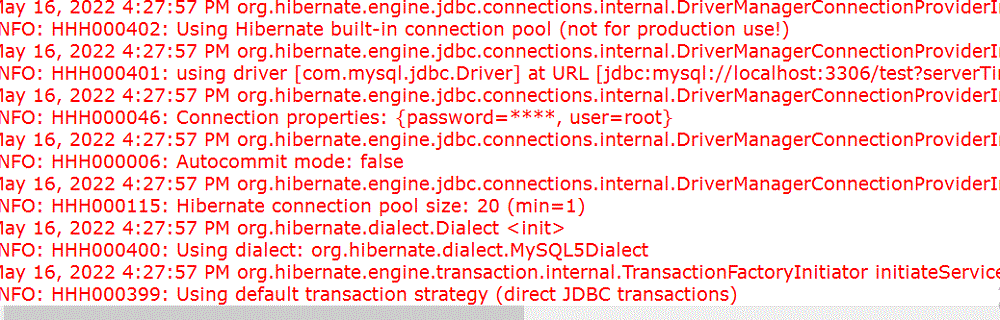
Producción:

Si cada fila se convierte en un objeto de la clase POJO, podemos usar el método addEntity() de SQLQuery
Java
// addEntity
System.out.println("***********Entity*************");
String entityQuery = "select * from studentsdetails";
SQLQuery sqlQuery2 = session.createSQLQuery(entityQuery);
sqlQuery2.addEntity(StudentsDetails.class);

List studentsEntityList = sqlQuery2.list();

// list contains StudentsDetails class objects.
// So that we can directly cast into StudentsDetails type :
Iterator studentsEntityIterator = studentsEntityList.iterator();

while (studentsEntityIterator.hasNext()) {
    StudentsDetails student = (StudentsDetails)studentsEntityIterator.next();
    System.out.println("id : " + student.getId() + " Name : "
                       + student.getName() + " NEETMarks : " + student.getNeetMarks());
}
Producción:
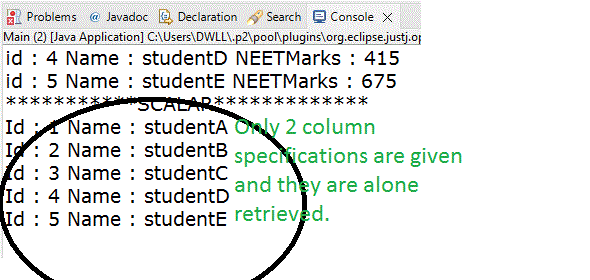
Datos escalares:
En caso de que queramos seleccionar parcialmente algunas columnas solo, es posible mediante addScalar(). Hibernate usa internamente ResultSetMetaData. Necesitamos especificar el tipo de datos cuando estamos usando addScalar()
Java
// addSclar
System.out.println("***********SCALAR*************");

String scalarQuery = "select * from studentsdetails";
SQLQuery sqlQuery3 = session.createSQLQuery(scalarQuery);

// As we are taking first 2 columns alone, we need to
// specify the name of the column and datatype here
sqlQuery3.addScalar("id", IntegerType.INSTANCE);
sqlQuery3.addScalar("name", StringType.INSTANCE);
List studentsScalarList = sqlQuery3.list();
Iterator studentsScalarIterator = studentsScalarList.iterator();

while (studentsScalarIterator.hasNext()) {
    Object[] object = (Object[])studentsScalarIterator.next();
    // Here also we can see only 2 column
    // retrieval because of addScalar()
    System.out.println("Id : " + object[0] + " Name : " + object[1]);
}
Producción:
Por último, veamos cómo actualizar los datos.
Java
// update
System.out.println("**********Update**********");

Transaction mySqlTransaction = session.beginTransaction();

// straight away righting update query specific to db
String updateQuery = "update studentsdetails set neetmarks=:neetmarks where id=:id";
SQLQuery sqlQuery4 = session.createSQLQuery(updateQuery);
sqlQuery4.setParameter("id", 1);
sqlQuery4.setParameter("neetmarks", 650);
sqlQuery4.executeUpdate();

// will do the changes permanent to database
mySqlTransaction.commit();
System.out.println("Completed");

// again check after doing committing
entityQuery = "select * from studentsdetails";
sqlQuery2 = session.createSQLQuery(entityQuery);
sqlQuery2.addEntity(StudentsDetails.class);

List studentsEntityList1 = sqlQuery2.list();
Iterator studentsEntityIterator1 = studentsEntityList1.iterator();

while (studentsEntityIterator1.hasNext()) {
    StudentsDetails student = (StudentsDetails)studentsEntityIterator1.next();
    System.out.println("id : " + student.getId() + " Name : "
                       + student.getName() + " NEETMarks : " + student.getNeetMarks());
}
Producción:

Comprobando también los datos de la base de datos:
El código completo
Java
import java.util.Iterator;
import java.util.List;
import org.hibernate.Filter;
import org.hibernate.Hibernate;
import org.hibernate.Query;
import org.hibernate.SQLQuery;
import org.hibernate.Session;
import org.hibernate.SessionFactory;
import org.hibernate.Transaction;
import org.hibernate.boot.registry.StandardServiceRegistryBuilder;
import org.hibernate.cfg.Configuration;
import org.hibernate.type.IntegerType;
import org.hibernate.type.StringType;
import com.gfg.hibernate.pojo.StudentsDetails;

public class Main {

    public static void main(String[] args)
    {
        // Refer the hibernate.cfg.xml
        Configuration configuration = new Configuration()
                                          .configure("hibernate.cfg.xml");
        StandardServiceRegistryBuilder builder = new StandardServiceRegistryBuilder()
                                                     .applySettings(configuration.getProperties());

        // SessionFactory will contain all the database property
        // details which are pulled from above hibernate.cfg.xml file
        // As application refers the database, it is required.
        // It is a threadsafe object
        SessionFactory factory = configuration.buildSessionFactory(builder
                                                                       .build());

        // To get a physical connection
        Session session = factory.openSession();

        // Query the database by means of specific tablename straightaway.
        // SQL should be like how we do from SQLCommandline or workbench
        String studentsQuery = "select * from studentsdetails";

        // New instance of Query for the given SQL
        SQLQuery sqlQuery1 = session.createSQLQuery(studentsQuery);

        // We will get the details via list
        List studentsList = sqlQuery1.list();

        Iterator studentsIterator = studentsList.iterator();

        while (studentsIterator.hasNext()) {
            Object[] object = (Object[])studentsIterator.next();
            System.out.println("Student Id : " + object[0] + " Student Name : " + object[1]
                               + " Caste : " + object[2]);
        }

        // addEntity
        System.out.println("***********Entity*************");
        String entityQuery = "select * from studentsdetails";
        SQLQuery sqlQuery2 = session.createSQLQuery(entityQuery);
        sqlQuery2.addEntity(StudentsDetails.class);

        List studentsEntityList = sqlQuery2.list();
        Iterator studentsEntityIterator = studentsEntityList.iterator();

        while (studentsEntityIterator.hasNext()) {
            StudentsDetails student = (StudentsDetails)studentsEntityIterator.next();
            System.out.println("id : " + student.getId() + " Name : "
                               + student.getName() + " NEETMarks : " + student.getNeetMarks());
        }

        // addSclar
        System.out.println("***********SCALAR*************");

        String scalarQuery = "select * from studentsdetails";
        SQLQuery sqlQuery3 = session.createSQLQuery(scalarQuery);

        sqlQuery3.addScalar("id", IntegerType.INSTANCE);
        sqlQuery3.addScalar("name", StringType.INSTANCE);

        List studentsScalarList = sqlQuery3.list();
        Iterator studentsScalarIterator = studentsScalarList.iterator();

        while (studentsScalarIterator.hasNext()) {
            Object[] object = (Object[])studentsScalarIterator.next();
            System.out.println("Id : " + object[0] + " Name : " + object[1]);
        }

        // update
        System.out.println("**********Update**********");

        // A transaction is associated with a Session and
        // is usually instantiated by a call to Session.beginTransaction()
        Transaction mySqlTransaction = session.beginTransaction();
        String updateQuery = "update studentsdetails set neetmarks=:neetmarks where id=:id";
        SQLQuery sqlQuery4 = session.createSQLQuery(updateQuery);
        sqlQuery4.setParameter("id", 1);
        sqlQuery4.setParameter("neetmarks", 650);
        sqlQuery4.executeUpdate();

        // will do the changes permanent to database
        mySqlTransaction.commit();
        System.out.println("Completed");

        // again check after doing committing
        entityQuery = "select * from studentsdetails";
        sqlQuery2 = session.createSQLQuery(entityQuery);
        sqlQuery2.addEntity(StudentsDetails.class);

        List studentsEntityList1 = sqlQuery2.list();
        Iterator studentsEntityIterator1 = studentsEntityList1.iterator();

        while (studentsEntityIterator1.hasNext()) {
            StudentsDetails student = (StudentsDetails)studentsEntityIterator1.next();
            System.out.println("id : " + student.getId() + " Name : "
                               + student.getName() + " NEETMarks : " + student.getNeetMarks());
        }

        session.clear();
        session.close();
    }
}
Conclusión
La principal ventaja de hibernate no es aplicable en absoluto debido a este enfoque de NativeSQL, pero aún así, ayuda en las aplicaciones antiguas que se ejecutan en producción y están disponibles para vivir significa que podemos optar por este enfoque. A veces, en términos de soporte, podemos optar por NativeSQL, pero las aplicaciones recientemente desarrolladas o las aplicaciones que están planificadas para admitir soporte de múltiples bases de datos no deberían seguir este enfoque.
Publicación traducida automáticamente
Artículo escrito por priyarajtt y traducido por Barcelona Geeks. The original can be accessed here. Licence: CCBY-SA