Requisitos previos: Introducción a tkinter | Análisis de sentimiento usando Vader
Python ofrece múltiples opciones para desarrollar una GUI (interfaz gráfica de usuario). De todos los métodos GUI, Tkinter es el método más utilizado. Python con Tkinter genera la forma más rápida y sencilla de crear aplicaciones GUI. En este artículo, aprenderemos cómo crear una aplicación GUI de Sentiment Detector usando Tkinter, con una guía paso a paso.
Para crear un tkinter:
- Importando el módulo – tkinter
- Crear la ventana principal (contenedor)
- Agregue cualquier cantidad de widgets a la ventana principal.
- Aplique el evento Trigger en los widgets.
La GUI se vería a continuación:
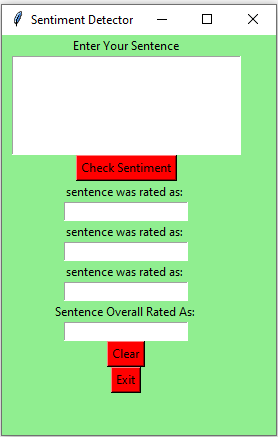
Vamos a crear una aplicación de detector de sentimientos basada en GUI que pueda mostrar los sentimientos con respecto a las oraciones dadas, dadas por el usuario.
A continuación se muestra la implementación:
Python3
# import SentimentIntensityAnalyzer class
# from vaderSentiment.vaderSentiment module.
from vaderSentiment.vaderSentiment import SentimentIntensityAnalyzer

# import all methods and classes from the tkinter
from tkinter import *

# Function for clearing the
# contents of all entry boxes
# And text area.
def clearAll() :

    # deleting the content from the entry box
    negativeField.delete(0, END)
    neutralField.delete(0, END)
    positiveField.delete(0, END)
    overallField.delete(0, END)

    # whole content of text area  is deleted
    textArea.delete(1.0, END)

# function to print sentiments
# of the sentence.
def detect_sentiment():

    # get a whole input content from text box
    sentence = textArea.get("1.0", "end")

    # Create a SentimentIntensityAnalyzer object.
    sid_obj = SentimentIntensityAnalyzer()

    # polarity_scores method of SentimentIntensityAnalyzer
    # object gives a sentiment dictionary.
    # which contains pos, neg, neu, and compound scores.
    sentiment_dict = sid_obj.polarity_scores(sentence)

    string = str(sentiment_dict['neg']*100) + "% Negative"
    negativeField.insert(10, string)


    string = str(sentiment_dict['neu']*100) + "% Neutral"
    neutralField.insert(10, string)

    string = str(sentiment_dict['pos']*100) +"% Positive"
    positiveField.insert(10, string)

    # decide sentiment as positive, negative and neutral
    if sentiment_dict['compound'] >= 0.05 :
        string = "Positive"

    elif sentiment_dict['compound'] <= - 0.05 :
        string = "Negative"


    else :
        string = "Neutral"

    overallField.insert(10, string)


# Driver Code
if __name__ == "__main__" :


    # Create a GUI window
    gui = Tk()

    # Set the background colour of GUI window
    gui.config(background =  "light green")

    # set the name of tkinter GUI window
    gui.title("Sentiment Detector")

    # Set the configuration of GUI window
    gui.geometry("250x400")

    # create a label : Enter Your Task
    enterText = Label(gui, text = "Enter Your Sentence",
                                     bg = "light green")

    # create a text area for the root
    # with lunida 13 font
    # text area is for writing the content
    textArea = Text(gui, height = 5, width = 25, font = "lucida 13")

    # create a Submit Button and place into the root window
    # when user press the button, the command or
    # function affiliated to that button is executed
    check = Button(gui, text = "Check Sentiment", fg = "Black",
                         bg = "Red", command = detect_sentiment)

    # Create a negative : label
    negative = Label(gui, text = "sentence was rated as: ",
                                        bg = "light green")

    # Create a neutral : label
    neutral = Label(gui, text = "sentence was rated as: ",
                                       bg = "light green")

    # Create a positive : label
    positive = Label(gui, text = "sentence was rated as: ",
                                        bg = "light green")

    # Create a overall : label
    overall = Label(gui, text = "Sentence Overall Rated As: ",
                                           bg = "light green")

    # create a text entry box
    negativeField = Entry(gui)

    # create a text entry box
    neutralField = Entry(gui)

    # create a text entry box
    positiveField = Entry(gui)

    # create a text entry box
    overallField = Entry(gui)

    # create a Clear Button and place into the root window
    # when user press the button, the command or
    # function affiliated to that button is executed .
    clear = Button(gui, text = "Clear", fg = "Black",
                      bg = "Red", command = clearAll)

    # create a Exit Button and place into the root window
    # when user press the button, the command or
    # function affiliated to that button is executed .
    Exit = Button(gui, text = "Exit", fg = "Black",
                        bg = "Red", command = exit)

    # grid method is used for placing
    # the widgets at respective positions
    # in table like structure.
    enterText.grid(row = 0, column = 2)

    textArea.grid(row = 1, column = 2, padx = 10, sticky = W)

    check.grid(row = 2, column = 2)

    negative.grid(row = 3, column = 2)

    neutral.grid(row = 5, column = 2)

    positive.grid(row = 7, column = 2)

    overall.grid(row = 9, column = 2)

    negativeField.grid(row = 4, column = 2)

    neutralField.grid(row = 6, column = 2)

    positiveField.grid(row = 8, column = 2)

    overallField.grid(row = 10, column = 2)

    clear.grid(row = 11, column = 2)

    Exit.grid(row = 12, column = 2)

    # start the GUI
    gui.mainloop()
Producción :