La siguiente es la explicación del código C++ para desenfocar una Imagen en C++ usando la herramienta OpenCV. Cosas que debe saber: (1) El código solo se compilará en un entorno Linux. (2) Comando de compilación: g++ -w article.cpp -o article `pkg-config –libs opencv` (3) Comando de ejecución: ./article (4) La imagen bat.jpg debe estar en el mismo directorio que el código . Antes de ejecutar el código, asegúrese de tener OpenCV instalado en su sistema.
// Title: OpenCV C++ Program to blur an image.
// Import the core header file
#include <opencv2/core/core.hpp>

// core - a compact module defining basic data structures,
// including the dense multi-dimensional array Mat and
// basic functions used by  all other modules.

// highgui - an easy-to-use interface to video
// capturing, image and video codecs, as well
// as simple UI capabilities.
#include <opencv2/highgui/highgui.hpp>

// imgproc - an image processing module that
// includes linear and non-linear image filtering,
// geometrical image transformations (resize, affine
// and perspective warping, generic table-based
// remapping) color space conversion, histograms,
// and so on.
#include <opencv2/imgproc/imgproc.hpp>

// The stdio.h header defines three variable types,
// several macros, and various functions for performing
// input and output.
#include <stdio.h>
#include <iostream>

// Namespace where all the C++ OpenCV functionality resides
using namespace cv;

using namespace std;

// We can also use 'namespace std' if need be.

int main() // Main function
{
    // read the image data in the file "MyPic.JPG" and
    // store it in 'img'
    Mat image = imread("bat.jpg", CV_LOAD_IMAGE_UNCHANGED);

    // Mat object is a basic image container.
    // imread: first argument denotes the image to be loaded
    // the second arguments specifies the image format.
    // CV_LOAD_IMAGE_UNCHANGED (<0) loads the image as is
    // CV_LOAD_IMAGE_GRAYSCALE ( 0) loads the image as an
    //                         intensity one
    // CV_LOAD_IMAGE_COLOR (>0) loads the image in the
    //                          BGR format
    // If the second argument is not specified, it is
    // implied CV_LOAD_IMAGE_COLOR

    // Check for no data
    if (! image.data )
    {
        cout << "Could not open or find the image.\n";
        return -1; // unsuccessful
    }

    // Function to blur the image
    // first argument: input source
    // second argument: output source
    // third argument: blurring kernel size
    blur(image,image,Size(10,10));

    // Create a window
    // first argument: name of the window
    // second argument: flag- types:
    // WINDOW_NORMAL If this is set, the user can resize the
    //                window.
    // WINDOW_AUTOSIZE If this is set, the window size is
    //                 automatically adjusted to fit the
    //                 displayed image() ), and you cannot
    //                 change the window size manually.
    // WINDOW_OPENGL If this is set, the window will be
    //              created with OpenGL support.
    namedWindow( "bat", CV_WINDOW_AUTOSIZE );

    // Displays an image in the specified window.
    // first argument: name of the window
    // second argument: image to be shown(Mat object)
    imshow( "bat", image );

    waitKey(0); // Wait infinite time for a keypress

    return 0; // Return from the main function
}
Para ejecutar el programa en Windows, VISUAL STUDIO puede usar el siguiente enfoque:
La idea es usar primero una función llamada cvtColor para convertir la imagen de entrada en una imagen en escala de grises, luego convertiremos esa imagen en escala de grises en una imagen borrosa usando una función GaussianBlur.
SINTAXIS:
cvtColor(imagen_origen, imagen_destino, código);
GaussianBlur(imagen_origen, imagen_destino, tamaño del kernel, sigmaX);
PARÁMETROS:
cvtColor es la función integrada en C++ que se usa para convertir un espacio de color (número de canales) a otro usando el código de conversión de espacio de color. El código de conversión del espacio de color es fácilmente accesible y está predefinido. Puedes aprender más sobre ellos aquí.
GaussianBlur toma la imagen en escala de grises como entrada y devuelve una imagen borrosa.
El tamaño del núcleo se utiliza para definir cuánto queremos que el núcleo afecte a los píxeles de nuestra imagen. Ahora, el kernel es la array de píxeles en la imagen, por lo que cuando definimos el tamaño del kernel, primero tomará un ancla (un punto central) y luego afectará a los píxeles en su vecindad. En una array de 3*3 solo se verán afectados los píxeles de la vecindad, mientras que en una array de 10*10 afectará a los píxeles en el rango de la array de 10*10 desde el centro.
SigmaX: una variable del tipo doble que representa la desviación estándar del núcleo gaussiano en la dirección X.
Implementación del enfoque anterior.
C++
#include <iostream>
#include <opencv2/highgui.hpp>
#include <opencv2/imgcodecs.hpp>
#include <opencv2/imgproc.hpp>

using namespace std;
using namespace cv;

void main() // we can use int main as well just don't forget
            // to add return 0 in the end
{
    string path = "Resources/face.jpeg";
    Mat img = imread(path);

    Mat imgGray, Blur_img;    //Defining Output Image matrix

    cvtColor(img, imgGray,
             COLOR_BGR2GRAY); // To convert image to
                              // grayscale image
    GaussianBlur(img, Blur_img, Size(7, 7), 5,
                 0); // Now finally adding blur to the image

    imshow("Image", img); // Image before the conversion
    imshow("GrayImage",imgGray); // After Conversion to GrayScale
    imshow("Blurimg", Blur_img); // Blurred Image

    waitKey(0); // wait for keystroke
}
PRODUCCIÓN:

Imagen original
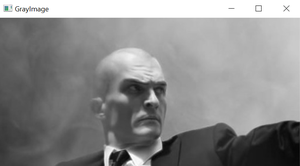
Imagen en escala de grises:

Imagen gris
Imagen borrosa:

Imagen borrosa
Programa OpenCV Python para desenfocar la imagen

Publicación traducida automáticamente
Artículo escrito por GeeksforGeeks-1 y traducido por Barcelona Geeks. The original can be accessed here. Licence: CCBY-SA