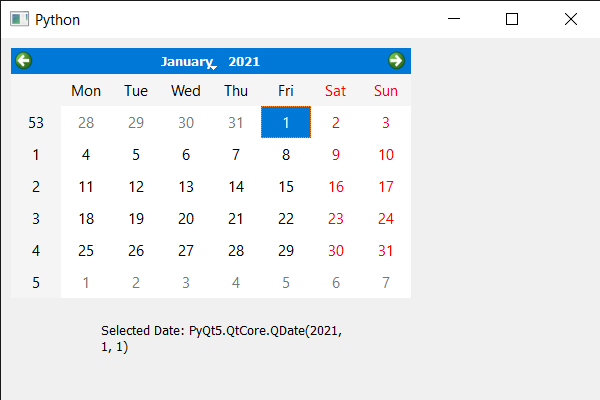
En este artículo, veremos cómo podemos obtener la fecha seleccionada de QCalendarWidget, la fecha seleccionada es la fecha que está actualmente resaltada. El usuario puede cambiar la fecha seleccionada usando el mouse y el cursor. Por defecto, la fecha seleccionada es la fecha en tiempo real, aunque podemos configurar la fecha seleccionada en cualquier momento con la ayuda del método setSelectedDate.
Nota: La fecha seleccionada debe estar dentro del rango de fechas especificado por las propiedades de fecha mínima y fecha máxima.
Para hacer esto, usaremos el método selectedDate con el objeto QCalendarWidget.
Sintaxis: calendar.selectedDate (fecha)
Argumento: no requiere argumento
Retorno: devuelve el objeto QDate
A continuación se muestra la implementación.
Python3
# importing libraries
from PyQt5.QtWidgets import *
from PyQt5 import QtCore, QtGui
from PyQt5.QtGui import *
from PyQt5.QtCore import *
import sys


class Window(QMainWindow):

    def __init__(self):
        super().__init__()

        # setting title
        self.setWindowTitle("Python ")

        # setting geometry
        self.setGeometry(100, 100, 600, 400)

        # calling method
        self.UiComponents()

        # showing all the widgets
        self.show()

    # method for components
    def UiComponents(self):

        # creating a QCalendarWidget object
        calendar = QCalendarWidget(self)

        # setting geometry to the calendar
        calendar.setGeometry(10, 10, 400, 250)

        # date
        date = QDate(2021, 1, 1)

        # setting selected date
        calendar.setSelectedDate(date)

        # creating label
        label = QLabel(self)

        # setting geometry to the label
        label.setGeometry(100, 270, 250, 60)

        # making label multi line
        label.setWordWrap(True)

        # getting the selected date
        value = calendar.selectedDate()

        # setting text to the label
        label.setText("Selected Date: " + str(value))


# create pyqt5 app
App = QApplication(sys.argv)

# create the instance of our Window
window = Window()

# start the app
sys.exit(App.exec())
Producción :

Publicación traducida automáticamente
Artículo escrito por rakshitarora y traducido por Barcelona Geeks. The original can be accessed here. Licence: CCBY-SA