Kivy es una herramienta GUI independiente de la plataforma en Python. Como se puede ejecutar en Android, IOS, Linux y Windows, etc. Básicamente se usa para desarrollar la aplicación de Android, pero eso no significa que no se pueda usar en aplicaciones de escritorio.
????????? Tutorial de Kivy: aprenda Kivy con ejemplos .
Ahora, en este artículo, aprenderemos cómo construir un botón en kivy usando el archivo kv , al igual que el botón que usamos en las calculadoras y muchos otros lugares.
Botones:
el botón es una etiqueta con acciones asociadas que se activan cuando se presiona el botón (o se suelta después de un clic/toque). Para vincular la acción del botón cuando se presiona, tenemos la función on_press .
Enfoque básico para el botón Acciones usando el archivo .kv:
1) Import kivy
2) Import kivy app
3) Import Box layout
4) create .kv with label and button
5) Bind button to a method
6) create method
Ahora codifiquemos el archivo .py.
Python3
# import kivy module
import kivy
# this restrict the kivy version i.e
# below this kivy version you cannot
# use the app or software
kivy.require("1.9.1")
# base Class of your App inherits from the App class.
# app:always refers to the instance of your application
from kivy.app import App
# BoxLayout arranges children
# in a vertical or horizontal box.
from kivy.uix.boxlayout import BoxLayout
# class in which we are defining action on click
class RootWidget(BoxLayout):
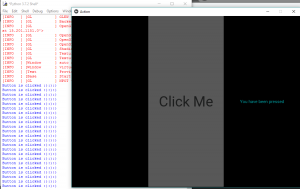
def btn_clk(self):
self.lbl.text = "You have been pressed"
# creating action class and calling
# Rootwidget by returning it
class ActionApp(App):
def build(self):
return RootWidget()
# creating the myApp root for ActionApp() class
myApp = ActionApp()
# run function runs the whole program
# i.e run() method which calls the
# target function passed to the constructor.
myApp.run()
Archivo .kv del código anterior [action.kv]:
debe guardarse con el nombre de la clase ActionApp. es decir, action.kv.
Python3
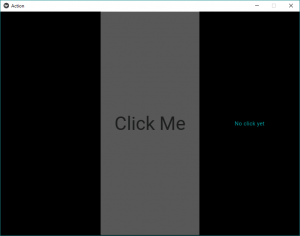
# Base widget from Rootwidget class in .py file
<RootWidget>:

    # used to change the label text
    # as in rootwidget class
    lbl:my_label

    # child that is an instance of the BoxLayout
    BoxLayout:
        orientation: 'vertical'
        size: [1, .25]

    Button:
        text:'Click Me'
        font_size:"50sp"
        color: [0, 255, 255, .67]
        on_press: root.btn_clk()

    Label:
        # id is limited in scope to the rule
        # it is declared in. An id is a weakref
        # to the widget and not the widget itself.
        id: my_label
        text: 'No click Yet'
        color: [0, 84, 80, 19]
Producción:
Vídeo explicativo de la salida:
Nota: BoxLayout organiza los widgets de forma vertical, uno encima de otro, o de forma horizontal, uno tras otro.
Publicación traducida automáticamente
Artículo escrito por YashKhandelwal8 y traducido por Barcelona Geeks. The original can be accessed here. Licence: CCBY-SA