Kivy es una herramienta GUI independiente de la plataforma en Python. Como se puede ejecutar en Android, IOS, Linux y Windows, etc. Básicamente se usa para desarrollar la aplicación de Android, pero eso no significa que no se pueda usar en aplicaciones de escritorio.
Widget de imagen:
El widget Imagen se utiliza para mostrar una imagen. Para usar el widget de imagen, debe importar:
desde kivy.uix.image importar imagen, AsyncImage (no es necesario mientras se trabaja con el archivo .kv)
porque el módulo kivy.uix.image tiene toda la funcionalidad relacionada con las imágenes.
Las imágenes se pueden cargar en la aplicación a través de dos tipos:
1) Carga síncrona: carga de una imagen desde el sistema (debe ser desde la carpeta en la que se guardan los archivos .py y .kv)
2) Carga asíncrona: para cargar una imagen de forma asíncrona (por ejemplo, desde un servidor web externo)
Nota: De manera predeterminada, la imagen está centrada y cabe dentro del cuadro delimitador del widget. Si no quiere eso, puede establecer allow_stretch en True y keep_ratio en False.
Basic Approach to create multiple layout in one file:
1) import kivy
2) import kivyApp
3) import image
4) import BoxLayout
5) set minimum version(optional)
6) Create the Layout class
7) Create App class
8) Create .kv file:
          1) Add BoxLayout
          2) Add Label
          3) Add Image
          4) Resizing, Positioning etc of Image
9) return instance of the layout class
10) Run an instance of the class
Entonces, en el siguiente código, explicaremos cómo cargar imágenes síncronas y asíncronas. También cómo cambiar el tamaño, posicionamiento, etiquetar, etc. la imagen con algunas cosas más.
archivo .py –
Python3
## Sample Python application demonstrating the
## working with images in Kivy using .kv file

##################################################
# import kivy module
import kivy

# base Class of your App inherits from the App class.
# app:always refers to the instance of your application
from kivy.app import App

# this restrict the kivy version i.e
# below this kivy version you cannot
# use the app or software
kivy.require('1.9.0')

# BoxLayout arranges children in a vertical or horizontal box.
# or help to put the children at the desired location.
from kivy.uix.boxlayout import BoxLayout

# to change the kivy default settings we use this module config
from kivy.config import Config

# 0 being off 1 being on as in true / false
# you can use 0 or 1 && True or False
Config.set('graphics', 'resizable', True)

# creating the root widget used in .kv file
class Imagekv(BoxLayout):
    '''
        no need to do anything here as
        we are building things in .kv file
    '''
    pass

# class in which name .kv file must be named My.kv.
class MyApp(App):
    # define build() function
    def build(self):
        # returning the instance of Imagekv class
        return Imagekv()

# run the App
if __name__ == '__main__':
    MyApp().run()
Implementación del archivo .kv –
Python3
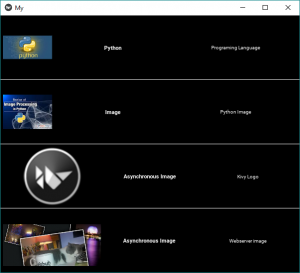
# How to use images in kivy using .kv

# root widget od Imagekv Class
<Imagekv>:

    # Giving orientation to Box Layout
    orientation:'vertical'

###############################################

    # Adding Box Layout
    BoxLayout:

        padding:5

        # Adding image from the system
        Image:
            source: 'download.jpg'

            # Giving the size of image
            size_hint_x: 0.4

            # allow stretching of image
            allow_stretch: True

        # Giving Label to images
        Label:
            text:"Python"
            font_size:11
            bold:True

        Label:
            text:"Programing Language"
            font_size:10

###############################################

   # Drawing the line between the multiples
    Label:
        canvas.before:
            Color:
                rgba: (1, 1, 1, 1)
            Rectangle:
                size: self.size
                pos: self.pos
        size_hint_y: None
        height: 1

################################################

    # Another Box Layout
    BoxLayout:
        padding:5
        Image:
            source:"downloading.jpg"
            size_hint_x: 0.4
            allow_stretch: True

        Label:
            text:"Image"
            font_size:11
            bold:True

        Label:
            text:"Python Image"
            font_size:10

#############################################

    # Drawing the line between the multiples
    Label:
        canvas.before:
            Color:
                rgba: (1, 1, 1, 1)
            Rectangle:
                size: self.size
                pos: self.pos
        size_hint_y: None
        height: 1

###############################################

    # Adding next Box Layout
    BoxLayout:
        padding:5

        # To load an image asynchronously
        # (for example from an external webserver)
        AsyncImage:
            source: 'http://kivy.org/logos/kivy-logo-black-64.png'
            width: 100
            allow_stretch: True

        Label:
            text:" Asynchronous Image "
            font_size:11
            bold:True

        Label:
            text:"Kivy Logo"
            font_size:10

####################################################

    # Drawing the line between the multiples
    Label:
        canvas.before:
            Color:
                rgba: (1, 1, 1, 1)
            Rectangle:
                size: self.size
                pos: self.pos
        size_hint_y: None
        height: 1

#####################################################

    # LAst Box Layout
    BoxLayout:
        padding:5

        AsyncImage:
            size_hint_y: None
            source: 'http://kivy.org/slides/kivypictures-thumb.jpg'
            width: 100
            allow_stretch: True

        Label:
            text:"Asynchronous Image "
            font_size:11
            bold:True

        Label:
            text:" Webserver image "
            font_size:10
Producción:
Publicación traducida automáticamente
Artículo escrito por YashKhandelwal8 y traducido por Barcelona Geeks. The original can be accessed here. Licence: CCBY-SA