Kivy es una herramienta GUI independiente de la plataforma en Python. Como se puede ejecutar en Android, IOS, Linux y Windows, etc. Básicamente se usa para desarrollar la aplicación de Android, pero eso no significa que no se pueda usar en aplicaciones de escritorio.
Widget de imagen:
El widget Imagen se utiliza para mostrar una imagen. Para usar el widget de imagen, debe importar:
from kivy.uix.image import Image, AsyncImage
porque el módulo kivy.uix.imagetiene toda la funcionalidad relacionada con las imágenes.
Las imágenes se pueden cargar en la aplicación a través de dos tipos:
1) Del sistema:
wimg = Image(source='mylogo.png')2) Carga asíncrona:
para cargar una imagen de forma asíncrona (por ejemplo, desde un servidor web externo), use la subclase AsyncImage:aimg = AsyncImage(source='http://mywebsite.com/logo.png')
Nota: De manera predeterminada, la imagen está centrada y cabe dentro del cuadro delimitador del widget. Si no quiere eso, puede establecer allow_stretch en True y keep_ratio en False.
Basic Approach to create multiple layout in one file:
1) import kivy
2) import kivyApp
3) import image
4) set minimum version(optional)
5) create App class
6) return Image/layout/widget
7) Run an instance of the class
A continuación se muestra el código de cómo puede usar las imágenes en su código:
Código #1:
Imagen simple del sistema (debe estar en la carpeta en la que se guarda el archivo .py)
# Program to explain how to add image in kivy

# import kivy module
import kivy

# base Class of your App inherits from the App class.
# app:always refers to the instance of your application
from kivy.app import App

# this restrict the kivy version i.e
# below this kivy version you cannot
# use the app or software
kivy.require('1.9.0')

# The Image widget is used to display an image
# this module contain all features of images
from kivy.uix.image import Image

# creating the App class
class MyApp(App):

    # defining build()

    def build(self):

        # return image
        return Image(source ='download.jpg')

# run the App
MyApp().run()
Salida: 
Código #2:
¿Cómo podemos agregar AsyncImage, es decir, desde el servidor web (externo)?
# Simple program to show how we add AsyncImage in kivy App

# import kivy module
import kivy

# base Class of your App inherits from the App class.
# app:always refers to the instance of your application
from kivy.app import App

# this restrict the kivy version i.e
# below this kivy version you cannot
# use the app or software
kivy.require('1.9.0')

# The Image widget is used to display an image
# this module contains all features of images
from kivy.uix.image import AsyncImage


# creating the App class
class MyApp(App):

    # defining build()

    def build(self):

        # return image
        return AsyncImage(source ='http://kivy.org/logos/kivy-logo-black-64.png')

# run the App
MyApp().run()
Producción: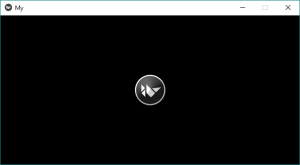
Ahora se me ocurrió una cosa: ¿cómo puede cambiar el tamaño, la posición, etc. de la imagen? El siguiente código también lo explicará:
Código #3:
# Program to Show how to use images in kivy

# import kivy module
import kivy

# base Class of your App inherits from the App class.
# app:always refers to the instance of your application
from kivy.app import App

# this restrict the kivy version i.e
# below this kivy version you cannot
# use the app or software
kivy.require('1.9.0')

# The Image widget is used to display an image
# this module contain all features of images
from kivy.uix.image import Image

# The Widget class is the base class required for creating Widgets
from kivy.uix.widget import Widget

# to change the kivy default settings we use this module config
from kivy.config import Config

# 0 being off 1 being on as in true / false
# you can use 0 or 1 && True or False
Config.set('graphics', 'resizable', True)


# creating the App class
class MyApp(App):

    # defining build()

    def build(self):

        # loading image
        self.img = Image(source ='download.jpg')

        # By default, the image is centered and fits
        # inside the widget bounding box.
        # If you don’t want that,
        # you can set allow_stretch to
        # True and keep_ratio to False.
        self.img.allow_stretch = True
        self.img.keep_ratio = False

        # Providing Size to the image
        # it varies from 0 to 1
        self.img.size_hint_x = 1
        self.img.size_hint_y = 1

        # Position set
        self.img.pos = (200, 100)

        # Opacity adjust the fadeness of the image if
        # 0 then it is complete black
        # 1 then original
        # it varies from 0 to 1
        self.img.opacity = 1


        # adding image to widget
        s = Widget()
        s.add_widget(self.img)

        # return widget
        return s

# run the app
MyApp().run()
Producción: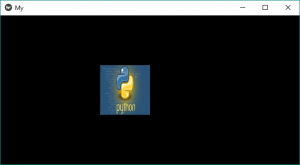
Publicación traducida automáticamente
Artículo escrito por YashKhandelwal8 y traducido por Barcelona Geeks. The original can be accessed here. Licence: CCBY-SA