Prerrequisitos: Introducción a Tkinter
Python ofrece múltiples opciones para desarrollar una GUI (interfaz gráfica de usuario). De todos los métodos GUI, Tkinter es el método más utilizado. Python con Tkinter genera la forma más rápida y sencilla de crear aplicaciones GUI. En este artículo, aprenderemos cómo crear una aplicación de Calendario GUI usando Tkinter, con una guía paso a paso.
Para crear un Tkinter :
- Importando el módulo – Tkinter
- Crear la ventana principal (contenedor)
- Agregue cualquier cantidad de widgets a la ventana principal.
- Aplique el evento Trigger en los widgets.
La GUI se vería a continuación:
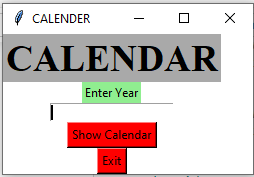
Vamos a crear una aplicación de calendario basada en GUI que pueda mostrar el calendario con respecto al año dado, proporcionado por el usuario.
A continuación se muestra la implementación:
Python3
# import all methods and classes from the tkinter
from tkinter import *

# import calendar module
import calendar

# Function for showing the calendar of the given year
def showCal() :

    # Create a GUI window
    new_gui = Tk()

    # Set the background colour of GUI window
    new_gui.config(background = "white")

    # set the name of tkinter GUI window
    new_gui.title("CALENDAR")

    # Set the configuration of GUI window
    new_gui.geometry("550x600")

    # get method returns current text as string
    fetch_year = int(year_field.get())

    # calendar method of calendar module return
    # the calendar of the given year .
    cal_content = calendar.calendar(fetch_year)

    # Create a label for showing the content of the calendar
    cal_year = Label(new_gui, text = cal_content, font = "Consolas 10 bold")

    # grid method is used for placing
    # the widgets at respective positions
    # in table like structure.
    cal_year.grid(row = 5, column = 1, padx = 20)

    # start the GUI
    new_gui.mainloop()


# Driver Code
if __name__ == "__main__" :

    # Create a GUI window
    gui = Tk()

    # Set the background colour of GUI window
    gui.config(background = "white")

    # set the name of tkinter GUI window
    gui.title("CALENDAR")

    # Set the configuration of GUI window
    gui.geometry("250x140")

    # Create a CALENDAR : label with specified font and size
    cal = Label(gui, text = "CALENDAR", bg = "dark gray",
                            font = ("times", 28, 'bold'))

    # Create a Enter Year : label
    year = Label(gui, text = "Enter Year", bg = "light green")

    # Create a text entry box for filling or typing the information.
    year_field = Entry(gui)

    # Create a Show Calendar Button and attached to showCal function
    Show = Button(gui, text = "Show Calendar", fg = "Black",
                              bg = "Red", command = showCal)

    # Create a Exit Button and attached to exit function
    Exit = Button(gui, text = "Exit", fg = "Black", bg = "Red", command = exit)

    # grid method is used for placing
    # the widgets at respective positions
    # in table like structure.
    cal.grid(row = 1, column = 1)

    year.grid(row = 2, column = 1)

    year_field.grid(row = 3, column = 1)

    Show.grid(row = 4, column = 1)

    Exit.grid(row = 6, column = 1)

    # start the GUI
    gui.mainloop()
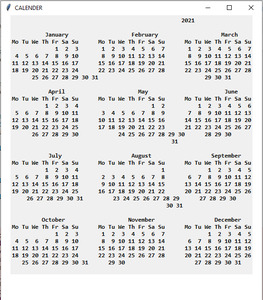
Producción :