Kivy es una herramienta GUI independiente de la plataforma en Python. Como se puede ejecutar en Android, IOS, Linux y Windows, etc. Básicamente se usa para desarrollar la aplicación de Android, pero eso no significa que no se pueda usar en aplicaciones de escritorio.
????????? Tutorial de Kivy: aprenda Kivy con ejemplos .
Cambiar widget:
El widget Switch está activo o inactivo, como un interruptor de luz mecánico. El usuario puede deslizar hacia la izquierda/derecha para activarlo/desactivarlo.
El valor representado por el interruptor es Verdadero o Falso. Es decir, el interruptor puede estar en la posición de encendido o en la posición de apagado.
Para trabajar con Switch debes tener que importar:
from kivy.uix.switch import Switch
Adjuntar devolución de llamada al conmutador:
- Se puede conectar un interruptor con una devolución de llamada para recuperar el valor del interruptor.
- La transición de estado de un interruptor es de ENCENDIDO a APAGADO o de APAGADO a ENCENDIDO.
- Cuando el interruptor realiza cualquier transición, se activa la devolución de llamada y se puede recuperar el nuevo estado, es decir, vino y se puede realizar cualquier otra acción en función del estado.
- Por defecto, la representación del widget es estática. El tamaño mínimo requerido es de 83*32 píxeles.
- Todo el widget está activo, no solo la parte con gráficos. Siempre que deslice el dedo sobre el cuadro delimitador del widget, funcionará.
Basic Approach:

1) import kivy
2) import kivyApp
3) import Switch
4) import Gridlayout
5) import Label
6) Set minimum version(optional)
7) create Layout class(In this you create a switch):
        --> define the callback of the switch in this
8) create App class
9) create .kv file (name same as the app class):
        1) create boxLayout
        2) Give Label
        3) Create Switch
        4) Bind a callback if needed
10) return Layout/widget/Class(according to requirement)
11) Run an instance of the class
A continuación se muestra la implementación:
hemos explicado cómo crear un botón, adjuntarle una devolución de llamada y cómo deshabilitar un botón después de activarlo o desactivarlo.
Archivo principal.py:
Python3
# Program to explain how switch works
# import kivy module
import kivy
# base Class of your App inherits from the App class.
# app:always refers to the instance of your application
from kivy.app import App
# this restrict the kivy version i.e
# below this kivy version you cannot
# use the app or software
kivy.require('1.9.0')
# The Switch widget is active or inactive
# The state transition of a switch is from
# either on to off or off to on.
from kivy.uix.switch import Switch
# The GridLayout arranges children in a matrix.
# It takes the available space and
# divides it into columns and rows,
# then adds widgets to the resulting “cells”.
from kivy.uix.gridlayout import GridLayout
# The Label widget is for rendering text.
from kivy.uix.label import Label
# A Gridlayout with a label a switch
# A class which contains all stuff about the switch
class SimpleSwitch(GridLayout):
# number of rows
rows = 4
# Callback for the switch state transition
# Defining a Callback function
# Contains Two parameter switchObject, switchValue
def switch_callback(self, switchObject, switchValue):
# Switch value are True and False
if(switchValue):
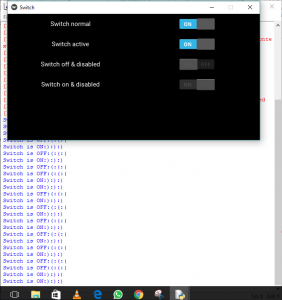
print('Switch is ON:):):)')
else:
print('Switch is OFF:(:(:(')
# Defining the App Class
class SwitchApp(App):
# define build function
def build(self):
# return the switch class
return SimpleSwitch()
# Run the kivy app
if __name__ == '__main__':
SwitchApp().run()
Archivo .kv : en este hemos hecho las devoluciones de llamada y también hemos desactivado el botón.
Python3
# .kv file in which the whole functions of a switch
# Along with labels are present

<SimpleSwitch>:

    # creating box layout for better view
    BoxLayout:
        size_hint_y: None
        height: '48dp'

        # Adding label to switch
        Label:
            text: 'Switch normal'

        # creating the switch
        Switch:

            # False means OFF and True means ON
            active: False

            # Arranging a callback to the switch
            on_active: root.switch_callback(self, self.active)

    # Another for another switch

    BoxLayout:
        size_hint_y: None
        height: '48dp'

        Label:
            text: 'Switch active'
        Switch:
            active: True
            on_active: root.switch_callback(self, self.active)


    BoxLayout:
        size_hint_y: None
        height: '48dp'

        Label:
            text: 'Switch off & disabled'

        Switch:
            # disabled True means After making switch False
            # it is disabled now you cannot change its state
            disabled: True
            active: False

    BoxLayout:
        size_hint_y: None
        height: '48dp'

        Label:
            text: 'Switch on & disabled'
        Switch:
            disabled: True
            active: True
Salida:
Imagen 1:

Imagen 2:
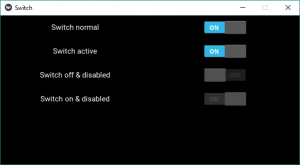
Imagen para mostrar las devoluciones de llamada:
Publicación traducida automáticamente
Artículo escrito por GeeksforGeeks-1 y traducido por Barcelona Geeks. The original can be accessed here. Licence: CCBY-SA