Kivy es una herramienta GUI independiente de la plataforma en Python. Como se puede ejecutar en Android, IOS, Linux y Windows, etc. Básicamente se usa para desarrollar la aplicación de Android, pero eso no significa que no se pueda usar en aplicaciones de escritorio.
Lienzo :
El lienzo es el objeto raíz utilizado para dibujar por un widget. Un lienzo kivy no es el lugar donde pintas. Cada Widget en Kivy ya tiene un Lienzo por defecto. Cuando crea un widget, puede crear todas las instrucciones necesarias para dibujar. Si self es su widget actual. Las instrucciones Color y Rectángulo se agregan automáticamente al objeto del lienzo y se usarán cuando se dibuje la ventana. Para usar Canvas debes tener que importar:
from kivy.graphics import Rectangle, Color
Basic Approach -
-> import kivy
-> import kivy App
-> import widget
-> import Canvas i.e.:
      from kivy.graphics import Rectangle, Color
-> set minimum version(optional)
-> Extend the Widget class
-> Create the App Class
-> create the .kv file:
    -> create the canvas
    -> Add action/callback if needed
-> return a Widget
-> Run an instance of the class
Implementación del enfoque: 1) Creación de un lienzo simple: archivo main.py
Python3
# import kivy module
import kivy

# this restrict the kivy version i.e
# below this kivy version you cannot
# use the app or software
kivy.require("1.9.1")

# base Class of your App inherits from the App class.
# app:always refers to the instance of your application
from kivy.app import App

# A Widget is the base building block
# of GUI interfaces in Kivy.
# It provides a Canvas that
# can be used to draw on screen.
from kivy.uix.widget import Widget

# From graphics module we are importing
# Rectangle and Color as they are
# basic building of canvas.
from kivy.graphics import Rectangle, Color


# class in which we are creating the canvas
class CanvasWidget(Widget):
    pass

# Create the App Class
class CanvasApp(App):
    def build(self):
        return CanvasWidget()

# run the App
CanvasApp().run()
Kivy busca un archivo Kv con el mismo nombre que su clase App en minúsculas, menos «App» si termina con ‘App’, por ejemplo: CanvasApp -> canvas.kv
Python3
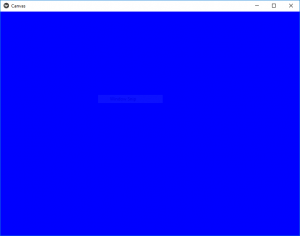
# .kv file of canvas

<CanvasWidget@Widget>

    # creating canvas
    canvas:
        Color:
            rgba: 0, 0, 1, 1    # Blue

        # size and position of Canvas
        Rectangle:
            pos: self.pos
            size: self.size
Producción:
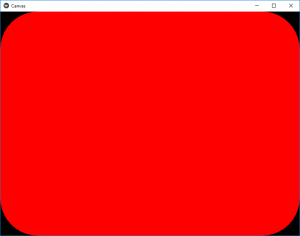
Ahora, ¿cómo podemos cambiar el color del lienzo con cualquier acción? A continuación se muestra un ejemplo en el que al hacer clic cambia el color de la pantalla.
Archivo principal.py:
Python3
# import kivy module
import kivy

# this restrict the kivy version i.e
# below this kivy version you cannot
# use the app or software
kivy.require("1.9.1")

# base Class of your App inherits from the App class.
# app:always refers to the instance of your application
from kivy.app import App

# From graphics module we are importing
# Rectangle and Color as they are
# basic building of canvas.
from kivy.graphics import Rectangle, Color

# The ButtonBehavior mixin class provides Button behavior.
from kivy.uix.button import ButtonBehavior

# The Label widget is for rendering text.
from kivy.uix.label import Label

# class in which we are creating the canvas
class CanvasWidget(ButtonBehavior, Label):
    pass

# Create the App Class
class CanvasApp(App):
    def build(self):
        return CanvasWidget()

# run the App
CanvasApp().run()
Archivo .kv:
Python3
# .kv file of canvas

<CanvasWidget>

    # Creating Canvas
    canvas:

        # Color is blue if button is pressed,
        # otherwise color is red
        Color:
            rgb: (1, 0, 0, 1) if self.state == 'normal' else (0, 0, 1, 1)

        # Rounded rectangle canvas
        RoundedRectangle:
            size: self.size
            pos: self.pos

            # Play with these if you want smooth corners for your button
            radius: 100, 100, 100, 100


    # Print the text when touched or button pressed
    on_release:
        print("I have been clicked")
Producción: 
Nota: las instrucciones de dibujo de Kivy no se relacionan automáticamente con la posición o el tamaño del widget. Por lo tanto, debe tener en cuenta estos factores al dibujar. Para que sus instrucciones de dibujo sean relativas al widget, las instrucciones deben declararse en KvLang o vincularse a los cambios de posición y tamaño.
Publicación traducida automáticamente
Artículo escrito por YashKhandelwal8 y traducido por Barcelona Geeks. The original can be accessed here. Licence: CCBY-SA