El administrador de geometría de cuadrícula coloca los widgets en una tabla bidimensional. El widget maestro se divide en varias filas y columnas, y cada «celda» de la tabla resultante puede contener un widget. El administrador de cuadrícula es el más flexible de los administradores de geometría en Tkinter . Si no desea aprender cómo y cuándo usar los tres administradores, al menos debe asegurarse de aprender este. Considere el siguiente ejemplo: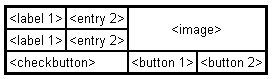
Es posible crear este diseño con el administrador de paquetes , pero se necesitan varios widgets de marco adicionales y mucho trabajo para que las cosas se vean bien. Si usa el administrador de cuadrícula en su lugar, solo necesita una llamada por widget para que todo se distribuya correctamente. Usar el administrador de cuadrícula es fácil. Simplemente cree los widgets y use el método de cuadrícula para decirle al administrador en qué fila y columna colocarlos. No es necesario que especifique el tamaño de la cuadrícula de antemano; el administrador lo determina automáticamente a partir de los widgets que contiene.
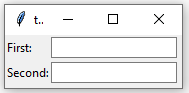
Código #1:
Python3
# import tkinter module
from tkinter import * from tkinter.ttk import *

# creating main tkinter window/toplevel
master = Tk()

# this will create a label widget
l1 = Label(master, text = "First:")
l2 = Label(master, text = "Second:")

# grid method to arrange labels in respective
# rows and columns as specified
l1.grid(row = 0, column = 0, sticky = W, pady = 2)
l2.grid(row = 1, column = 0, sticky = W, pady = 2)

# entry widgets, used to take entry from user
e1 = Entry(master)
e2 = Entry(master)

# this will arrange entry widgets
e1.grid(row = 0, column = 1, pady = 2)
e2.grid(row = 1, column = 1, pady = 2)

# infinite loop which can be terminated by keyboard
# or mouse interrupt
mainloop()
Producción:
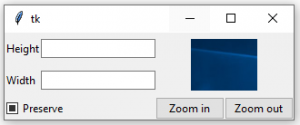
Código #2: Crear el diseño que se muestra arriba.
Python3
# import tkinter module
from tkinter import * from tkinter.ttk import *

# creating main tkinter window/toplevel
master = Tk()

# this will create a label widget
l1 = Label(master, text = "Height")
l2 = Label(master, text = "Width")

# grid method to arrange labels in respective
# rows and columns as specified
l1.grid(row = 0, column = 0, sticky = W, pady = 2)
l2.grid(row = 1, column = 0, sticky = W, pady = 2)

# entry widgets, used to take entry from user
e1 = Entry(master)
e2 = Entry(master)

# this will arrange entry widgets
e1.grid(row = 0, column = 1, pady = 2)
e2.grid(row = 1, column = 1, pady = 2)

# checkbutton widget
c1 = Checkbutton(master, text = "Preserve")
c1.grid(row = 2, column = 0, sticky = W, columnspan = 2)

# adding image (remember image should be PNG and not JPG)
img = PhotoImage(file = r"C:\Users\Admin\Pictures\capture1.png")
img1 = img.subsample(2, 2)

# setting image with the help of label
Label(master, image = img1).grid(row = 0, column = 2,
       columnspan = 2, rowspan = 2, padx = 5, pady = 5)

# button widget
b1 = Button(master, text = "Zoom in")
b2 = Button(master, text = "Zoom out")

# arranging button widgets
b1.grid(row = 2, column = 2, sticky = E)
b2.grid(row = 2, column = 3, sticky = E)

# infinite loop which can be terminated
# by keyboard or mouse interrupt
mainloop()
Producción:
Advertencia: nunca mezcle grid() y pack() en la misma ventana maestra.
Publicación traducida automáticamente
Artículo escrito por sanjeev2552 y traducido por Barcelona Geeks. The original can be accessed here. Licence: CCBY-SA