OpenCV-Python es una biblioteca de enlaces de Python diseñada para resolver problemas de visión por computadora.
El método cv2.arrowedLine() se usa para dibujar un segmento de flecha que apunta desde el punto de inicio hasta el punto final.
Sintaxis: cv2.arrowedLine(image, start_point, end_point, color, thick, line_type, shift, tipLength)
Parámetros:
image: Es la imagen sobre la que se va a dibujar la línea.
start_point: Son las coordenadas de inicio de la línea. Las coordenadas se representan como tuplas de dos valores, es decir ( valor de la coordenada X , valor de la coordenada Y ).
end_point: Son las coordenadas finales de la línea. Las coordenadas se representan como tuplas de dos valores, es decir ( valor de la coordenada X , valor de la coordenada Y ).
color: Es el color de la línea a dibujar. Para BGR , pasamos una tupla. ej.: (255, 0, 0) para el color azul.
grosor: Es el grosor de la línea en px .
line_type: Denota el tipo de línea a dibujar.
shift: Denota el número de bits fraccionarios en las coordenadas del punto.
tipLength: Denota la longitud de la punta de la flecha en relación con la longitud de la flecha.
Valor devuelto: Devuelve una imagen.
Imagen utilizada para todos los siguientes ejemplos:

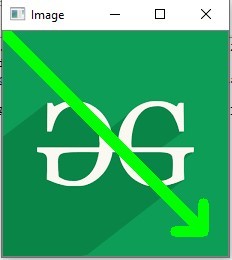
Ejemplo 1:
Python3
# Python program to explain cv2.arrowedLine() method

# importing cv2
import cv2

# path
path = r'C:\Users\Atomix\Desktop\geeksforgeeks\geeks.png'

# Reading an image in default mode
image = cv2.imread(path)

# Window name in which image is displayed
window_name = 'Image'

# Start coordinate, here (0, 0)
# represents the top left corner of image
start_point = (0, 0)

# End coordinate
end_point = (200, 200)

# Green color in BGR
color = (0, 255, 0)

# Line thickness of 9 px
thickness = 9

# Using cv2.arrowedLine() method
# Draw a diagonal green arrow line
# with thickness of 9 px
image = cv2.arrowedLine(image, start_point, end_point,
                                     color, thickness)

# Displaying the image
cv2.imshow(window_name, image)
Producción:
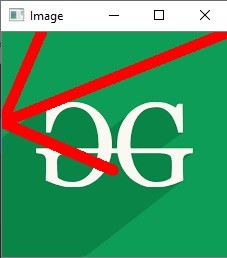
Ejemplo #2:
Python3
# Python program to explain cv2.arrowedLine() method

# importing cv2
import cv2

# path
path = r'C:\Users\Atomix\Desktop\geeksforgeeks\geeks.png'

# Reading an image in default mode
image = cv2.imread(path)

# Window name in which image is displayed
window_name = 'Image'

# Start coordinate, here (225, 0)
# represents the top right corner of image
start_point = (225, 0)

# End coordinate
end_point = (0, 90)

# Red color in BGR
color = (0, 0, 255)

# Line thickness of 9 px
thickness = 9

# Using cv2.arrowedLine() method
# Draw a red arrow line
# with thickness of 9 px and tipLength = 0.5
image = cv2.arrowedLine(image, start_point, end_point,
                    color, thickness, tipLength = 0.5)

# Displaying the image
cv2.imshow(window_name, image)
Producción: