Kivy es una herramienta GUI independiente de la plataforma en Python. Como se puede ejecutar en Android, IOS, Linux y Windows, etc. Básicamente se usa para desarrollar la aplicación de Android, pero eso no significa que no se pueda usar en aplicaciones de escritorio.
????????? Tutorial de Kivy: aprenda Kivy con ejemplos .
Diseño de pila:
Para usar StackLayout, primero importe StackLayout con el siguiente comando:
from kivy.uix.stacklayout import StackLayout
Es bastante confuso entender la diferencia entre Stack y Boxlayout .
StackLayout puede organizar widgets con más complejidad que BoxLayout Boxlayout puede organizar widgets de forma vertical u horizontal. Pero con StackLayout, puede combinar las orientaciones. Hay 4 orientaciones de fila y 4 de columna.
More flexible that Boxlayout(1D)

StackLayout Orientation (2D):
 - right to left or left to right
 - top to bottom or bottom to top
 - 'rl-bt', 'rl-tb', lr-bt', 'lr-tb'(Row wise)
 - 'bt-rl', 'bt-lr', 'tb-rl', 'tb-lr'(Column wise)
Las cuatro orientaciones por filas y las cuatro orientaciones por columnas se muestran en las siguientes imágenes.
Basic Approach to create Stack layout :

1) import kivy
2) import kivyApp
3) import Button
4) import Stacklayout
5) Set minimum version(optional)
6) create App class
7) return widget
8) Run an instance of the class
Implementación del Enfoque:
Python3
# code to show how to use StackLayout

# import kivy module
import kivy

# this restricts the kivy version i.e
# below this kivy version you cannot
# use the app or software
kivy.require("1.9.1")

# base Class of your App inherits from the App class.
# app:always refers to the instance of your application
from kivy.app import App

# creates the button in kivy
# if not imported shows the error
from kivy.uix.button import Button

# The StackLayout arranges children vertically
# or horizontally, as many as the layout can fit.
from kivy.uix.stacklayout import StackLayout


# class in which we are creating StackLayout
class StackLayoutApp(App):

    def build(self):

        # Different orientation
        # ['lr-tb', 'tb-lr', 'rl-tb', 'tb-rl',
           'lr-bt', 'bt-lr', 'rl-bt', 'bt-rl']
        SL = StackLayout(orientation ='lr-tb')

        # Creating Multiple Buttons
        btn1 = Button(text ="B1",
                      font_size = 20,
                      size_hint =(.2, .1))
        btn2 = Button(text ="B2",
                      font_size = 20,
                      size_hint =(.2, .1))
        btn3 = Button(text ="B3",
                      font_size = 20,
                      size_hint =(.2, .1))
        btn4 = Button(text ="B4",
                      font_size = 20,
                      size_hint =(.2, .1))
        btn5 = Button(text ="B5",
                      font_size = 20,
                      size_hint =(.2, .1))
        btn6 = Button(text ="B6",
                      font_size = 20,
                      size_hint =(.2, .1))
        btn7 = Button(text ="B7",
                      font_size = 20,
                      size_hint =(.2, .1))
        btn8 = Button(text ="B8",
                      font_size = 20,
                      size_hint =(.2, .1))
        btn9 = Button(text ="B9",
                      font_size = 20,
                      size_hint =(.2, .1))
        btn10 = Button(text ="B10",
                      font_size = 20,
                      size_hint =(.2, .1))


        # adding widgets
        SL.add_widget(btn1)
        SL.add_widget(btn2)
        SL.add_widget(btn3)
        SL.add_widget(btn4)
        SL.add_widget(btn5)
        SL.add_widget(btn6)
        SL.add_widget(btn7)
        SL.add_widget(btn8)
        SL.add_widget(btn9)
        SL.add_widget(btn10)


        # returning widgets
        return SL

# run function runs the whole program
# i.e run() method which calls the
# target function passed to the constructor.
if __name__ == '__main__':
    StackLayoutApp().run()
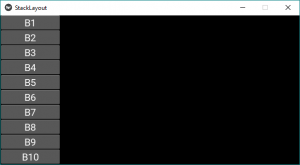
Producción:
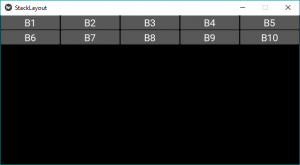
Esto es para la orientación ‘lr-tb’. Primero, los widgets se agregan de izquierda a derecha y luego de arriba a abajo.
Nota: si desea cambiar la orientación, simplemente cambie la orientación en la línea n. ° 31 con cualquiera de las siguientes orientaciones:
For row wise orientation use:
  -'lr-tb'
  -'lr-bt'
  -'rl-tb'
  -'rl-bt'

For column wise orientation use:
  -'tb-lr'
  -'tb-rl'
  -'bt-lr'
  -'bt-rl'
A continuación, se muestra la salida de la imagen con todas las orientaciones anteriores:
para usar la orientación por filas:
'lr-tb'
Producción:
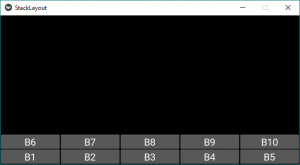
'lr-bt'
Producción:
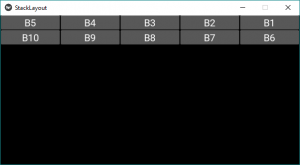
'rl-tb'
Producción:
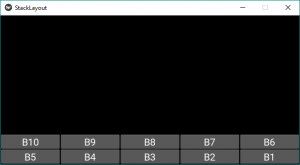
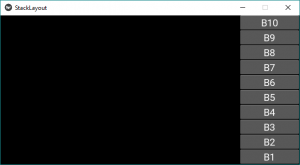
'rl-bt'
Producción:
Para la orientación de la columna, use:
'tb-lr'
Producción:
'tb-rl'
Producción:

'bt-lr'
Producción:

'bt-rl'
Producción:
Publicación traducida automáticamente
Artículo escrito por YashKhandelwal8 y traducido por Barcelona Geeks. The original can be accessed here. Licence: CCBY-SA