Python ofrece múltiples opciones para desarrollar una GUI (interfaz gráfica de usuario). De todos los métodos GUI, Tkinter es el método más utilizado. Python con Tkinter es la forma más rápida y sencilla de crear aplicaciones GUI. Crear una GUI usando Tkinter es una tarea fácil.
En Python3, Tkinter viene preinstalado, pero también puede instalarlo usando el comando:
pip install tkinter
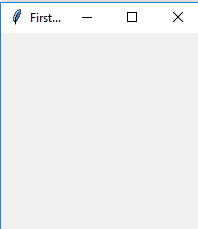
Ejemplo: ahora vamos a crear una ventana simple usando Tkinter
Python3
# creating a simple tkinter window
# if you are using python2
# use import Tkinter as tk

import tkinter as tk


root = tk.Tk()
root.title("First Tkinter Window")
root.mainloop()
Producción :
El widget de entrada
El widget de entrada es un widget de Tkinter que se utiliza para ingresar o mostrar una sola línea de texto.
Sintaxis:
entry = tk.Entry(parent, options)
Parámetros:
1) Principal: la ventana principal o el marco en el que se mostrará el widget.
2) Opciones: Las diversas opciones proporcionadas por el widget de entrada son:
- bg : El color de fondo normal que se muestra detrás de la etiqueta y el indicador.
- bd : El tamaño del borde alrededor del indicador. El valor predeterminado es 2 píxeles.
- font : La fuente utilizada para el texto.
- fg : El color utilizado para representar el texto.
- justificar: si el texto contiene varias líneas, esta opción controla cómo se justifica el texto: CENTRO, IZQUIERDA o DERECHA.
- relieve : Con el valor por defecto, relieve=FLAT. Puede configurar esta opción para cualquiera de los otros estilos como: HUNDIDO, RÍGIDO, ELEVADO, RANURA
- show : Normalmente, los caracteres que escribe el usuario aparecen en la entrada. Para hacer una .contraseña. entrada que repite cada carácter como un asterisco, configure show=”*”.
- textvariable : para poder recuperar el texto actual de su widget de entrada, debe establecer esta opción en una instancia de la clase StringVar.
Métodos: los diversos métodos proporcionados por el widget de entrada son:
- get() : Devuelve el texto actual de la entrada como una string.
- delete() : Elimina caracteres del widget
- insert (índice, ‘nombre’) : Inserta la string ‘nombre’ antes del carácter en el índice dado.
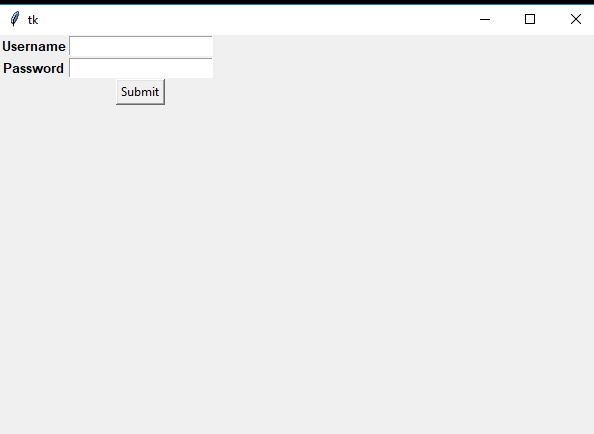
Ejemplo:
Python3
# Program to make a simple
# login screen


import tkinter as tk

root=tk.Tk()

# setting the windows size
root.geometry("600x400")

# declaring string variable
# for storing name and password
name_var=tk.StringVar()
passw_var=tk.StringVar()


# defining a function that will
# get the name and password and
# print them on the screen
def submit():

    name=name_var.get()
    password=passw_var.get()

    print("The name is : " + name)
    print("The password is : " + password)

    name_var.set("")
    passw_var.set("")


# creating a label for
# name using widget Label
name_label = tk.Label(root, text = 'Username', font=('calibre',10, 'bold'))

# creating a entry for input
# name using widget Entry
name_entry = tk.Entry(root,textvariable = name_var, font=('calibre',10,'normal'))

# creating a label for password
passw_label = tk.Label(root, text = 'Password', font = ('calibre',10,'bold'))

# creating a entry for password
passw_entry=tk.Entry(root, textvariable = passw_var, font = ('calibre',10,'normal'), show = '*')

# creating a button using the widget
# Button that will call the submit function
sub_btn=tk.Button(root,text = 'Submit', command = submit)

# placing the label and entry in
# the required position using grid
# method
name_label.grid(row=0,column=0)
name_entry.grid(row=0,column=1)
passw_label.grid(row=1,column=0)
passw_entry.grid(row=1,column=1)
sub_btn.grid(row=2,column=1)

# performing an infinite loop
# for the window to display
root.mainloop()
Producción :

Publicación traducida automáticamente
Artículo escrito por roshanagarwal883 y traducido por Barcelona Geeks. The original can be accessed here. Licence: CCBY-SA