Requisito previo: control deslizante en Kivy
Kivy es una herramienta GUI independiente de la plataforma en Python. Como se puede ejecutar en Android, IOS, Linux y Windows, etc. Básicamente se usa para desarrollar la aplicación de Android, pero eso no significa que no se pueda usar en aplicaciones de escritorio.
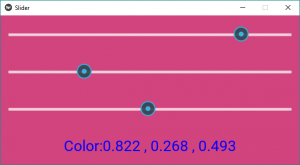
En este artículo, aprenderemos cómo podemos controlar el color de fondo en kivy, lo que significa que si deslizamos el control deslizante, el color de la ventana cambia en consecuencia.
Hay muchos métodos diferentes por los cuales puedes hacer esto. Veamos un enfoque simple.
????????? Tutorial de Kivy: aprenda Kivy con ejemplos .
Basic Approach to make it is very simple:
1) import kivy
2) import kivyApp
3) import BoxLayout
4) set minimum version(optional)
5) Extend the class
6) set up .kv file :
        -> Set orientation
        -> Set slider color
        -> Create canvas.before property
        -> Create Sliders
        -> Create label
7) Return layout
8) Run an instance of the class
¿Cuántos controles deslizantes controlan el color de fondo en Kivy?
Python3
# main.py to manipulate the window
# color or screen colour in kivy

# base Class of your App inherits from the App class.
# app:always refers to the instance of your application
from kivy.app import App

# BoxLayout arranges children in a vertical or horizontal box.
# or help to put the childrens at the desired location.
from kivy.uix.boxlayout import BoxLayout

# creating the root widget used in .kv file
class MultipleSliderWidget(BoxLayout):
    pass

# class in which name .kv file must be named Slider.kv.
# or creating the App class
class Multiple_Slider(App):
    def build(self):
        # returning the instance of SliderWidget class
        return MultipleSliderWidget()

# run the app
if __name__ == '__main__':
    Multiple_Slider().run()
Ahora el archivo .kv del código anterior es:
Python3
# Multiple_Slider.kv file of the main.py file.

#.kv file to manipulate the window colour.
<MultipleSliderWidget>:

    # giving the orientation of Slider
    orientation: "vertical"

    # initially providing this colour to window
    slider_colors: 0.5, 0.5, 0.5

    # executed before the canvas group.
    canvas.before:
        Color:
            rgb: root.slider_colors
        Rectangle:
            pos: root.pos
            size: root.size

    # creating the Slider
    Slider:
        min: 0  # minimum value of Slider
        max: 1 # maximum value of Slider
        value: 0.5  # initial value of Slider

        # when slider moves then to increase value
        on_value: root.slider_colors[0] = self.value;

    Slider:
        min: 0
        max: 1
        value: 0.5
        on_value: root.slider_colors[1] = self.value

    Slider:
        min: 0
        max: 1
        value: 0.5
        on_value: root.slider_colors[2] = self.value

    # Adding The label
    Label:
        font_size: "30sp"
        # the for loop is for continuously changing
        # the colour as slider value changes
        text: "Color:" + ", ".join(["%.3f" %(i) for i in root.slider_colors])
        color: 0, 0, 1, 1
Producción:
Salida de vídeos:
Publicación traducida automáticamente
Artículo escrito por YashKhandelwal8 y traducido por Barcelona Geeks. The original can be accessed here. Licence: CCBY-SA