Kivy es una herramienta GUI independiente de la plataforma en Python. Como se puede ejecutar en Android, IOS, Linux y Windows, etc. Básicamente se usa para desarrollar la aplicación de Android, pero no significa que no se pueda usar en aplicaciones de escritorio.
????????? Tutorial de Kivy: aprenda Kivy con ejemplos .
Widget de carrusel:
El widget de carrusel proporciona la clásica vista de carrusel compatible con dispositivos móviles en la que puede pasar de una diapositiva a otra. Puede agregar cualquier contenido al carrusel y hacer que se mueva horizontal o verticalmente. El carrusel puede mostrar páginas en secuencia o en bucle. Para trabajar con este widget debes tener que importar:
from kivy.uix.carousel import Carousel
Basic Approach:
1) import kivy
2) import kivy App
3) import Gridlayout
4) import Carousel
5) set minimum version(optional)
6) Create as much as widget class as needed
7) create the App class
8) return the widget/layout etc class
9) Create Carousel.kv file:
        1) Create button( or what is needed)
        2) Arrange the on_release / on_press function
10) Run an instance of the class
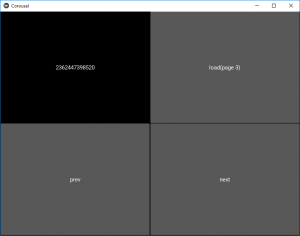
En el siguiente ejemplo, estamos creando los botones en la aplicación. En esto usamos las funciones load_previous() y load_next().
load_next(mode=’next’) Animar a la siguiente diapositiva. load_previous() Animar a la diapositiva anterior.
Implementación del Enfoque: archivo main.py:
Python3
# Program to explain how to add carousel in kivy

# import kivy module
import kivy

# base Class of your App inherits from the App class.
# app:always refers to the instance of your application
from kivy.app import App

# this restrict the kivy version i.e
# below this kivy version you cannot
# use the app or software
kivy.require('1.9.0')


# The Carousel widget provides the
# classic mobile-friendly carousel
# view where you can swipe between slides
from kivy.uix.carousel import Carousel

# The GridLayout arranges children in a matrix.
# It takes the available space and
# divides it into columns and rows,
# then adds widgets to the resulting “cells”.
from kivy.uix.gridlayout import GridLayout


# Create the Layout Class
class Carousel(GridLayout):
    pass

# Create the App class
class CarouselApp(App):
    def build(self):
        # Set carousel widget as root
        root = Carousel()

        # for multiple pages
        for x in range(10):
            root.add_widget(Carousel())
        return root


# run the App
if __name__ == '__main__':
    CarouselApp().run()
Archivo carrusel.kv :
Python3
# Carousel.kv file of the code

# Carousel Creation
<Corousel>:

    rows: 2

    # It shows the id which is different for different pages
    Label:
        text: str(id(root))

    # This button will take you directly to the 3rd page
    Button
        text: 'load(page 3)'
        on_release:
            carousel = root.parent.parent
            carousel.load_slide(carousel.slides[2])

    # load_previous() is used to go back to previous page
    Button
        text: 'prev'
        on_release:
            root.parent.parent.load_previous()

    # load_next() is used to go to next page
    Button
        text: 'next'
        on_release:
            root.parent.parent.load_next()
Producción: 
Publicación traducida automáticamente
Artículo escrito por YashKhandelwal8 y traducido por Barcelona Geeks. The original can be accessed here. Licence: CCBY-SA