Kivy es una herramienta GUI independiente de la plataforma en Python. Las aplicaciones de Kivy se pueden ejecutar en Android, IOS, Linux y Windows, etc. Se utiliza básicamente para desarrollar la aplicación de Android, pero eso no significa que no se pueda utilizar en aplicaciones de escritorio.
Widget de casilla de verificación:
la casilla de verificación es un botón específico de dos estados que se puede marcar o desmarcar. Las casillas de verificación tienen una etiqueta adjunta que describe el propósito de la casilla de verificación. Las casillas de verificación se pueden agrupar para formar botones de opción. Las casillas de verificación se utilizan para indicar si se debe aplicar o no una configuración.
Para trabajar con Checkbox , primero debe importar Checkbox desde el módulo que consta de todas las características, funciones del control deslizante, es decir
from kivy.uix.checkbox import CheckBox
Enfoque básico a seguir al crear Slider:
1) import kivy
2) import kivy App
3) import gridlayout
4) import Label
5) import Checkbox
6) import Widget
7) set minimum version(optional)
8) Extend the class
9) Add widget in the class
10) Create the App class
11) run the instance of the class
Ahora el programa de Cómo crear Checkbox en Kivy:
Python3
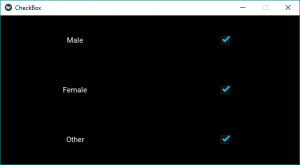
# Program to learn how to make checkbox in kivy

# import kivy module
import kivy

# base Class of your App inherits from the App class.
# app:always refers to the instance of your application
from kivy.app import App

# The :class:`Widget` class is the base class
# required for creating Widgets.
from kivy.uix.widget import Widget

# The Label widget is for rendering text.
from kivy.uix.label import Label

# To use the checkbox must import it from this module
from kivy.uix.checkbox import CheckBox

# The GridLayout arranges children in a matrix.
from kivy.uix.gridlayout import GridLayout


# Container class for the app's widgets
class check_box(GridLayout):

    def __init__(self, **kwargs):
        # super function can be used to gain access
        # to inherited methods from a parent or sibling class
        # that has been overwritten in a class object.
        super(check_box, self).__init__(**kwargs)

        # 2 columns in grid layout
        self.cols = 2

        # Add checkbox, widget and labels
        self.add_widget(Label(text ='Male'))
        self.active = CheckBox(active = True)
        self.add_widget(self.active)

        self.add_widget(Label(text ='Female'))
        self.active = CheckBox(active = True)
        self.add_widget(self.active)

        self.add_widget(Label(text ='Other'))
        self.active = CheckBox(active = True)
        self.add_widget(self.active)


# App derived from App class
class CheckBoxApp(App):
    def build(self):
        return check_box()

# Run the app
if __name__ == '__main__':
    CheckBoxApp().run()
Producción:
Ahora la pregunta es: ¿Cómo podemos vincular o adjuntar una devolución de llamada a Checkbox?
Entonces se da el ejemplo simple que vincula la casilla de verificación con el clic, es decir, cuando se hace clic en ella, se imprime «Casilla de verificación marcada», de lo contrario, se imprimirá «Casilla de verificación sin marcar».
Ahora programe para organizar una devolución de llamada a Checkbox, es decir, si la casilla de verificación está marcada o no.
Python3
# Program to learn how to make checkbox
# and adding callback in kivy
# import kivy module
import kivy
# base Class of your App inherits from the App class.
# app:always refers to the instance of your application
from kivy.app import App
# The :class:`Widget` class is the base class
# required for creating Widgets.
from kivy.uix.widget import Widget
# The Label widget is for rendering text.
from kivy.uix.label import Label
# To use the checkbox must import it from this module
from kivy.uix.checkbox import CheckBox
# The GridLayout arranges children in a matrix.
# imports the GridLayout class for use in the app.
from kivy.uix.gridlayout import GridLayout
# Container class for the app's widgets
class check_box(GridLayout):
def __init__(self, **kwargs):
# super function can be used to gain access
# to inherited methods from a parent or sibling class
# that has been overwritten in a class object.
super(check_box, self).__init__(**kwargs)
# 2 columns in grid layout
self.cols = 2
# Add checkbox, Label and Widget
self.add_widget(Label(text ='Male'))
self.active = CheckBox(active = True)
self.add_widget(self.active)
# Adding label to screen
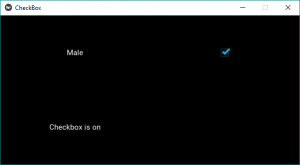
self.lbl_active = Label(text ='Checkbox is on')
self.add_widget(self.lbl_active)
# Attach a callback
self.active.bind(active = self.on_checkbox_Active)
# Callback for the checkbox
def on_checkbox_Active(self, checkboxInstance, isActive):
if isActive:
self.lbl_active.text ="Checkbox is ON"
print("Checkbox Checked")
else:
self.lbl_active.text ="Checkbox is OFF"
print("Checkbox unchecked")
# App derived from App class
class CheckBoxApp(App):
def build(self):
# build is a method of Kivy's App class used
# to place widgets onto the GUI.
return check_box()
# Run the app
if __name__ == '__main__':
CheckBoxApp().run()
Producción:
Salida de vídeo:
Referencia: https://kivy.org/doc/stable/api-kivy.uix.checkbox.html .
Publicación traducida automáticamente
Artículo escrito por YashKhandelwal8 y traducido por Barcelona Geeks. The original can be accessed here. Licence: CCBY-SA